Posts

Showing posts with the label landscape beds

Kentucky Coffee Tree Seedlings - Year 2 - May 2022

Image
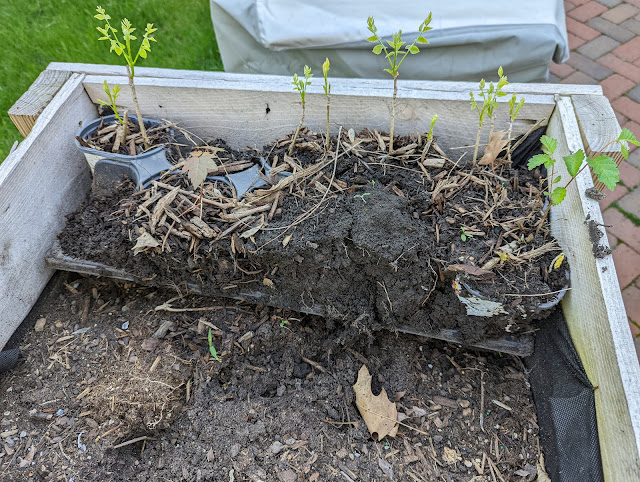
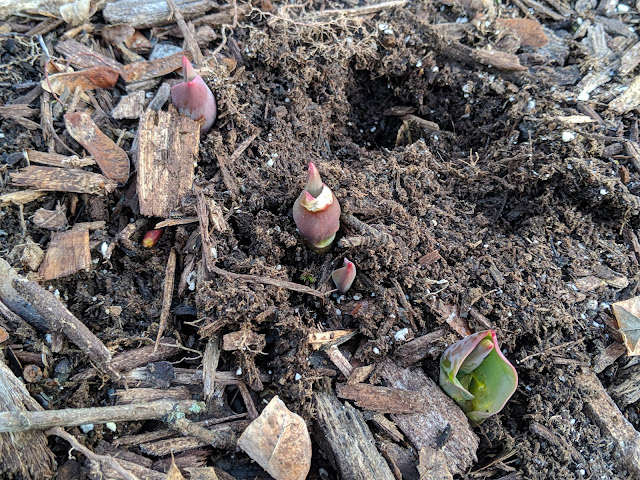
By last September, they were leaf'd out and looking good .  Before the frost arrived, I decided to dig them into the landscape and let them try to overwinter outside .  I covered them with mulch and surrounded them with chicken wire to keep the rabbits out.   Well...much to my surprise, these have come back.  In that September post, I talked about how there were ten Kentucky Coffee tree seedlings and one small Maple tree seedling .  I dug these up and moved them to our raised bed by the patio.  Here, below, is what they look like after a long winter's nap: By my count, there are nine (maybe ten) KCT seedlings and that one Maple that have made it.  Pretty good.   #7 on 2022 to-do list was (in part) to continue to work the seedlings . Next up on my list is to try to germinate these Honey Locust seeds .  

Alice Oakleaf Hydrangeas Blooming - July 2021

Image
Last Summer, I planted a series of seven Alice Oakleaf Hydrangeas .  Two dwarf versions and five normal ones.  These were contemplated as part of our existing landscape plan and I planted them along the fence on the southside in the bed closest to the kitchen nook window.   Alice Oakleaf Hydrangeas are officially named Hydrangea quercifolia 'Alice' (thanks Roy Diblik) is described by NC State Extension office as a shrub that puts on a white flower show that fade to pink.  From their post : Oakleaf Hydrangea 'Alice' is an erect rounded decidous shrub with showy white flowers that appear in early to mid-summer. As the flowers age they fade to pink. This shrub will reach a height of 5 to 8 feet tall and wide at maturity. Plant 'Alice' in the full sun to partial shade in moist well-drained soil. Mulch this plant in the summer to conserve soil moisture.   Like all hydrangeas, it needs to be pruned immediately after flowering as flower buds are produced on sec

15 Lancifolia Hostas Transplanted - South Bed Border - April 2021

Image
Yesterday, I posted a photo showing the new location of the dozen Fanal Astilbes that I transplanted out to the edge of their new bed and commented that that was the FIRST of a few posts showing the transplanting that I have been doing this Spring.   Today, the photo below shows the new location of 15 teardown hostas that I planted on the southside of the yard in the curved border of this new bed.  You can see the first three on the left taking the 'second row' spot and if you look closely, there are two more in the 'second row' under the Oak tree at the top of the photo: Here's an annotated version of that photo showing the 15 hostas: A few important notes: 1. These hostas are (I'm pretty sure) Lanifolia Hostas .  Based on this "What hosta do I have?" page , I found this Lancifolia page in the Hosta Library.  Things check out.  I inherited them when we moved in.  They're plain green with glossy leaves.  2.  They get to a nice size - if left alone

Backyard Curvilinear Landscape Beds - Cut into Final Form - April 2021

Image
Here I was...thinking I'm writing a post that is going to knock a HUGE item off my 2021 to-do list in the yard.  But, when I went to go look up what number "cutting new, larger curvilinear beds" was on the list...imagine my disappointment that it isn't one of the 25 things.  Womp, womp.   But, it is still a big deal for me and a big milestone for the yard.   First, a review of a few things:  Starting with curvilinear bed design .  I covered where I wanted to go with our bed layout and how we had a bunch of "little" curves/bumps in our current beds - while the ideal state is very few, larger, swooping edges.  As Sue from Not Another Gardening Blog pointed out, these big, swooping curves are hard to pull off . I went through three colors of spray paint trying to get the curves right.  And, I think I got them like 90% there - with just a little bit of cleanup having to come in the next few seasons.   Second:  a note about the "order of operations" I

New Backyard Beds Step 1: Automower Wire Removed

Image
Back in March, I decided that one of the projects that we wanted to take on this season was the creation of clean, new, swooping bed edges in our backyard.  And, in order to figure out what I needed to do - and by who - I created a simple order of operations list of the steps as I see them . Step one:  pick up the Automower boundary and guide wire that rings the perimeter of our backyard.  I started on that project recently and have made some progress.  Here, below, is about 40% of the backyard boundary wire that I've pulled up out of the grass and collected the spikes that hold it in place. This set of wire is littered with those little pigtail plugs that connect the wire in various places that it has severed over the years.  This section of the wire has been picked up and reset various times over the years, so it wasn't that hard to pull up.  There are other parts (the remaining 60%) that hasn't moved since I put it in initially back in 2017, so it is buried in the thatch

Learning The Ways of Curvilinear Bed Design - March 2021

Image
I've talked and talked and talked about our backyard landscape plan on the blog over the years and I've made a lot of progress towards realizing the vision laid out there.  But, because I'm doing things myself, my best laid plans don't always work out.  And, one of the ways where I've been having trouble is in laying out the beds in the back.  You look at these ideal woodland gardens and any backyard garden of note, one of the things that you often see are beautiful, graceful, swooping curves that mark the edges of the beds .   In poking around the Web, I found this post from Sue at Not Another Gardening Blog that was part of her " Good Lines Mean Good Designs " series titled: Curves Wonderful Curves .  Those posts are almost ten years old, but they're just as valid as today.  And, for a beginner gardener like me?  They are *just* what I needed for where I am on my gardening journey right NOW. In the  post , Sue introduces (to me) Curviliear Form for

Mini Variegated Hosta - Summer 2020

Image
Last year, I posted a photo of this transplanted miniature hosta that currently resides underneath the large Oak tree that hosts our tree swing and remarked that it had come back and wasn't getting trampled by the kids like it was when I had it planted in the far back. The hosta is quite a bit larger than last year as it seems to have had enough time to establish itself and now is spreading a little bit.  Once it gets large enough, this one deserves to be split up and spread around with a series of clumps living here. The photo above shows a couple of other things for context - the trunk of the Oak tree behind the hosta, the larger hosta in the top right showing the edge of the bed.  And what appears to be a tiny, (and new??) hosta leaf emerging on the far left.

Rear Foundation Boxwoods - Fall 2019 Update

Image
Above is a look at the four boxwoods that are planted right outside of our Kitchen windows next to the foundation.  I last posted a photo of these four shrubs back in April of this year when I was taking off the Winter Burn from them and shaping them a little bit.   They've really grown quite a bit and green'd up on their tips in a nice way. A lot of boxwoods in our neighborhood took hard hits from Winter Burn this past Winter - including a few of ours in front - but these seem to have totally recovered nicely.  The two in front are now larger than the two in back.  I was initially thinking of clipping these into nicely shaped orbs, but now that I've seen the Jacques Wirtz-inspired hedge of boxwoods outside of the Fedex World Headquarters , I'm thinking I can grow these together and make a more cloud-like shape out of all four of them.  The other thing to note in this [ Garden Diary ] post is the other plant in the photo.  No...it isn't a weed.  Well, not a

Fall Look: Disneyland Roses On Northside - September 2019

Image
The last time I posted photos of the pair of Disneyland Roses on the side of our house was right in the middle of the hot Summer in early July of this year .  At that time, I remarked at the time that one of them was much larger than the other - with the one being planted towards the front of the house/porch being smaller and without blooms .   Today, you can see a photo collage at the top of the post showing what these things look like come late September.  I've posted the individual photos below as a way to look back at them in larger format.   Planted in October of 2018 , these are growing at two very different speeds/pace. The first Disneyland Rose is the larger one - and it was larger in July, too.  When I planted it, this one had a small bloom on it .  Today, it is multi-stemmed and gaining some height and spread.  The blooms are big and bright.  The other one is smaller.  Just like it was at planting AND in July .  But it, too, is blooming.  So, tha

The Other Two Disneyland Roses (July 2019)

Image
Last week, I posted a photo about our first Disneyland Rose and mentioned how I would get around to posting photos of the other two.  Welp, here's the post showing off the other two.  These were 10th Anniversary gifts from Nat's Mom and I planted them in October of last year .  October!  It was late, but that's when they were shipped to us.  I put them on the southside of our house , in the kind of narrow space between our house and our neighbor to the south.  The top photo shows the Disneyland Rose that I put in a little bit more oriented towards the back of our house.  It has blooms!  The photo below shows the other rose bush that I planted closer to the front of the house.  It does NOT have any blooms.  And in fact, it seems like half of the bush has perished (the back half), but the front half is full of green growth.  If go back and look at the original plants, you'll note that the one that is doing better *this year* was also doing better when I put it

Disneyland Rose In Bloom - June 2019

Image
Our first Disneyland Rose bush is in bloom.  And it is a stunner.  We received it as an anniversary gift in September of 2017 and I planted it that Fall .  Wasn't totally sure it was going to make it.  But, survive it did.  And now the area where I planted it is a lush garden of green.  You can kind of tell from the photo above that it is surrounded with hostas and ferns.  But, compare this June 2019 blooming photo with the same Disneyland Rose plant one year ago .  Quite a different view. Not just because of the filling-in of the rest of the bed, but also the height and bloom numbers of this particular plant.  It is doing really well and provides a great pop of orange and pink in the sea of green.  Love it.   Last Fall, Nat's Mom gave us two more and I planted them on the side of the house .  They're, umm, not doing as well as this one.  But they are one year younger.    I'll snap a couple of photos of those as I get around the yard in the coming days. 

Transplanted Miniature Variegated Hosta - June 2019

Image
All the way in the back of our lot is a tree that the kids climb from time-to-time.  Back there, underneath that tree was the sweetest little variegated hosta plant that I just noticed late last Summer.  By then, it had been trampled by little kid feet.   This Spring, I decided to be proactive and get it out of the spot where it was going to be stomped on and move it.    Last May, I picked up two different hosta varieties (Christmas Tree and Fantabulous) and planted them around the large Oak Tree that we have a rope swing hanging from in the yard.  If you go check out that post, you'll see that the landscape plan calls for hostas around the tree .   So, I figured, I'd take this little hosta and move it to right around that tree.  This photo doesn't really give you a sense for the scale of the leaves, but they're small.  And the color of this is quite nice - the variegated edge is yellow, not white.    This is one to watch this Summer.  If I can get it establishe

Done: Backyard Tulip Bulbs Relocated

Image
Number one on my 2019 Gardening To-Do Addendum List was to relocate some of my Fall bulbs.  It didn't make my main To-do list for the year, but the two kind of go together.  Why's that?  Because #8 on the main To-Do list is to add some conifers to the backyard.    My thinking was that if I move these tulips from back against the fenceline, I can replace them with the Weeping White Spruce that I bought and move these closer to the front of the bed.    Here's what these same tulips looked like earlier this Spring .  I started to dig them and realized that moving blooming tulips is not for the faint of heart.  I dug deep and tried to pull out the bulbs and the ground with them.  Then, I poked around and tried to remove whatever weeds that had glom'd on to the bulbs and stuck them back in the ground.  Everything I've read about Tulips suggests that people often cut off the tulip leaves far too early because once the flower blooms, they figure that they should

Front Yard Tulips Blooming - 2019 (90% Flower Rate)

Image
Last fall, I planted 50 tulip bulbs in the bed out front of our porch in the front yard at the base of a large Norway Maple tree.  They were a blend of 25  Orange Double Late Princess Tulips and 25  Crystal Beauty Fringed Pink Tulips .  And I followed up with some photos of these tulip bulbs emerging from their long Winter's nap under the bed of mulch in a post in late March of this Spring .   At that time, I wasn't sure how many of the 50 bulbs were going to flower and after seeing some marks of critters pulling up the bulbs in the Winter, I was hoping for the best. But now the flowers are fully bloomed and you can see the blend of tulips in the photo at the top of this post.  I counted 45 of the 50 bulbs had bloomed - 90% - which I'm pretty satisfied with in this mass planting.  I love the way these look and from the street, they give off a really wonderful shot of color.  And...I'm already thinking of adding EVEN MORE tulip bulbs in orange and red this Fall. 

Purple Sensation Allium Emerge For Their First Season - 2019

Image
Last October, at the time I planted 50 Tulip bulbs in our front yard, I also planted five Allium bulbs in the same bed.  Here's the post showing those bulbs going in .  I planted these Purple Sensation Allium bulbs behind the boxwood hedge but in front of the hydrangeas that are right in front of our porch.  This is the second set of Allium bulbs that we've tucked into our yard with the first ones going in the Fall of 2017 in our backyard .  Those made quick work of themselves and emerged and flowered in their first season.  Just like the front yard tulips that popped up this Spring , these Allium bulbs have sprouted, too.  If you look at the photo at the top of this post, you'll see all five of them have arrived, but the first two on the left seem the strongest and the middle one is a little behind and has just emerged and is still yellow.  I've always liked Allium bulbs, but they're Nat's favorite bulb.  She seems to be drawn to them more than tulips o

Teardown Peony Emerging - 2019

Image
Yesterday, I posted a hopeful photo of the first peony that I planted in the backyard that has come back for the second season.  Today, you're seeing another peony - one that we planted from my Sister-in-Law's yard before they built their new house.  Here's the post showing the harvest I pulled out of her yard that included irises, a grass or two, some hostas and what at the time I was pretty sure was a peony plant.  If you look at the date on that post, you'll notice that it is right in the middle of the Summer.  Not an ideal time to transplant anything.  But, we didn't have a choice, so late June transplanting was what we were dealing with in this situation.  Most of the plants didn't show much life.  They didn't show total death for the most part, but I wasn't that hopeful that much of anything was going to come back.  The only plant that seemed to flourish and grow post transplanting from her yard was this happy fern that I put in the

Sarah Bernhardt Peony Emerging - 2019

Image
Last May, I planted the first peony tuber in our backyard after having quite a few varieties in our old backyard in Elmhurst.  This first plant was a Sarah Bernhardt variety and is supposed to have big, beautiful pink blooms.  Here's the post showing how I planted it in May of 2018 .   It seemed to establish itself in the Spring because in June of last Summer it showed some signs of life with little purple shoots coming up for the first time .   But, that's about all the 'action' we saw out of this plant during the Summer.  But, I'm thinking that it was busy establishing itself under the mulch because if you peek at the photo at the top of this post, you'll see that we now have a strong leader popping up this Spring.   This is still an immature peony and I'm hoping that we get one flower out of it this year, but we might not get any.  If you want to see what a very mature (7 year established) peony plant looks like at this time of year, have a lo

Spring Rhododendron Update (Post Winter Wilt-Pruf Application)

Image
Back in December, I posted about an experiment that I was conducting with the application of Wilt-Pruf to one of our Rhododendrons that are located on either side of our back stoop.  Wilt-Pruf is an anti-transpirant that I bought to use on our fresh-cut Christmas Trees, but I also learned can be applied to any evergreen in an attempt to help it get through difficult Winters.  Wilt-Pruf is a natural product made of pine oil and creates a clear, almost flexible coating on the leaves and needles.   I sprayed it on just one of the Rhododendrons and figured it would be useful to compare the results.   The photo you see at the top is shows both of them on top/bottom.  The plant on the top is the one that had Wilt-Pruf applied.  The plant on the bottom was left bare.   The results?  Hard for me to say if it did anything, frankly.  I think the one that was treated has less spotting on the leaves, but maybe that's just random?   Thus, I'd say the experiment is incon

Front Yard Tulips Emerge For First Spring - 2019

Image
Seems like this is the week for (finally) some action in our garden/yard that indicates Spring is actually arriving.  Yesterday, I posted a photo of what I think is a 'clump' 1 of Ostrich Ferns.  Today, let's talk about bulbs.   Last October, I planted 50 Tulip bulbs in one of our beds out in front of the porch, just underneath a giant Norway Maple .  At the time, I did my best to protect them from various critters, but as time went on, I noticed some digging in the area.  Between the skunks looking for grubs and perhaps squirrels with their eyes on the actual bulbs, somebody was pretty active shortly after I planted these bulbs.   And the soil?  I've talked about the soil we have close to our foundation.  It is terrible right now.  All clay.  If you read my Top 10 2019 Spring/Summer Gardening To-Do List , you'll remember that #1 on my list was to continue to improve the soil .  But, I've only have had one full garden season to work the soil and the

Fall Bulb Planting - Front Yard Tulips and Allium 2018

Image
About ten days ago, I shared a photo of a set of fringed tulip bulbs that I expected to get in the ground.  You can see that post here .    They're called Crystal Beauty and are a reddish-pink in color.  I ended up buying two packages of them and put them in the spot you see above.  Along with these other "double late" Orange Princess Tulip bulbs.  All-in, there are now 50 little bulbs in the ground in our front beds in between the large Maple tree and our hostas and from the sign post you see in the photo above and the edge of the bed. Here's the packaging of the Orange Princess bulbs, but note they're called "Double Late". What's that mean? From Gardenia.net : Award-winning Tulip 'Orange Princess' is a lovely peony-flowered tulip featuring light nasturtium-orange petals, flushed with reddish-purple and glazed lightly in warm pink. Its chubby bowl-shaped flowers are also tipped with green on the outer petals.  ...Because of th