Posts

Showing posts with the label woodworking

Walnut Wood Rounds - Firewood and Woodworking Projects - Storage and Preservation - November 2023

Image
Our neighbors to the West were having a Walnut tree limb taken down recently and the tree guy who was doing the work was the same one that gave me a bunch of Ash firewood almost three years ago to the day.  At that time - and in this post - I called it all Ash.  But, now that I look back, it is clear that they included some Walnut in the mix, too.   They tossed (just like last time) a number of rounds of wood over the fence and I stacked them up in a spot to figure out what to do with them.  You can see that pile above - and you can also see that some of the pieces required a little bit more cutting with my chainsaw.   Now...knowing that this is Walnut gave me pause.  Sure...I could store it, process it, split it and burn it.  But, it also has woodworking value as Walnut.  So, I decided to select a few pieces to pull out and store separately.  I texted with my brother-in-law (a woodworker and carver) about if he'd want some of the Walnut and he said he would.  I grabbed about a d

Black Walnut Stain DIY Finishing Process - January 2022

Image
Back in November, I posted a couple of photos and talked about the process of turning a collection of Black Walnuts into a homemade 1 scratchmade wood stain.  In that post , I laid out the steps from collecting the walnuts to bottling the stain - and about midway is where we pick things up in this post.  Six weeks of macerating in the five gallon bucket with a little bit of evaporation ended up yielding about 3 gallons or so of material.  A quick stir with a stick every once in a while and I had a thick, black syrup.  Along with a mass of walnut hulls and bits. I grabbed a piece of cheesecloth that Nat had on hand and a couple of rubber bands and donned a set of disposable gloves.  Knowing this is, indeed, stain, I opted to deal with the process out in the yard.  You can see the setup below.  The five-gallon bucket on the right, topped with cheesecloth strainer.  A smaller, one gallon finish bucket in the middle and a couple of pints of rubbing alcohol (91%) to thin the syrup out.  I

Outdoor Bonsai Table (DIY Idea)

Image
Back in February, when I was at the end of the line in terms of wanting to deal with snow, I posted something that amounted to a bonsai wish list (or to-do list) for the season.  It was a way to get my brain thinking about what the Spring and Summer will look like and a coping mechanism after all the snow.  (Listen...I'm not normally someone who hates Winter.  But, February...and ALL.THE.SNOW was, umm, a bit much.) So, out of that post , I mentioned that I wanted to do a few things including utilizing the existing nursery stock that I have on hand, acquire more for future use, dig up a 'found' bonsai (American Elm), take a bonsai class and...create a bench or table for the trees.   I've looked around (briefly) on the Web to figure out the right way to display bonsai and it seems like if you are interested in learning more about the topic, stop number one on your journey should be this Bonsai Empire post that talks how to display trees and gives some tips.  They also sh

Garden Obelisk - Lumber Order - Spring 2020 Projects

Image
Yesterday, I posted (for my own thinking) a lumber order for the building of a Versailles Orangerie Planter box and mentioned that it was one of a couple of projects I'm thinking about as part of our social distancing program.  I recently received the catalog from Gardeners Supply Company - which is a joy to read right now - and saw this large cedar obelisk.  They're asking $199.00 for what seems to be a pretty " good quality item ".  But, I know that I can beat that price if I built them myself. Here's the Gardener's Supply Company Obelisk.  This is NOT my photo - it is via their catalog here: Source via Gardener's Supply . As for the 'why' add an obelisk, well...I'm not totally sure just now, but thinking about growing something like hops.  We had Golden Hops planted in our yard back in Elmhurst and I liked having them grow up a trellis.  It took a couple of seasons to get them to grow vertically, but by the time we moved, they

Social Distancing Project: Versailles Orangerie Boxes - Lumber Spec'd

All this social distancing and being on quarantine has me putting together a lumber delivery from the fine folks at Menards.  Or...at least assuming that *if* I put a lumber order in that they will deliver it.  The list of 'essential' jobs and stores includes hardware stores, so I'm thinking that they're open? There are a few projects that I included in my 2020 to-do list including a raised planter or a Versailles box.   With all the time spent at home, I've also added another project or two to my list:  a garden obelisk and a boardwalk.  More on both of those at some point. Today, I'm thinking - once again - about the Versailles planter box that we first saw at Luxembourg Gardens in Paris .   Why?  Because I recently came across this photo on Instagram that features a couple of the Orangerie boxes: View this post on Instagram Love this pair of Versailles boxes, with their wonderful metal topia

Summer Project: Outdoor Chair "Desk" Build

Image
Right at the end of last year, I posted a photo of a Wave Hill Garden chair and talked about how I was struck by the design of the chair - and the fact that it wasn't a traditional adirondack chair that you see everywhere.  We had spent some time in Luxembourg Gardens in Paris last year and fell in love with lots of things - including their chairs - and have been thinking about how I bring a chair or two to our backyard and garden.  The Wave Hill chair seemed to scratch me right where I itch. A gardener named Dan Benarcik has developed plans for the chair and is selling them for $35 (the updated plan version) on his site . I put the idea of creating a chair like this on my 2020 Gardening To-Do List .  #11 on the list is to 'build something' like these chairs (or a raised bed).  I haven't sprung for the plans (yet), but I've been nosing around the Web for some additional inspiration.  I came across this post on Reddit that featured a photo of a modified Wave

Robin's Nesting Shelf - With Nest

Image
I posted back in August how a bird's nest had fallen from one of our big Oak trees down to the yard and how the kids were fascinated by it.  I read up a bit and figured out that we could build a nesting platform for both the replacing of *this* nest and hopefully the usage of other birds (Robins?) next season.  I found these easy plans for a nesting platform/shelf here .    I had 1/2" plywood on hand, so I decided to use that.  I know that Cedar would be better, but I had the plywood on hand.  I made the cuts, assembled the thing and even tweaked it a bit.  I added a series of drainage holes to the bottom of the platform and to the bottom/sides of the walls.  Figured for both drainage and airflow.  After I built it, I had the Bird paint it.  You can kind of see that she used some metallic paints on the back/sides of it.  After I asked her if she wanted to finish it, she insisted that it was done.   So, I put down a few coats of spray-on clear coat to both protect her p

Work-in-Progress DIY Firewood Rack

Image
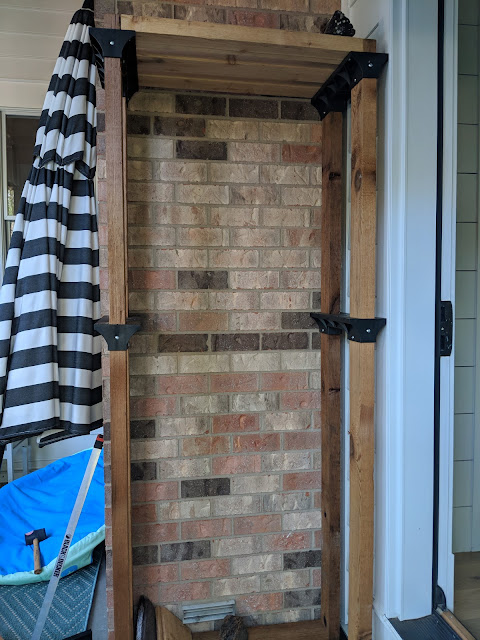
Just a few days back, I posted a link to these DIY firewood rack brackets that Menards was carrying on their site .  I ordered five sets and got busy working with three of them.  Here, above, is a work-in-progress show that shows the position of one of the racks that I'm building.  This one is the one right outside of the family room door and I've built the rack in a vertical orientation.  I ended up using some rough sawn cedar that was left over from my fence installation, but that move caused some issues.  Turns out, rough sawn cedar 2x4's aren't the same size as normal, dimensional construction lumber.  They're a bit bigger.  Not true two inches by four inches, but bigger by just a hair.  Here's the height difference.  On the left is a traditional, Home Depot bought 2x4.  On the right is a rough sawn Cedar 2x4.  And the thickness difference. I first went to Home Depot and the one by us has just an indoor lumber yard, so they have limited su

Hang Up on the Wall-Hung Workbench - Notched Cuts Template

Image
Back at the end of July, I posted a photo of the wall-hung workbench that I had selected to build first in the garage (garden bench) and then down in my shop (once I got the hang of it!).  I pulled down some plans from WoodSmith Plans and got started ripping down the lumber to make all the pieces.  But there was a part that I got hung up on - these angled brackets with notched cuts at the bottom that I've circled above.  The plan calls for these supports to be notched and attached to a ledger board (that gets attached to the wall).  But, my little, amateur woodworking brain couldn't quite figure out how to make those cuts.  I took a sacrificial board and drew all over it to get the angles right.  I even took it over to Nat's Dad's house and had him mark it up so I could figure out the best way to make the cuts.  He showed me how to use my table saw to get most of the wood out, then a saber saw to make the final cuts.  But then I got home and had to actually do it

New Shop Tool: The Grr-Ripper from Microjig

Image
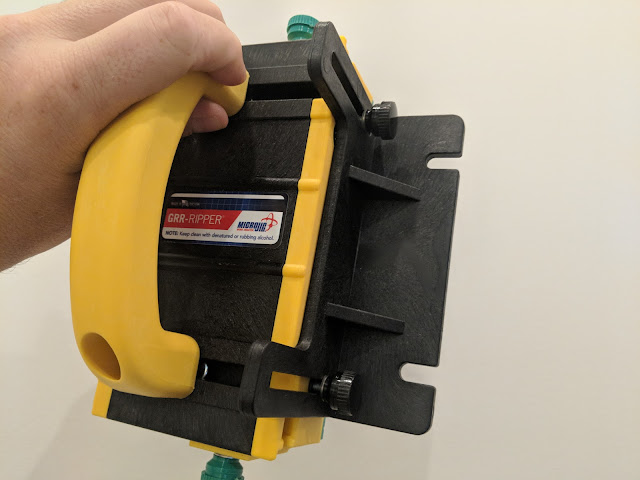
I'm always very hesitant to use my table saw in my shop.  If there's another tool that will get the job done, I usually chose it.  But, there are plenty of instances that call for a table saw.  To stack the odds in my favor, I usually am very deliberate with the saw and use a push stick and keep my hands away from anything moving during the cut and way long after the blade stops. But, I've started to use this thing:  The Grr-Ripper to 'bulletproof' my hands.  You use this thing to guide the piece through the cutting zone.  See below for the channel that the blade runs through. I won't use the saw without this thing now.  I'm not even doing it justice, so if you have interest, check out this video below that explains everything about it as they call it a "must-have for any table saw."

Decision Time: Final Wall-Hung Work Bench Design

Image
Bench via WoodsmithPlans.com In March of this year, I posted a photo of a wall-hung workbench that I came across on Instagram .  The photo above is of that same bench, but comes from the source of the plans:  Woodsmith Plans .  They're offering a plan for sale for the bench plus the tool holder above and the little shelf for hand tools on the very top for $10 .  I think I've settled on going with this direction for both a bench in my shop in the basement, but also for a garden bench that I'm now planning in the garage. This whole thing started with this initial wall-hung workbench with curves that I found online at the WoodArchivis t.  But, in looking at the space constraints that I have in my shop, coupled with some concerns about the rigidity of the curved superstructure, I've kind of drifted away from my initial plan.  In the shop, my plan calls for hanging the bench on concrete walls, which requires cleats or ledgers (as in this design above).  For the othe

Getting Smart About Plywood

Image
With my shop floor done, my attention is now turning to some shop fixtures. And that has lead me down a path of learning all about plywood.  Veneers, cores, grades, types.  All of it.  It is a surprisingly deep rabbit hole to go down . 

Revisiting The New, Ideal Raised Bed Design

Image
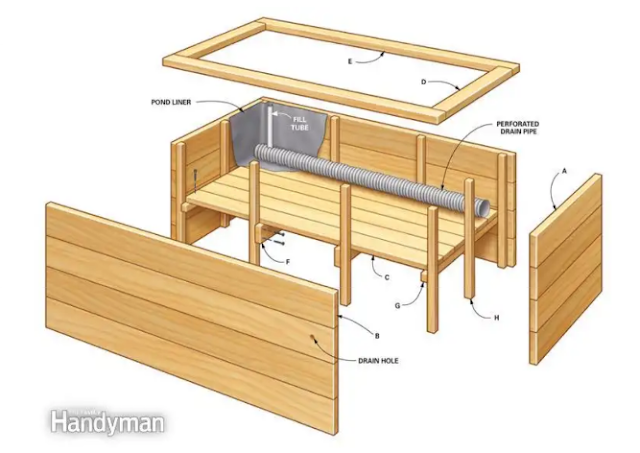
Back last summer, I posted this photo of a set of raised beds that I thought were particularly well designed .  Since then, I've been thinking about what it would take to pull them off and I recently came across this image - which based on the watermark is from the Family Handyman , but I found on some weird, scraped site.  I went and found the original article - which you can read here .  There's a self-watering component at play here that utilizes a perforated drain pipe and a pond liner that I'm not sure is something that I want to get into/deal with.  But, rest of the design seems to indicate the direction that the construction can take.  There are a few changes that I'm going to make - starting with using 2x4's for the 'legs' as well as the cross members.  Right now, I'm thinking that notching the legs to accept the cross member is the right approach.  I also want to make these much taller than they're showing, but with a similar 'fal

Another Wall-Hung Workbench?

Image
Back at the end of January, I posted about this wall-hung workbench and - at the time - commented about how it was quite a 'looker'.  I still like it.  But, somehow, I came across this Instagram post from woodworking_lovers - which I think is a spammy account - that features a twist on the wall-hung workbench.  Spammy post (about starting a business) aside, the bracing that this bench shows off is interesting to me - and maybe just seems a bit stronger/easier to understand how it would work.  The 2x6's that are angled from the top to the wall are notched to rest on the wall cleat.  Visually, it makes sense to me why it would support the weight.  Maybe there's a way to marry the two ideas?  This one for the super-structure.  Then wrapped in the curves from the original to cover up the structure? 

Jelly Belly Warehouse - Tour and President Reagan Stuff

Image
We found ourselves near the Jelly Belly Warehouse up in Pleasant Prairie Wisconsin recently and decided to take the two youngest kids on a tour and stop at the factory store.  The tour is free and is a nice way to spend an hour.   They put you on a little tram ride that takes you around the facility and shows you how they make the beans.  But...this isn't a factory.  It is a warehouse.  And we went on a Sunday when the place was shut down.  Still was fun, though.  They also have an in-house bean artist that does displays like the one you see above with Mickey and Minnie Mouse made entirely out of Jelly Belly jelly beans.  Here's the non-operational warehouse: One aspect of the tour is the wait for the tram to arrive.  There's only one tram and if it is out on a tour, you have to wait for it to come back into the station for the next tour.  They have you wait - not in the warehouse - but in a separate spot.  The waiting room is actually upstairs where they have a

Wall-Hung Workbench - Quite a Looker!

Image
I came across this wall-hung workbench on the Wood Archivist and it stopped me in my tracks. I posted last week on my link blog the minute I saw it .  I was/am smitten.  I didn't want to lose the link.  Just look at it - she's a beaut, right?  Those curves. The built in lighting.  The fact that it doesn't hog floorspace?  The built-in dust collection system? All of it.  Awesome.  The full plans (or call it an article showing some of the steps and the cutlist) are here .  My shop right now is just a 'space', but that is ending soon.  Have plans to add a wall and a door to define the space.  Then, the first step is to finish my miter saw table.  After that, I'm going to turn my attention to a few benches. I currently have a bench that is satisfactory, but needs an upgrade.    I posted about the first (and existing) bench here on the blog back in 2010 .  Still looks the same.  Functional, but kinda basic.   I also need a secondary table for some other bench

Ready to Cut With The Rockwell Sonicrafter 4.2 Amp F80

Image
I've had one of these Rockwell Sonicrafters for a number of years and I've found it pretty useful from time-to-time.  It isn't something that I pull out every time I tackle a project, but have been a specific set of applications that required *just* this tool.  This year at Christmas, I was upgraded to the new version of the F80 that has 4.2 Amps and comes with this nifty hard-sided case.  My original one came in a cloth carrying bag and I pushed it to it's max, so this upgraded version is a welcome addition to my shop lineup. You might be wondering...what do you do with an oscillating tool?  Welp, the fine folks at Rockwell have created this handy list of 10 things you can do with a Sonicrafter . The F80 comes with a nice light to shine on your project and has two 'degrees' - meaning one setting is a narrow oscillation and the other is a wider oscillation.  Also, note... this is a corded tool.  But, it is a 10 foot cord, so you get some pretty good rea