Posts

Showing posts with the label landscape

Frans Fontaine Hornbeam Trees - Summer Screen in Landscape - July 2022

Image
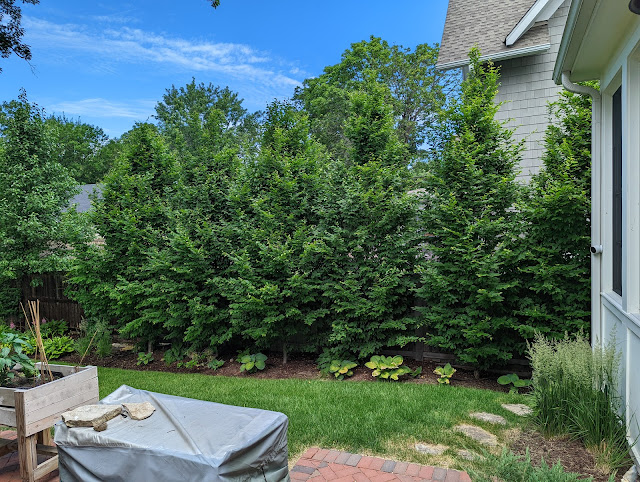
At the top of this post is a look at the row of Frans Fontaine Fastigiate Hornbeam trees that we planted back in 2018 along the northern border of our property.  These trees were planted as a screen between our backyard, our screened porch and our neighbor's house.  When we put them in, our neighbors to the norther were in a small ranch that was set pretty far back from the property line.  A few years back, a new house was built and the screening was needed more than ever.   [NOTE:  If you are here reading about the really amazing Frans Fontaine Columnar Hornbeam Trees and want to know the full history we've had with planting a row of eight of them, you can head to this post from August of 2021 that includes links to their full history dating back to being planted in 2018.  Alternatively, you can poke around at this [ Frans Fontaine ] post tag.  Or start here with my post showing them being planted as 2" caliper trees in 2018.] The last time that I documented these Frans

We Found Some Fossils In Our Northern Illinois Backyard - November 2021

Image
I was out in the backyard doing what I spend most of my free time doing these days:  dealing with the leaves.  We have a mix of native trees (Kentucky Coffee Trees, Hackberry) and a couple of large Oak trees.  The Oak leaves come down differently than the the rest of the trees.  Rather than dropping them mostly at once, our Oaks drop leaves a little bit at a time.  And the Oaks are HUGE, so there are TONS of leaves. That means, Oak leaf cleanup lasts for weeks.   How I start my cleanup is by blowing the leaves into the lawn where I collect them in big piles then I begin to mulch them in and bag some of them up.  As part of that blowing with the leaf blower (don't worry...I use an electric one from eGo and it isn't loud), I was cleaning up our firepit area.  And, for *some* reason, I looked closely at the stepping stones that take you from our lawn to the gravel bed.  One one of them - clear as day - was what sure looked like a fossil to my naked eye.  I got down on my knees and

Fanal Astilbes - June 2021 Update

Image
A year ago, I planted twelve Fanal Astilbes in the backyard - in the south bed - according to the placement spec'd by our landscape plan.  They suffered some transplant shock and had a tough go of it for the first month or so.   I baby'd them for the rest of the Summer in hopes that they'd come back this Spring.  By April of 2021, I was starting to see them come back and emerge from their dormancy .  I knew that I planted these in the wrong spot, so when I expanded the new backyard beds, all twelve of these needed to be transplanted out closer to the border in May of this year .  I've been watering this area in pretty good this Summer because there are a series of things that have been transplanted (these + the Oakleaf Hydrangeas) and some new items ( Butterscotch Amsonia that I planted in May, too ). And, all that watering has paid off with these Fanal Astilbes as many of them have come up big and bold with red flowers and quite a bit of foliage.  See the photos below

Backyard Curvilinear Landscape Beds - Cut into Final Form - April 2021

Image
Here I was...thinking I'm writing a post that is going to knock a HUGE item off my 2021 to-do list in the yard.  But, when I went to go look up what number "cutting new, larger curvilinear beds" was on the list...imagine my disappointment that it isn't one of the 25 things.  Womp, womp.   But, it is still a big deal for me and a big milestone for the yard.   First, a review of a few things:  Starting with curvilinear bed design .  I covered where I wanted to go with our bed layout and how we had a bunch of "little" curves/bumps in our current beds - while the ideal state is very few, larger, swooping edges.  As Sue from Not Another Gardening Blog pointed out, these big, swooping curves are hard to pull off . I went through three colors of spray paint trying to get the curves right.  And, I think I got them like 90% there - with just a little bit of cleanup having to come in the next few seasons.   Second:  a note about the "order of operations" I

Learning The Ways of Curvilinear Bed Design - March 2021

Image
I've talked and talked and talked about our backyard landscape plan on the blog over the years and I've made a lot of progress towards realizing the vision laid out there.  But, because I'm doing things myself, my best laid plans don't always work out.  And, one of the ways where I've been having trouble is in laying out the beds in the back.  You look at these ideal woodland gardens and any backyard garden of note, one of the things that you often see are beautiful, graceful, swooping curves that mark the edges of the beds .   In poking around the Web, I found this post from Sue at Not Another Gardening Blog that was part of her " Good Lines Mean Good Designs " series titled: Curves Wonderful Curves .  Those posts are almost ten years old, but they're just as valid as today.  And, for a beginner gardener like me?  They are *just* what I needed for where I am on my gardening journey right NOW. In the  post , Sue introduces (to me) Curviliear Form for

2021 Priority Area #2 - Woodland Understory on Northside

Image
Yesterday, I published the first of my 2021 garden/yard priority areas .  Today, is my second one - with the hope that this exercise helps me contain my enthusiasm and force me to focus on adding things that matter.  Like a lot of you, I find myself in a daze when Spring comes and I add things to my cart that I don't really need just because they're, well, there.   Priority Area #1 for 2021 calls for 15 plants (8 Allium, 7 ferns), so that part ALONE is a substantial investment.  Priority Area #2 calls for even more.  41 plants.  Yeah...41.  This one might take two years to swing in terms of getting the plantings right.  But, lets start by looking at the area in question.  This is in between Priority Area #2 from last year AND the trio (at the time) of tiny Canadian Hemlock trees I planted along the north side of the fence line.  Here, below, is a look at this area: You can see that this area calls for: 10 Lenten Rose 9 Guacamole Hosta 7 Bottle Rocket Spiked Ligularia 8 Hadspe

Floating Mulch Solution: Installing A Small Retaining Ledge

Image
Our front yard is pitched from the house down to the street.  There's a significant grade difference between where our house sits and the curb such that our yard is on a slope and parts of our parkway are on a pretty severe slope.  But, so, too, are the beds in front and on side of our front porch.  You can kind of see/appreciate the grade difference in the photo above in this post. This is a profile view of the area that you can see in the photo on this tulip post from last year .  In that photo/post, you can see how the grade from about halfway back on the house all the way to the front of this bed is downhill.  But, it also slopes away from the foundation, too. This area is where I get the most erosion in any of the beds around our property.  We get rainwater erosion and plenty of floating mulch.  A couple of times a year, I break out the rake and pull the mulch back into the bed. Here's a post showing all the mulch in place .  If you look at the white boards on the

Backyard Priority Project #2: Hornbeam/Oak Gap Filling

Image
A couple of days ago, I discussed that I'm very susceptible to 'plant lust' and 'tree lust' once the Winter thaw breaks and Home Depot and Menards start to put out their nursery stock.  The traps there are well-established.  First, buying stuff and then trying to 'figure out where to put it' is not a good approach.  Not to mention that the Big Box stores tend to feature A LOT of Spring/early Summer flowering items (so we are naturally drawn to them!) and if you plant what they have in stock and on sale, you often-times end up with a NON-four-season garden.  You get a lot of show in say...Spring.  But, you have a boring Summer and Fall (and even Winter) garden.  Because we had a professional do our plan, I just need to stick to it.  And not stray too far. Unlike years past, I'm going into this season of plant buying with a FIRM plan.  That means focusing on three areas - maybe two and a half areas - for enhancing the view from our patio.  The fir

Fall Look: Disneyland Roses On Northside - September 2019

Image
The last time I posted photos of the pair of Disneyland Roses on the side of our house was right in the middle of the hot Summer in early July of this year .  At that time, I remarked at the time that one of them was much larger than the other - with the one being planted towards the front of the house/porch being smaller and without blooms .   Today, you can see a photo collage at the top of the post showing what these things look like come late September.  I've posted the individual photos below as a way to look back at them in larger format.   Planted in October of 2018 , these are growing at two very different speeds/pace. The first Disneyland Rose is the larger one - and it was larger in July, too.  When I planted it, this one had a small bloom on it .  Today, it is multi-stemmed and gaining some height and spread.  The blooms are big and bright.  The other one is smaller.  Just like it was at planting AND in July .  But it, too, is blooming.  So, tha

Gold Cone Juniper September 2019 Check-in - Signs Of Stress

Image
At the beginning of the season this year, I planted three small Gold Cone Juniper shrubs .  And they took off with the wet Spring and put on a great show .  After reading all about these particular juniper shrubs, I decided to 'wire them up' to ensure that they don't suffer from splaying based on snow fall in the Winter.  By June, I had wired them up and they looked great .  Then, we hit the hot part of Summer with July and August.  And the shrubs are showing signs of stress.  I'm posting this photo in the [ garden diary ] here on the blog to show the emerging brown spots on some of the shrub.  It is on the 'backside' mostly, so I'm wondering if it is both water/drought-related, but perhaps also sun-related?  The backside gets less sun than the front.  I also wonder if the 'wiring up' caused some of the stress?    I've done this dance before in the Fall - are the trees/shrubs that are showing signs of stress going to make it through the Wi

Trained Vines Between Trees In Luxembourg Gardens

Image
I could post for 100 days straight and I don't think I would run out of things to say and share about Luxembourg Gardens in Paris.  Yesterday, I posted about the green tree boxes .  Today are a couple of photos of a fountain area that is in the northeast corner of the garden.  It is a reflecting pool with a large fountain at the far Eastern edge that is lined by (I'm pretty sure that they're) London Plane trees or perhaps just Plane Trees since they're NOT in London?!?! The trees themselves are magnificent.  There are four or five on either side of the reflecting pool that are placed in a line.  In between these trees is ivy.  You can see it in the photos at the top and bottom of this post.  The ivy is trained from the central base in between the trees - and the space in between the trees - and trained out in two angles.  Where it meets the trees, it is then trained back across in a straight line.  Look at it in the photos.  Amazing, isn't it?  The vines

Gold Cone Junipers Planted - 2019

Image
A couple of weeks ago, I brought home a three Gold Cone Junipers from Menards and shared photos and details from them here .  I ended up getting two of them in the ground this week and have the third still in the cast iron urn in our front yard.  Above you'll see one in the ground and the other one is kind of staggered behind it. These are generally in the vicinity of where I planted the small Hemlock last year (that died!) and should serve as a nice multi-layered look of conifers once I get the Hemlocks in the ground.    This is an area that gets plenty of morning sun and since it is on the northside of the property, it gets some decent oblique sun throughout most of the day until about 2 or 3 pm in the afternoon. The Gold Cone Juniper is a columnar conifer that is billed - per the tag - to only be four to five feet tall, but there are a few photos on the Web that show something more on the order of eight to ten feet tall?  I'll be happy with cute little four feet tall

2019 Garden and Yard To-Do List Addendum

Image
Last week, I posted photos of the new Gold Cone Junipers that I bought at Menards .  I'll get around to posting some photos once I get them into the ground in the coming days.  But, that post talked about the need to add some spiral wire around the trees to ensure that they can take the snowload and stop them from splaying during the Winter.  In that post , I mentioned that I needed to add to the 'addendum' that lengthens my 2019 garden To-Do List that included wiring up these Junipers. That got me wondering what else would be on my addendum list. Let's get started and I'm guessing I'll revisit this list to add more items over the Spring and Summer. Addendum To-Do List for 2019 Gardening Season.   Original List here .   1.  Relocate some of the Fall bulbs including these Tulips along the South Fence line in the backyard .   If I move these 'forward', I can extend that bed and add something taller in the back. 2.  After I plant the tree Gold C

Spring Rhododendron Update (Post Winter Wilt-Pruf Application)

Image
Back in December, I posted about an experiment that I was conducting with the application of Wilt-Pruf to one of our Rhododendrons that are located on either side of our back stoop.  Wilt-Pruf is an anti-transpirant that I bought to use on our fresh-cut Christmas Trees, but I also learned can be applied to any evergreen in an attempt to help it get through difficult Winters.  Wilt-Pruf is a natural product made of pine oil and creates a clear, almost flexible coating on the leaves and needles.   I sprayed it on just one of the Rhododendrons and figured it would be useful to compare the results.   The photo you see at the top is shows both of them on top/bottom.  The plant on the top is the one that had Wilt-Pruf applied.  The plant on the bottom was left bare.   The results?  Hard for me to say if it did anything, frankly.  I think the one that was treated has less spotting on the leaves, but maybe that's just random?   Thus, I'd say the experiment is incon

Planning Ostrich Ferns In Deep Rear of Yard - Per Our Landscape Plan

Image
Just five days ago, I posted for all to see my top 10 to-do items for our yard and garden in 2019 .  There were some significant items on there like dealing with trees and adding another espalier, but item #10 talked about planning for the 'outer walking path'.  I posted about considering a path like that in August of last year and then also discussed the idea of what material is right:  decomposed granite .   That path would wind all the way to the back rear portion of our yard.  And that's where this post comes in.  To get my head wrapped around some items in the yard this Spring, I pulled out the landscape plan and revisited parts of it.  Our plan was drafted by our landscape designer and I've shared portions of it here on the blog.  Here's the links to the various snapshots: Our southern fence line with Hydrangeas and allium One of our rear foundation beds outside of our kitchen A look at the north fence line that we put the Frans Fontaine Europea

Another Garden Wall Style Courtesy of Disney's Aulani

Image
In early January, I posted about 2019 garden trends and highlighted gabion-style walls (retaining walls made of loose stone/other items that are kind of bound by wire/mesh fence) while discussing how the style was appealing in what we're thinking about for our own backyard.  But, while on vacation in Ko' Olina in Hawaii at Disney's Aulani, I noticed that they've selected a different wall style that they use across the resort.  You can see it above and below in two different uses.  Top is a waterfall along with retaining wall.  Below the photo is just a retaining wall.  In both of these cases, they've used what I presume to be a stone/rock veneer that is all one color and irregular in shape.  Mostly round(ish) and stacked without thick mortar lines in most areas, but clean, straight lines at the top and on the corners/edges.  Kind of the best of both worlds:  natural shapes from the material, but clean lines from the edges.  There's a stone veneer availab

My Wilt-Pruf Over-Winter Rhododendron Experiment

Image
In the photo above you can see both of our Rhododendrons that flank the stoop out the back door of our family.  In April of last year, I showed the landscape plan that specified these two plants to be placed in the beds on either side of the rear stoop and then in June, I got around to actually planting them .  And they bloomed beautifully this Summer .  They're a really interesting plant/shrub because they have an almost tropical appearance but also are winter hardy here in Zone 5B.  They keep their leaves on all winter, but that doesn't mean they can't use a little bit of help in fighting off the harsh cold and ice. And that's where something called Wilt-Pruf comes in.  Wilt-Pruf is an Anti-transpirant.  That means it helps protect plants from drying out.  We bought the concentrate version and mixed up a batch to put on some of our plants/trees.  I sprayed our Weeping Cedar in the back .  And the little boxwoods that I added near the foundation behind our kitch

Current Landscape State: Northside, In Front of Fence

Image
I've posted about this area of our landscape before - here - and discussed a potential solution to the sightlines that exist between my house and our neighbor to the north.  I'm posting this photo here because I'd like to reference it after we *solve* this area.  I'm actually not sure what the real solve is here - besides the creation of a brick paver walk down the middle.  That's just part of the solution, but doesn't solve any of the sightlights or help give this area a real sense of place.  It currently has just some grass and a few transplanted ferns tucked into the foundation bed.  That's it.  The stones you see under the gate are there to keep Lizzie from sneaking out.  You can go back and check out the post I made about Sky Pencil Holly that I could plant and use to screen to the north, but this post is here to help stimulate my thinking over the Fall on what to do in terms of screening.  You'll note that in that post, I shared the landsca

Fall Tree Planting: Bald Cypress

Image
Recently, we made a stop at the Home Depot to pick up some painting supplies for a project and I, as I usually do, wandered out to the garden center.  There....I was confronted with a bunch of small fall-planting-ready trees.  Most of them were fruit trees, but mixed in on the pallets were a few shade trees.  But there was one small tree that caught my eye:  a small (less than 1" caliper) Bald Cypress. Priced at $19, I had a hard time passing it up.  That's it in the photo above and you can see that it is small and...dare I say....scrawny.    But at $19, it isn't all that much different than the Dawn Redwood that I planted as a replacement earlier this Summer . Nat's folks have a couple of Bald Cypresses and there are a few down at Barth Pond (that we use to mark the water level of the pond!) and at Whittier School in our neighborhood.  Each time we walk by them or see them, I remark that I'd like to have one of those trees on Hornbeam Hill. Now?  We have