Posts

Showing posts with the label tools

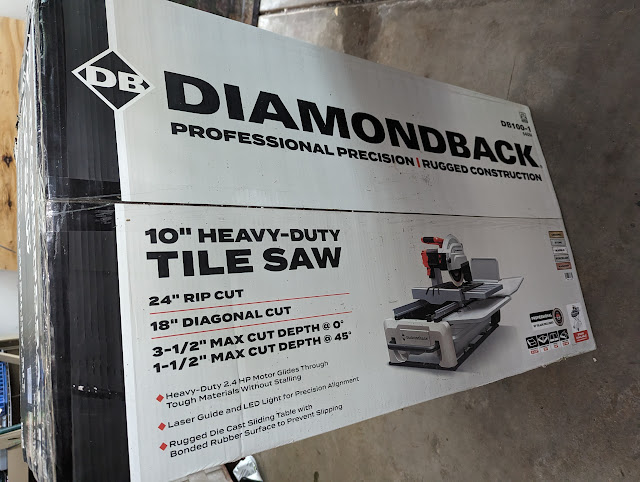
DIY Pizza Oven Build - 10" Wet Saw - Tools Needed - May 2024
Image
So far in my diy backyard wood-fired pizza oven build, all that I've talked about/posted about is what I'll call infrastructure.  That's the foundation slab (reinforced), the block stand (cores filled) and the suspended hearth (reinforced).  But, once all that is out of the way, it quickly becomes a brick-cutting exercise.  Medium-duty firebricks are 2.5" thick, 4.5" wide and 9" long.  They're beefy.   Each of those bricks require 4 (or so) cuts to make them useable in the dome.  In order to cut those big firebricks, one needs a saw that is both ready to cut brick (wet saw) and has a big throat (cut depth), so you don't have to cut one-side, then flip, and cut the other. After bouncing around Facebook Marketplace and Craigslist for months, I decided to take the plunge with a new saw from Harbor Freight.  Between their Memorial Day sale, another discount (membership) and a gift card that I was given for my birthday earlier this year, the new 10" D

Acquired: Caliper Measurement Tool For Tree Measurements

Image
As part of my [ garden diary ], I've been working to keep annual logs of growth on some of the trees and shrubs including my tree height inventory.  Here is the link to the 2019 tree height inventory post .   And here's the one for 2018 .  The reason I bring this up is that earlier this month, as part of doing a mid-Winter yard inventory, I posted about some Winter damage on our Flowering Cherry Tree in the backyard .  In that post , I lamented that my measurement(s) for some of the trees is becoming inaccurate because of their heights getting too tall to get a tape measure on properly.   Welp...thanks to the miracles of e-commerce shopping, I'm now the proud owner of this Digital Caliper Measurement Tool that you can see below.  This one is just $8.99 , so it isn't the most expensive or sophisticated caliper tool, but I'm thinking it will get the job done. It is pretty easy to use and came with a couple of backup batteries. As I mentioned in my '

Adding a Folding Saw To Garden Arsenal?

Image
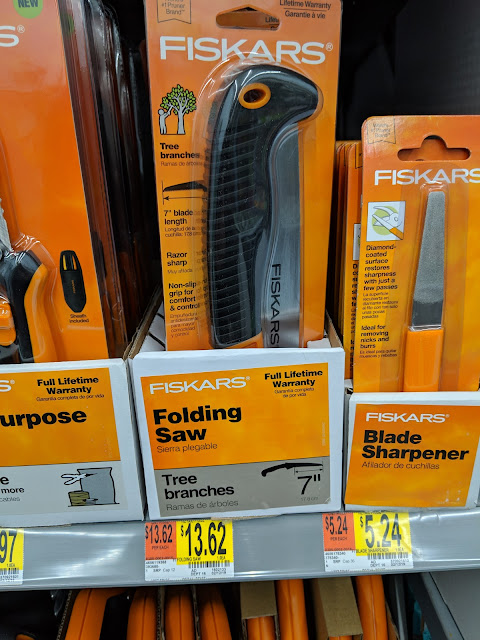
I was out at the Walmart with one of the kids on a recent weekend and I naturally wandered into the garden section.  They didn't have the outside part open yet, but the inside was being stocked up for all your Spring and Summer needs.  There were pots of all various shapes and sizes, bags of soil and down at the end of the garden center was this display of tools.  They had pruners and clippers and shovels.  But they also had this:  a folding saw.  (oh...and yeah..there's a blade sharpener, too!  But, for this post, let's focus on the folding saw.) Our yard is full of medium and some very mature trees.  Oaks and Maples.  And they loose a lot of little branches and limbs.  So, every Spring (and frankly...all Summer long), our yard is full of sticks.  Plenty of them are small little things.  I can crack them in two with my hands and I throw them in one of the fireplaces.  But others are larger and I can't handle them well.  I don't own an axe - either a large on

Vessel Precision Phillips Screwdriver - Made In Japan

Image
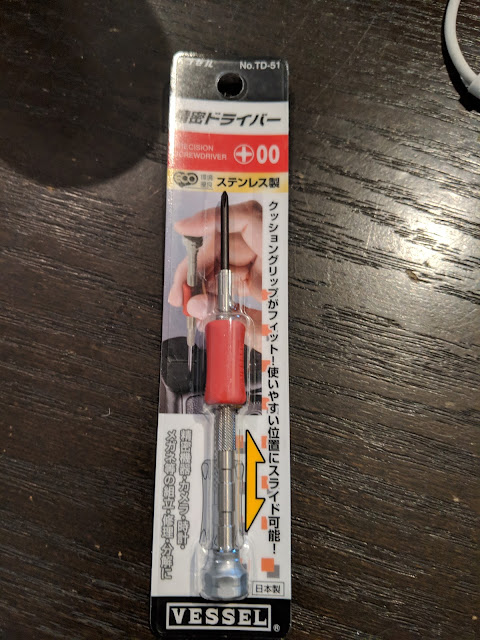
I found myself in a Japanese hardware store in Ginza and discovered that a lot of the products are just like ours:  made in China.  But, there was a section that had some signage that proclaimed:  Made in Japan.  That's where I spent my time poking around to try to find something small and inexpensive that I could bring home for myself and for my tool-loving family members who had birthdays coming up.  There on the rack were a series of these precision screwdrivers.  Or "micro precision drivers" as I think they were billed.  This Phillips head driver from Vessel has that red padded section that you can use to twist the screw into place while applying pressure to the base.  I have a set of precision drivers, but they're stuck in a case and it always takes me a second to pull them out.  Now I have a driver that I can keep in the coffee mug on my desk at home along with my most-used regular-sized driver and a pair of needle nose pliers.  You can buy a full set of

Millers Falls Plane - One that Got Away

Image
There's a few more post-worthy items that I came across at the big Estate Sale up in Twin Lakes including this Millers Falls plane.  My brother-in-law has a few vintage tools and a couple of nice planes, so whenever I come across one, I usually check it out.  Normally, if they're Stanley and less than $5, I will grab them. This one is from Millers Falls - which I had not come across before - and they were asking $12.  So, needless to say, this one didn't come home with me. As for Millers Falls, turns out, they were trying to make planes that were *different* than Stanley.  And that red background - behind the work mark - was part of their key difference.  From this "Old Tools Heaven" post : When the Millers Falls Company introduced its new line of hand planes in 1929, it needed a way to differentiate its products from others already on the market. The identity problem was compounded by the fact that all of the new models were knock-offs of existing Stanle

New Shop Tool: The Grr-Ripper from Microjig

Image
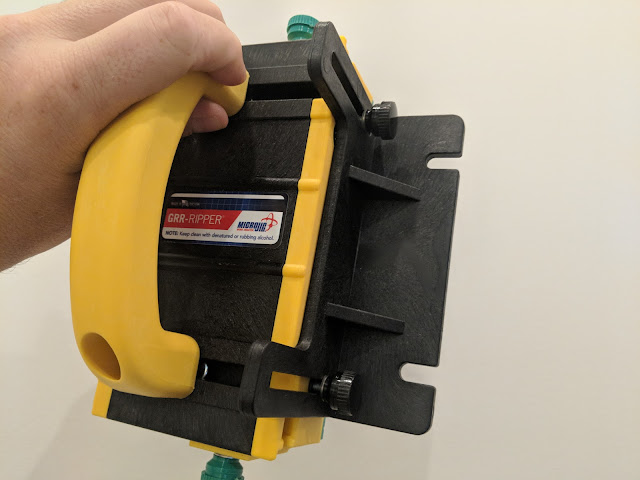
I'm always very hesitant to use my table saw in my shop.  If there's another tool that will get the job done, I usually chose it.  But, there are plenty of instances that call for a table saw.  To stack the odds in my favor, I usually am very deliberate with the saw and use a push stick and keep my hands away from anything moving during the cut and way long after the blade stops. But, I've started to use this thing:  The Grr-Ripper to 'bulletproof' my hands.  You use this thing to guide the piece through the cutting zone.  See below for the channel that the blade runs through. I won't use the saw without this thing now.  I'm not even doing it justice, so if you have interest, check out this video below that explains everything about it as they call it a "must-have for any table saw."

Cutting the Cord: On My Circular Saw (Womp, Womp)

Image
As I was doing some work to cut plywood for a garage project, I made a mistake and there was a pretty big spark.  Somehow, my circular saw cord got caught up on itself and I sliced it right open.  Amateur hour, right?  I texted this photo over to my father-in-law and asked him if it was repairable and he said:  yep!  Easy fix.  So, I stuck this saw in my car and the next time I head over there, I'll drop it off for him to repair.  The good news is that I wasn't electrocuted.  Between the GFI and the plastic handle, I didn't learn this lesson the hard way. 

Workshop Wall Going In (Basement)

Image
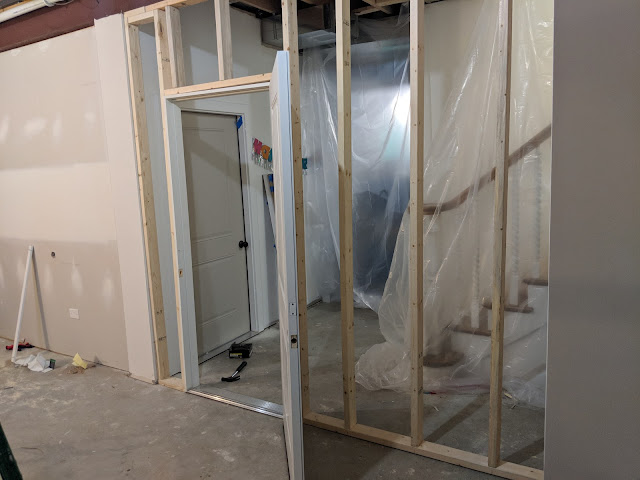
After months of planning and thinking and posting about my eventual workshop, we finally have progress:  the wall that divides the rest of our basement with my shop is getting installed.  In the photo above, you can see the wall being framed and the steel door - an exterior door - installed.  On the right side of the photo - through the framing - you can see the existing stairs and banister coming down from the first floor.  In the middle of the room, you can see an existing door/wall that built out by our builder to contain the mechanical room.  They used a steel, exterior door on the mechanical room, so we replicated that with the door for my shop.  They're going to be so close, so it was important for them to match. Right after the wall framing is done, drywall is going on the outside, but I'm going to leave the inside unfinished.  I'm still planning on cutting in a spot for a vent ( see here for inspiration ) and stuffing the joist cavities with insulation so we ca

A Multimeter - Workshop Addition

Image
My father-in-law gifted me this Sears Craftsman 8-function Multimeter for Christmas and I've just gotten around to unboxing it and finding it's permanent home in my shop.  I wasn't quite sure what to do with a multimeter (or multi-meter as it is sometimes spelled), but Nat's Dad also sent along with CNET piece that explains all that this tool can do .   Here's the list: 1.  Test batteries 2.  Check extension cords 3.  Determine the life of lightbulbs 4.  Identify the 'hot' wire 5.  Find bad switches So...turns out, it wasn't all bird stuff at Christmas this year, right?!?

Ready to Cut With The Rockwell Sonicrafter 4.2 Amp F80

Image
I've had one of these Rockwell Sonicrafters for a number of years and I've found it pretty useful from time-to-time.  It isn't something that I pull out every time I tackle a project, but have been a specific set of applications that required *just* this tool.  This year at Christmas, I was upgraded to the new version of the F80 that has 4.2 Amps and comes with this nifty hard-sided case.  My original one came in a cloth carrying bag and I pushed it to it's max, so this upgraded version is a welcome addition to my shop lineup. You might be wondering...what do you do with an oscillating tool?  Welp, the fine folks at Rockwell have created this handy list of 10 things you can do with a Sonicrafter . The F80 comes with a nice light to shine on your project and has two 'degrees' - meaning one setting is a narrow oscillation and the other is a wider oscillation.  Also, note... this is a corded tool.  But, it is a 10 foot cord, so you get some pretty good rea

Got a Stripped Screw? Try the Speedout. Seriously.

Image
I am the KING of stripped screws.  Putting screws in.  I strip them.  Taking screws out.  I strip them. We're getting some painting done and I had to take down some bookcases.  I took out a bunch of the screws, but encountered one last one:  and it was awfully stripped out. But...fortunately...I had this little kit on hand called "Speedout" .   See that screw in the top photo?  That's AFTER I finally got it out of the wall. Thanks to the Speedout .   The Speedout is a series of 2-sided bits.  You pop the "a" side into your drill/drive and you bore a slightly bigger 'hole' into the screw head.  Then, you flip the bit over and use the 'b' side to 'grab' the screw out. I received the Speedout from my in-laws for my birthday earlier this year and I had not used it before this weekend.  Now?  I'll keep it in my work-bucket and use it all the time. Watch this video.  I swear...this was my exact experience.

Meat Shredder - Crate & Barrel

Image
Nat found these "meat shredders" at Crate & Barrel recently.  They're certainly going to make pulling pork shoulder a bit easier on the hands and I'll end up with less burns.

Google Follow Your World Update

Image
Last night, I received an email from the "Follow Your World" application of Google Maps that alerted me that there was new imagery for a "point of interest" of mine.  Sure enough, I had entered our home address in the tool back when it launched in October of last year and forgot all about it.  The new satellite images are pretty recent - as there's a new house being constructed on our block and the image has the roof shingles installed and the driveway in; which are both pretty recent events (within the last month or so). The Follow Your World tool is a neat little app that gives you a heads up when Google updates their imagery of your house.  We're still not on StreetView (our block) so I'm hoping that one day soon, a note like the one above will arrive that will include the details of how our house is now included in the StreetView collection. If you haven't signed up for a Follow Your World update, you should do so here .

Rockwell Sonicrafter

Image
For Christmas this year, I was gifted the Rockwell Sonicrafter - which is billed as one of the "most versatile and effective power tools on the market".  It is a multi-purpose tool that is a step-up in terms of power and functionality from a Dremel.  I've pulled out my Dremel from time to time, so I can understand the usefulness of this thing.  In fact, Nat has a big project made out of PVC pipe that we have to work on and I think the Sonicrafter will make short work of the cuts. I'm starting to amass a nice set of tools, but after the basement construction, I lost most of my work space and storage.  I was planning on doing it out in the crawlspace, but it is so chocked full of our stuff, there isn't a lot of room to operate.  Looks like I may end up out in the garage for now.  My plans call for putting a second story on our garage, but that's a big project and will have to wait until I get everything done in the basement.  Until then, my tools will kind

Gator Grip Universal Socket

Image
Down in the basement, the floor is a bit uneven due to the old floor drains, some cracks and just the general age of the entire place.  In order to properly put in the floors, I have to throw down quite a bit of self-leveling concrete.  The stuff comes in a 5 gallon bucket and you just add water and mix to get the consistency right. The problem?  The instructions recommend that you use a 'mixer' - which is this metal thing that attaches to your hand-held drill.  Unfortunately, the mixer that Menards recommended requires a 1/2" chuck and my drill doesn't open up that wide.  So, what's the solution?  This thing above:  the Gator Grip.  It is perfect for this application - as it turns my simple drill into a socket that will hold the mixer stick. It was $11.99 so hopefully I'll find more than just this one application.  The packaging calls out using it on stripped/rusty/broken nuts and bolts, so it might be good to have on hand.

Black & Decker Leaf Collection System

Image
The second part of my Black & Decker Leafhog arrived this week via Amazon.   Billed as a Leaf Collection System, this is an 8' hose with a garbage can attachment that takes the sucked/chopped leaves and deposits them right in your garbage can.  I need a few moisture-free days to get everything to dry out before I can give it a shot, but as you can imagine, I'm chomping at the bit to get started this spring. 

36" Black and Decker Accu-Mark Level with Gecko Grip: Perfect for Hanging Pictures

Image
I mentioned earlier in the year that we received a really nice wood carving for our home from my future-brother-in-law Bill as a Christmas/Wedding present.  Since December 25th, it has had a nice home leaning against the wall on top of our piano.  Nat was getting tired of it not being hung.  I was getting tired of not being hung.  The issue was that on the back, Bill had sunk in two fixed heavy-duty hangers.  The type that you have to put two screws in the wall then try to "hit" the hole on the back.  There wasn't a wire to hang this thing from, so I first considered stringing one of those. Nat's folks were over this weekend and I mentioned to them that I thought that's how I was going to hang it.  However, her mother reminded me that they bought me a level for Christmas last year (2008) that was made for this task:  The 36" Black and Decker Accu-Mark Level with Gecko Grip! The level is, indeed, made for hanging things on the wall.  First, it has this gr