Posts

Showing posts with the label 2021 to-do list

Synthethic Weed and Feed - Applied to Backyard - May 2021
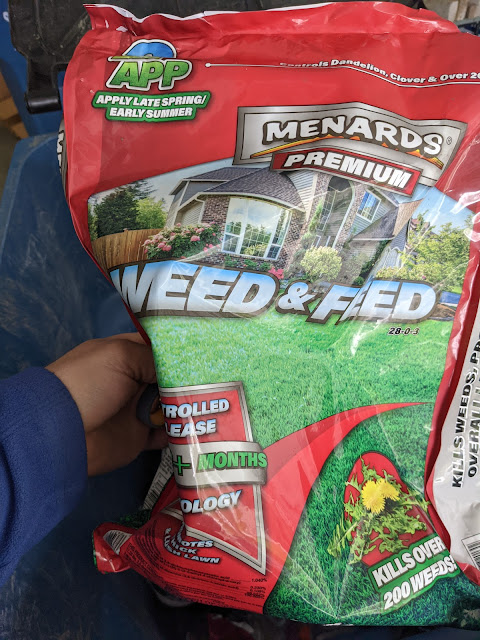
Image
For the past few years, I've put nothing but organic/natural products down on the yard to control weeds, feed the turf and improve the soil.  But, this year, I skipped the application of a pre-emergent and I'm dealing with A LOT more weeds in the backyard than I normally have at this time of year.  I don't know if skipping the pre-emergent has to do with the weeds or if it is just a coincidence. But, I needed to take some action.  I bought a concentrate to spray the weeds and applied that a couple of weeks ago.  It worked - in spots - but wasn't enough.   So, I went with what I consider a drastic measure:  I bought a bag of Weed and Feed from Menards and threw it down in the backyard .  I looked around for a weed control ONLY granular product, but didn't see something that would work, so I decided to use this combination product.  Here's a look at the bag: Here's a closer look (below) at the makeup of the herbicide product including Dimethylamine Salt, Propi
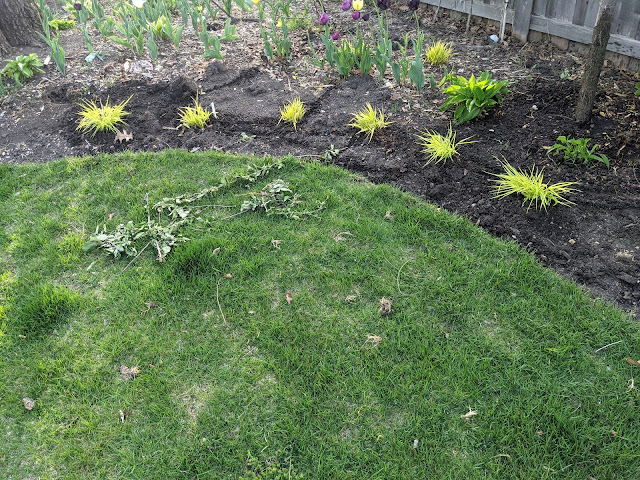
Three More All Gold Japanese Forest Grasses In Curved Border - May 2021

Image
I added three new All Gold Japanese Forest Grasses to this little curve in our backyard bringing the border total to six with three more in the back.  Back on May 9th, I posted a photo showing how I moved three of these to the edge of the new bed .  These three new ones are from the Arbor Day Plant Sale from the Morton Arboretum.   Here's what the sign looked like at this most recent sale - where they were asking $18.95 each. I bought eleven (11) of these last Fall at the Morton Arboretum Fall Plant sale for $16 each .  That means that I now have nine of these back in this spot and five up front - in between two driveways.  I have these planted by themselves in a border, but seeing them now I think I should move the back three a little closer to these front three to make more of a drift.  This pdf describes a drift as 'a colony' and I kind of like that description.   Here's what I'm thinking in terms of some transplanting in this area with last year's grasses i

Aphid Control on Greenspire Lindens - Spring 2021

Image
Last week, I posted a photo of my horizontal cordon espalier Greenspire Lindens as they were about to break bud for the Spring. The trees are starting to really fill out and look like I wanted them to look - now in their fifth growing season.  But, last year something happened.  These trees were swarmed by yellow jackets .  And, after a little bit of research, I discovered that the trees were inhabited by Linden Aphids - which is (apparently) quite common.   Last Fall, I took the first step to trying to treat the Aphid infestation - and figured out that there are two ways to treat trees:  with either persistent contact treatments or systemic treatments . Persistent contact sprays - they kill what they contact.  And they'll last from a few hours on the leaves up to a few days.  They're good for more immediate results, but they have some downsides in that they may harm non-targets (meaning...they will kill not just aphids). That's what I tried to use November .  My thought

Pre-Bonsai: Bird's Nest Spruce - May 2021

Image
I had four bonsai-related items on my 2021 to-do list for the yard and garden .  One of them - Number 10 -  was to buy some pre-bonsai materials that I can purchase as smaller stock (and thus, lower prices) to use in later seasons.  Number 10 on the list reads: That idea of buying some pre-bonsai is something that I've done before by buying nursery stock and sticking it directly in the ground.  The guys at Bonsai Empire have a page up about pre-bonsai where they give you some tips on how to do it; including what to kind of look for when buying nursery stock.  I currently have three pre-bonsai junipers that I've picked up over the years - two in the ground and one in a larger container .  My plan for this year - #8 on the list - is to 'work' those three this season.  That means digging them up, pruning them a bit and likely sticking them back in the ground to overwinter in their pots at the end of the season.   But, this post isn't about those old pre-bonsai tre

Tamukeyama Japanese Maple Planted - May 2021

Image
I've posted quite a bit about Japanese gardening and Japanese-inspired gardening over the years on the blog and dedicated a whole post last year to talking about Japanese Maple trees .  Well, the impulse to buy one got the best of me and I came home with a new tree for the yard.  This is the second tree planted this year - the first was the bareroot Shagbark Hickory .  This post is about the second:  a Tamukeyama Japanese Maple tree that I bought at Home Depot.  Here's the tag from this tree: And here's the tree as it stood pre-planting: Here it is in context pre-planting: And, the price:  $69.98 with a Menards-matching 11% rebate bringing the total for this tree down to $62.28.   This tree is a dwarf tree - and stays small.  I was drawn to it being 'medium-sized' in nature and thought it could play a nice role in the layering by being in the 'in between' area behind the border plants and in front of the larger shrubs in the back.  It is weeping and lace-l

First Ironite Application - Front Lawn - April 2021

Image
I've adopted the approach to limit feeding my lawn until May.  Why?  Because I want to avoid having to cut the lawn more than I need to in Spring.  That means that all during March and April, when the big box stores are pushing their various Step 1 programs and I see all the fertilizer on pallets, I don't apply it to my lawn.   I feed late in the season (Thanksgiving time) and know that my lawn greens up on it's own in April.  And, like I said....I don't want to have to start cutting it just yet.   Last year I published my lawn care schedule .  In that post, I include a few April items that aren't feeding the lawn like Humic Acid and Lime (soil conditioners) as well as using Ironite in the front to get that dark green look (without ALL THE GROWTH).   I'm posting this on April 24, but that bag of Ironite you see in this post went down on April 18th.  I put it on the full front yard - main yard, parkway and 'in between two driveways'.  5K square feet. Note

Backyard Curvilinear Landscape Beds - Cut into Final Form - April 2021

Image
Here I was...thinking I'm writing a post that is going to knock a HUGE item off my 2021 to-do list in the yard.  But, when I went to go look up what number "cutting new, larger curvilinear beds" was on the list...imagine my disappointment that it isn't one of the 25 things.  Womp, womp.   But, it is still a big deal for me and a big milestone for the yard.   First, a review of a few things:  Starting with curvilinear bed design .  I covered where I wanted to go with our bed layout and how we had a bunch of "little" curves/bumps in our current beds - while the ideal state is very few, larger, swooping edges.  As Sue from Not Another Gardening Blog pointed out, these big, swooping curves are hard to pull off . I went through three colors of spray paint trying to get the curves right.  And, I think I got them like 90% there - with just a little bit of cleanup having to come in the next few seasons.   Second:  a note about the "order of operations" I

Another Firewood Rack Built - Firepit Area - Spring 2021

Image
Last Summer, I built a few firewood racks in our yard based on scrap wood that I scavenged from our neighbor's dumpster.  I put two of them next to the house and loaded them with bought firewood .  And, I built an additional one back by where our fire pit is located and loaded it with scavenged Ash firewood .  Last Fall, I also acquired even more firewood from a neighbor and ended up stacking that on a couple of two-by-fours with the hope of being able to process it this Spring.   With my brand new battery-powered chainsaw ( gloves here) , I began to cut down SOME of the larger pieces to get em into a spot where I can process the rounds.  That started, but I didn't get it all done.   As part of my Spring-time " order of operations " list, we're going to be expanding our beds.  In order to do that properly, I needed to move that existing pile of Ash rounds to a new spot.  Hence, the creation of a new firewood rack.  I built this one out of leftover lumber that I

Mailbox Post - Small Gardening Tool Storage Idea - March 2021

Image
I was in the Menards garden center recently and came across this rack that had four mailbox posts laying on it that had my gears turning a little bit.  Turning about what?  Well, that would be #11 on my 2021 to-do list for the season :   "Figure out SMALL tool storage - like pruners, saws, gloves, hand shovels, hose washers, other smalls." Could a mailbox post and a large, metal mailbox be the solve? I've danced around various tool storage ideas and have not settled on something that I'm in love with in terms of location, size, type, utility for gardening tool storage.  But, a mailbox solves A LOT of what I'm facing:  it is weatherproof, it closes and some of the larger ones can hold a lot of things like saws, shovels, gloves, even wire and automower supplies.  I currently keep everything in the garage, but that means that when I need them, I have to out front, grab them, then come back and do the work.   This would put my most-essential tools right on hand IN the

New Backyard Beds Step 1: Automower Wire Removed

Image
Back in March, I decided that one of the projects that we wanted to take on this season was the creation of clean, new, swooping bed edges in our backyard.  And, in order to figure out what I needed to do - and by who - I created a simple order of operations list of the steps as I see them . Step one:  pick up the Automower boundary and guide wire that rings the perimeter of our backyard.  I started on that project recently and have made some progress.  Here, below, is about 40% of the backyard boundary wire that I've pulled up out of the grass and collected the spikes that hold it in place. This set of wire is littered with those little pigtail plugs that connect the wire in various places that it has severed over the years.  This section of the wire has been picked up and reset various times over the years, so it wasn't that hard to pull up.  There are other parts (the remaining 60%) that hasn't moved since I put it in initially back in 2017, so it is buried in the thatch

Mickey Mouse Topiary - Build and Plant - May 2021

Image
I've been thinking about topiary for a number of years.  I've talked about backyard topiaries - including (recently) the idea of a Block I one and as far back as 2017, I bought a topiary wire (angel) at an Estate Sale and never did anything with it .   It is something that I've included on my to-do lists over the years ( 2019 and 2020 ), but never was able to tackle the project.  I've also set it as #24 on this year's list (topiary), but I've taken a little veer off course. Instead of moving on an outdoor topiary, I've somehow started with a tropical topiary on a stuffed frame. This, too, has been like five years in the making.   Over those five-or-so-years, we've been down to the Epcot Flower and Garden Festival a number of times and EACH TIME we're there, I always pause and pick up a Mickey Mouse-shaped topiary and THINK about buying it.  But, each time, I've put it down.  Either logistics, or impulse control or something.   But this year...

Order of Operations - Spring Beds, Transplants, Locations and Mulch

Image
Yesterday, I shared a post talking about the concept of creating curvilinear flower beds in landscape design and how one of my initial backyard projects is to move towards a final shape with our beds.  That requires us to carve up a bunch of the current lawn and creating new beds that jut out into the grass.  But, before I can even begin to think about how to make those swoop'ing, curved beds, there is some thinking that I have to do in in order to get both ready for the days of sod removal AND what has to happen AFTER the creation of the new beds to get them ready and dressed for the season.   To arrange my thinking - and to pressure test on what I want to do - I thought I'd create an individual (for me) order of operations document that details the steps in the order I need to take in order to make this all work.  So, let's go. 1.  Remove our Automower wire.   Around the entire perimeter of our backyard, we have a low-voltage green wire buried about 3" or so from th

2021 Area #3: Front Yard - Between Two Driveways (Priority or Not?)

Image
Back at the end of February, I published my 25 point "to do" list for the yard and garden for 2021 .  In that list, I included what I called two "priority areas" as #1 and #2.  The item in spot #3 was to work the area between the two driveways. The first two priority areas are in the backyard, but this one is in the front yard and I didn't label it as a priority area before I published the list, so I'm not sure I can now.  Instead, let's just call this"Between Two Driveways".    I mentioned it yesterday as a potential location for some transplanted peonies. This is a long, narrow strip that was - up until last fall - just turf with a very small Bald Cypress and a troubled Chanticleer Pear tree .  Our neighbors directly to the north of us have recently built their new house and moved in this past Fall.  As part of their new construction, they added a new driveway that runs parallel to ours - thus creating this long strip of land.  The Bald Cypr

Disneyland Rose Transplanted - To Southside (Sunny) from Back

Image
All the way back in the late Summer of 2017, Nat's Mom sent us a Disneyland Rose as an anniversary present.  It was our first rose and I planted it in a bed that had basically nothing in it - right outside of our kitchen windows.  But, it was quickly clear that this was in the wrong spot.   The following Fall ( 2018 ), we acquired two more Disneyland Roses , but this time, I planted them in on the southside of our house, along the foundation.  And, they've fared pretty well.  But the initial one, planted in the wrong spot wasn't doing as well.  By last Summer, the Disneyland Rose was being crowded out by grasses, hostas and well, weeds .   So, this year, a portion of #6 on my 2021 to-do list was to transplant the rose to be over by the other ones.   I did a little bit of research on the timing and prep for transplanting a floribunda rose and figured out a couple of things:   1.  Do it in late winter/early spring.  When the ground is soft enough to work the hole. 2.  Pre-d