Posts

Showing posts with the label backyard planning

New Backyard Beds Step 1: Automower Wire Removed

Image
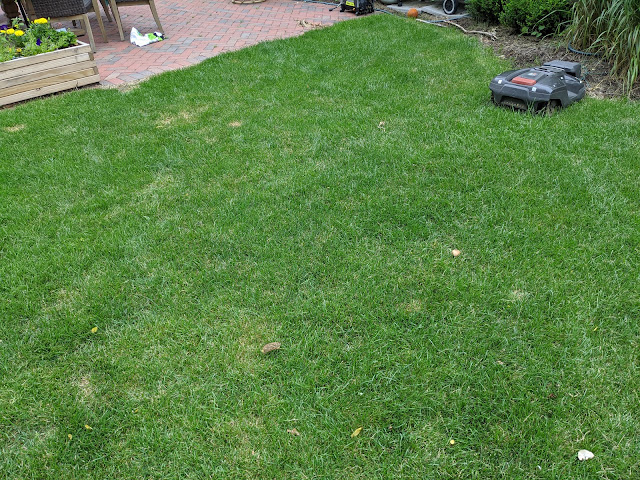
Back in March, I decided that one of the projects that we wanted to take on this season was the creation of clean, new, swooping bed edges in our backyard.  And, in order to figure out what I needed to do - and by who - I created a simple order of operations list of the steps as I see them . Step one:  pick up the Automower boundary and guide wire that rings the perimeter of our backyard.  I started on that project recently and have made some progress.  Here, below, is about 40% of the backyard boundary wire that I've pulled up out of the grass and collected the spikes that hold it in place. This set of wire is littered with those little pigtail plugs that connect the wire in various places that it has severed over the years.  This section of the wire has been picked up and reset various times over the years, so it wasn't that hard to pull up.  There are other parts (the remaining 60%) that hasn't moved since I put it in initially back in 2017, so it is buried in the thatch

Order of Operations - Spring Beds, Transplants, Locations and Mulch

Image
Yesterday, I shared a post talking about the concept of creating curvilinear flower beds in landscape design and how one of my initial backyard projects is to move towards a final shape with our beds.  That requires us to carve up a bunch of the current lawn and creating new beds that jut out into the grass.  But, before I can even begin to think about how to make those swoop'ing, curved beds, there is some thinking that I have to do in in order to get both ready for the days of sod removal AND what has to happen AFTER the creation of the new beds to get them ready and dressed for the season.   To arrange my thinking - and to pressure test on what I want to do - I thought I'd create an individual (for me) order of operations document that details the steps in the order I need to take in order to make this all work.  So, let's go. 1.  Remove our Automower wire.   Around the entire perimeter of our backyard, we have a low-voltage green wire buried about 3" or so from th

Learning The Ways of Curvilinear Bed Design - March 2021

Image
I've talked and talked and talked about our backyard landscape plan on the blog over the years and I've made a lot of progress towards realizing the vision laid out there.  But, because I'm doing things myself, my best laid plans don't always work out.  And, one of the ways where I've been having trouble is in laying out the beds in the back.  You look at these ideal woodland gardens and any backyard garden of note, one of the things that you often see are beautiful, graceful, swooping curves that mark the edges of the beds .   In poking around the Web, I found this post from Sue at Not Another Gardening Blog that was part of her " Good Lines Mean Good Designs " series titled: Curves Wonderful Curves .  Those posts are almost ten years old, but they're just as valid as today.  And, for a beginner gardener like me?  They are *just* what I needed for where I am on my gardening journey right NOW. In the  post , Sue introduces (to me) Curviliear Form for

2021 Priority Area #2 - Woodland Understory on Northside

Image
Yesterday, I published the first of my 2021 garden/yard priority areas .  Today, is my second one - with the hope that this exercise helps me contain my enthusiasm and force me to focus on adding things that matter.  Like a lot of you, I find myself in a daze when Spring comes and I add things to my cart that I don't really need just because they're, well, there.   Priority Area #1 for 2021 calls for 15 plants (8 Allium, 7 ferns), so that part ALONE is a substantial investment.  Priority Area #2 calls for even more.  41 plants.  Yeah...41.  This one might take two years to swing in terms of getting the plantings right.  But, lets start by looking at the area in question.  This is in between Priority Area #2 from last year AND the trio (at the time) of tiny Canadian Hemlock trees I planted along the north side of the fence line.  Here, below, is a look at this area: You can see that this area calls for: 10 Lenten Rose 9 Guacamole Hosta 7 Bottle Rocket Spiked Ligularia 8 Hadspe

Pizza Oven Planning - Foundation And Our Drywell

Image
Over the past few years, I've dreamed about building a backyard pizza oven - both in our old house in Elmhurst and here in Downers. I've posted a few times on the potential location(s) on the blog. Here back in 2017 . And, here again earlier this year and most recently just last month when I was talking about a pond. In each of those explorations, I've included a location of the pizza oven that is along the north side of our property, off of our patio, down in a lower level of our patio. As I continue to think about the location - and I'm increasingly thinking that the northside site - that is situated down low - is the right spot.  It is low-lying, so the fireplace won't be sticking up for all of the neighbors to see - and to expose to the elements.   I've read the Forno Bravo DIY installation instructions like six times and lurked all over the forums over the years.  One of the pieces of counsel that they give is that if you live in an area of

Patio Adjacent Pond Location - Backyard Dreaming

Image
Could it be quarantine that is getting to me?  Seems likely.  As I'm now dreaming about the installation of a small pond and waterfall in our backyard.   This isn't a new idea, as I've posted about water features over the years here on the blog - including a schematic that showed how it could work across our yard in February .  Today, I'm sharing this photo of a spot that is adjacent to our back patio that I'm now focusing my attention on in terms of initial pond placement.   Below, you can see a schematic (new one) of what I'm thinking (currently) about where things could go and how they'd work together.  Importantly, I'm trying to think about this in phases and making sure that we can make future phases work with the initial undertaking.    The new schematic calls for a pond located to the south of the patio with a small berm and waterfall that is backed up to where the air conditioning units are located.  Then, utilizing the existing grad

New Mulch Beds - Northside Behind Oak Tree Swing

Image
Yesterday, I shared a video of our twelve yard mulch delivery and my plans to spread it around our property as part of my (new) social distancing project plans.  One of the areas that I mentioned in that post as a 'net new' bed was in the area by our tree swing - what I've billed as " Priority Area 2 " earlier this Spring.  Here's a new look at that area from our bedroom (zoomed in) that shows how I've take what was once a mulch island (just a ring of mulch around that big Oak) to more of a continuous bed. I took the tree ring - that you can mostly still see and extended the bed all the way to the right where one of our large Chanticleer Pear trees is located.  And to the left, I created a whole new bed that was a mix of thin grass, weeds and, frankly...leaf mulch.  Have a look at this post - featuring that River Birch behind the Oak tree - to see what I'm talking about.  This area was some grass, some weeds and never really defined in any way

Adding Boxwoods On Corner Of Our Patio?

Image
In the latest Garden Design email that went out last week , I saw a photo of a patio that was beautiful.  But, also gave me a little bit of wondering as to what we can do with our current patio.  Oh, you're not getting the Garden Design email?  Head here and subscribe .  It is free and - for me - is the email newsletter that I read and click on everytime it arrives.  No skimming for me. In the newsletter, she linked to this story about outdoor living space and included this photo of someone's dreamy patio that faces what look the marshland that borders the Cloister at Sea Island.  Here's that photo with a couple of MY red circles calling attention to something: Not my photo.  Original source can be found here . In those two red rings, I've highlighted some patio-border shrubbery.  What I think are probably boxwoods or yews or something similar.  The oval on the right snows a patio corner installation that I want to focus on here.  Now...that looks like someth

Lenten Roses In The Backyard? There's a Plan For That.

Image
You can't open up gardening Instagram this Spring without seeing a post or a story about someone's  hellebores in bloom.  Oh...what's that?  You call them Lenten Roses?  Oh...me, too.  Actually, I haven't thought much of them at all.  But, all this posting made me remember that we have a few clusters of them spec'd in our backyard landscape plan.  Like this section you see below that calls for a grouping of ten (10). What are hellebores or Lenten roses?  From one of my favorite gardening bloggers Deborah Silver in Detroit who posted about the month of March in her garden and how Lenten Roses or hellebores play a role: Any gardener who reads here knows I am a fan of hellebores. They are, in my opinion, the perfect perennial. Thick glossy foliage persists in its green state until late in the winter. The flowers emerge on leafless stalks in April, and bloom for a very long time. The green remains of the flowers can persist in the garden well in to June. T

Patio Trees, An Expanded Patio, A Stream and a Pond - Backyard Dreaming

Image
Welp, here we go with even more backyard planning and dreaming.  It was just a couple of days ago that I posted my 2020 to-do list with 25 things that I'd like to prioritize .  And then just yesterday, I went ahead and posted my initial findings about Japanese Maples - which weren't even on that list.  In a few posts talking about the priority areas for the yard, I mentioned that the hardest part I have with gardening right now is STICKING WITH MY PLAN.  I'm like a bug drawn to the bright light of garden centers and see plants and trees that are NOT in my initial plan.  I have to remind myself:  prioritize and stick to the plan.  Once that is done, we can explore enhancements. Welp...this post is all about what I'd call a major 'enhancement'.  And how I got here was the whole research about Japanese Maples .  And thinking about their placement.  I started to think about our patio and the patio trees that I've been thinking about since we moved in.  R

Belgian Fence Apple Trees: Need Pollinators

Image
I've been talking about a Belgian Fence Espalier since we saw a nice setup at Disneyland in a couple of spots.  In my mind, I'm going to likely want to use fruit trees like Apple trees because the ones at Disneyland are made from Pyracantha - which I think is not hardy down to our zone 5b. There are a couple of spots that I'm thinking of/considering for the placement of the Belgian Fence.  The first is kind of as the 'backdrop' for that priority area #3 along the fence.  This is southern-facing.  You can see the approximate location in the red arrows below.  The second spot is on the south side of our house where we've planted the pair of Disneyland Roses.   This is a somewhat narrow spot that having a set of trees clinging to the house would work well.  We also have a big space of blank wall.  As for impact, I'm thinking that the first spot - next to the Frans Fontaines is of higher 'impact' in terms of being visible from our house and pa

Backyard Priority Project #3: Behind Yews & Along Fence (Walkway + Screening)

Image
You can't swing a gardening blogpost around the Web these days without people warning gardeners like me (beginners!) to be VERY careful of plantlust and Spring Black Friday mania.  That means...don't fall in love with plants and then 'find a home for them'. That's what I've done far too often. Instead, all the gardening bloggers/experts (dare I say....ummmm..."influencers") will tell you that having a plan is the KEY to a garden design. In an effort to reinforce this notion with myself, I'm publicly committing to trying to stick to my priorities this year.  We have a large yard that is NOT anywhere near done.  We need so much plant material.  But, we also have a professional plan.  And, instead of winging it, I'm going to try to stick to it as best I can.  And, because I did some "winging it" over the past two Summers, that means adapting the plan to incorporate some of the existing materials. This is the third in the series of

Columnar Tree Dreaming - Dakota Pinnacle Birch and Swedish Aspen - Winter 2020

Image
Since the new year, I've posted about a couple of spots that I'm thinking about for trees in 2020.  That started with the five trees that I want to plant in the front yard ( including five new trees ) and a small section between the espalier Linden trees and a Cleveland Pear along the southern fence line.  In both of those pieces, I talked quite a bit about columnar trees.  At this point, you're probably like:  we get it, Jake.  You like columnar form. Yes indeed.  But, because this is *my* blog, you're going to have to bear with me.  Over the course of the next few days and weeks, I'm going to use this space as a reference guide for some columnar trees that I've come across that are work referencing back as I add more inventory. This post is about a pair of what I'm calling 'white trees'.  Birch and Aspen. First up is this Dakota Pinnacle Birch Tree . The folks at  Fast Growing Trees are currently selling a 5-6' version for $99 right no

Triumph and Darwin Tulips Up - April 2019

Image
Back in the Fall of 2017 (our first fall), I planted 30 tulip bulbs along the fenceline in our backyard in between the section where our espalier system is set up and where we are growing a series of hydrangeas.  They popped up for the first time in March of 2018 and I documented that here .  And by Mid-May they had bloomed in a beautiful combination of orange and yellow .  I mentioned last year that I thought it was going to be best to relocate these bulbs, but guess what?  I never got around to moving them.  This post claims that the *best* time to transplant tulip bulbs is the late Fall - about the same time that I put these in the ground.  From the post : The best time to transplant tulips is in the late fall, according to Ron Smith, Horticulturist at the North Dakota State University Extension Service. In the fall, bulbs have completed their growing cycle and lie dormant. Moving dormant tulips doesn't interrupt the growing cycle and makes the bulbs less susceptible to

Raised Bed Garden Enclosure - Backyard Project Inspiration

Image
Raised Bed enclosure via Wayfair It has been a couple of years since we had a garden .  Sure, we've tried to grow tomatoes and basil in containers (with mixed results), but ever since we moved out of our house in Elmhurst, we have been garden-free.  Nat has mentioned that she misses it.  She misses the veggies.  But also how our kids were involved and helped both plant and harvest.  Not to mention the understand you get about health and nature and the environment when you grow your own food. Why do I bring this up?  Because a week or so ago, Nat texted me the photo that you see above of this raised ben enclosure that she came across.  This one is being sold from Wayfair , but there are a few different varieties of these things sold from various places online.  They start at about $1K and go up to $3K.  Which...if you ask me is nuts. If you've been following along on the blog here, you may remember that I've been dreaming about a raised bed project for more than

Rear Stoop Planting: Rhododendrons in Landscape Plan

Image
This is the fifth chapter is a series of our landscape plan posts that show off various portions of our #newoldbackyard in the planning stages.  The other four are here: 1.  Part of the southern fence line that includes some hydrangeas, hostas, ferns, allium and Canadian Hemlocks.   2.  Part of our rear foundation planting areas , right outside our breakfast nook/kitchen windows. Grasses, boxwoods and even a peek at one of the rhododendrons that *this* post is all about.  3.  The hornbeam/privacy hedge on the north fenceline near our screened porch .   4.  Far southwest corner by the trampoline that includes some Canadian Hemlocks . This fifth chapter covers just two plants that you can see in the sketch above.  They are both PJM Rhododendrons that occupy some foundation beds on either side of our rear stoop heading to our back patio.   Here's a look at those beds that I took this past weekend: You can see the two beds are good-sized and fall on th