Posts

Showing posts with the label compost

Adding Composted Manure to Stump Grindings - October 2022

Image
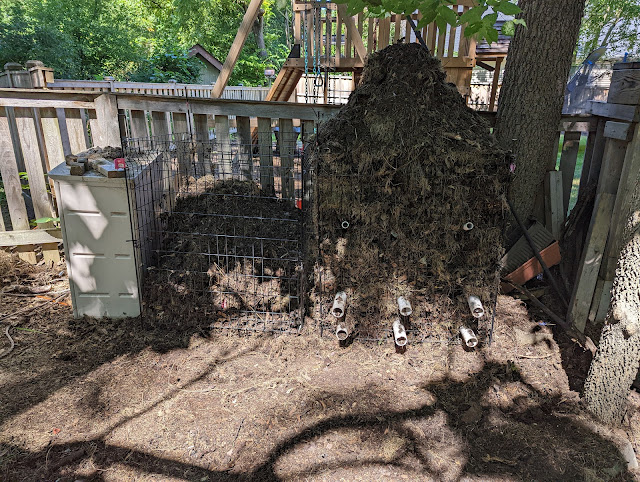
This is the third in a series of posts related to the removal of our large, 70-year-old (but in decline) Norway Maple tree in our front yard.  First, I shared photos of the tree being removed .  Then yesterday, I showed photos and a video of the stump being ground out .  Today, I wanted to talk a little bit about what comes next.  After doing a little bit of digging on the Web about what to do after you grind a stump, I've come to the conclusion that I needed to think about both amending the soil with organic material AND....being deliberate about adding nitrogen.   The stump grinding left behind A LOT of small pieces of wood.  A mulch of sorts.  But, about two-feet-deep. I knew that we're going to plant a new three here, so I wanted to be proactive with the soil.  I also knew that I'm dealing with a LOT of hydrophobic mulch in this area, so anything I do here will likely help.  In fact...I'm pretty sure the act of grinding the stump - AND all the soil and mulch in th

Compost Pile Settling - September 2022

Image
Ten days in the life of a recently turned compost pile is an eternity.  At least, that's how it seems with my compost bins.  Ten or so days ago, I posted the details of how I emptied my compost bins (and tumbler) and refilled them with a proper mix of browns and greens along with some alfalfa cube accelerant .  At that time, the main, properly mixed bin was heaping.  By that, I mean I piled up the compost into a mound that extended well above the top of the fence panels on all sides and was mounded about 30" past the top of the panels in the very center.  Go here to have a look at the pile ten days ago . Thanks to active decomposition and gravity, the 'heaping pile' bin is now well under-control.  See below for an updated photo showing the edges of the bin have all sunk down and are now under the top of the fence panel edges.  And the center mound?  That's dropped by more than half, too.   We're getting close to the start of leaf collection season, so that mean

Turning And Re-Pile'ing Compost - September 2022

Image
Earlier this week I posted a couple of updates on our compost project.  First, I shared photos of the black gold compost that came out of our tumbler .  I spread that material on the front beds as an amendment and a way to try to improve the conditions up there.  Then, I posted some photos of what the pair of bins looked like pre-turning and walked through how I emptied them to get down to the 'most done' material (at the bottom of the mixed bin - under the passive aeration pipes) in an attempt to fill the tumbler and get the balance of the material ready for re-pilin'ing.  At that point, I had two full-to-the-top bins.  The one on the right, properly mixed.  The one on the left...not so much.  It was filled with Fall leaves and whatever I picked up this season including all the thatch from my backyard lawn renovation project. My plan was to open up the front panel of the bins to allow me to empty the bins to allow for proper mixing, then put the front panel back in place

Compost Pile Update and Turning - September 2022

Image
I mentioned a few days ago that I had begun to empty the compost tumbler and spreading the black gold out in the beds out front as a soil amendment .  Having that tumbler empty means that I can begin to tackle the other two bins.  Below is a photo showing the current state (early September) of the two bins.  Of note, you'll see in the bin on the left AND in the wheelbarrow, I have recently added a big batch of grass clippings and thatch that I removed from our backyard.  Both bins are full up to the top. I began to turn these piles by starting to empty the bins.  The bin on the right is a proper mix of greens and browns.  And has passive aeration in it.  The bin on the left was empty up until last Fall when I filled it up with mulched-up leaves.  It was (then) mostly browns.  And now, it is topped with grass - mostly greens.   So, these bins need three things:  first...pulling out of the most-done compost material that I can fill up the tumbler to get a batch of 'finished'

Spreading Compost (Black Gold) on Front Porch Beds - Amending the Soil - September 2022

Image
On my 2022 to-do list were a few items related to compost that I've begun to address in the past week or so since the weather has started to cool down.  If you go back and look at this year's list , you'll see that #13 focused on MAKING compost and using what I have while #19 talked about improving the soil conditions in the front of our house.  This post is about how I've combined those two things by using the compost - or Black Gold - that is in our compost tumbler and applied it to our font porch beds.  First, have a look (below) at the makeup of the compost that is currently in our tumbler.  Do I turn this thing regularly?  No.  Is it in the sun?  No.  Do we still get a pot of black gold compost at the end of the Summer?  Yes.  Here's proof: I wanted to take it a little bit at a time (to start), so I began to fill a couple of five-gallon buckets with the compost.  See below: And, brought it up front to the beds where I'm dealing with a mix of hydrophobic mu

Disneyland Roses - Winter Protection vs. No Protection - March 2022

Image
On the southside of our house, we have three different Disneyland Rose bushes.  They're floribunda roses and the two that are to the furthest East were planted directly into their spots and on the closest to our backyard was transplanted last Spring.  That transplanted one seemed to recover once Spring arrived and leaf'd out .   During the past two winters, I've built a little ring around these Disneyland roses with a net of garden/chicken wire and then filled it with mulched leaves in an attempt to protect them from the dangerous Winter temperatures.  However, I don't really know the efficacy of the protection since in the 2020/2021 Winter, I protected all of them.  So, this past Fall, I decided to leave one of them out - without any protection other than being tucked in against the house on the southside.  You can see the photo below showing the transplanted Disneyland Rose on the left - without protection - and one of the other, larger ones - on the right in the mulc

Late Winter Compost Bins - March 2022

Image
The last time that I showed the state of our two compost bins in the far back of our yard was back in early November when I had just topped the bins with their final collection of grass and leaves.  You can see that post here .  Below, you can see the current (this week) state of the bins after a Winter of snow and compaction.   On the left is a browns-only bin.  And on the right is a mixed bin with some passive aeration pipes inserted in a couple of spots. Not a TON of compaction, is there?  The temperatures are really working against any active decomposition during the Winter, so gravity is what is mostly at play.  The bin on the right had some compaction - and was aided by that log on top.  One of the things I'll get to this Spring is doing a full-turn on both bins and working in more of the browns from the right to get a 'cooking' bin set up for success this Summer.   I suppose, I should include in my 2022 to-do list an item on compost.  I think the right goal is to pu

Compost Bin Snapshot - Early Fall 2021

Image
These are the days for filling up our compost bins.  Each Fall, the leaves in our yard drop all of their annual leaves and I use the mower to mulch them up and pick A LOT of them up off the grass .  My process is actually a little nuanced in terms of mulching vs. bagging.  I use my Ego leaf blower to clean out the beds and push all the leaves to the middle of the yard on the grass.  From there, I use my mower - with the bag attached - set to the lowest level to begin to mulch-up and vacuum all the leaves.   However, I don't immediately clear the mower bag once it is full.  If you've done this (like I do), you know when the bag is full because you start to see dust and little leaf parts flying around because there's no place for them to get ejected into the bag, so they kind of fly out the sides.  I'm doing that on purpose - so I leave a little bit of leaf litter (mulched up, mind you) behind on the lawn to feed the soil. But, after doing that for a couple of passes, I e

Active Compost Cooking - Over 100 Degrees - September 2021

Image
A week ago, I posted some photos and talked about the new (to me) process of laying in some 'alfalfa cube soup' in my active compost bin as I turned it over and mixed the browns and greens.  That layering of the material that I've collected since last Fall in the one, active bin, came after I had turned over the top of the active bin and removed all the (mostly) black gold from the bottom a week prior .  We're still in the heat of Summer - with air temperatures in the 80's and 90's around here, so it is prime compost decomposition time and 'active' time in our bin.   I have measured the temperature of my bins before - earlier this Summer, I was seeing temperatures of the pile above the air temperature, but only in the 'steady' category .  Somewhere between 80 degrees and 90 degrees.  I posted a photo of my long-stem compost thermometer here back in July showing right around 90 degrees .    Where are we after the alfalfa soup and turning the pile

Compost Bin Layering Using Alfalfa Cubes - Late Summer - 2021

Image
Over the weekend, I posted a couple of photos that showed the latest turn in our two-bin and one tumbler compost setup in our backyard .  Since last Summer, I had one bin (the one on the right as you face it) in 'cooking' mode.  That one has some pvc pipes installed for passive aeration and was (mostly) the right mix of greens and browns.  The second bin (on the left) has been my storage, inactive bin.  I almost everything in there that I had collected since last Fall.  That means, once the bin on the right was full of the final grass and leaves combo from early Fall, I started to put in everything on the left. In the post from a few days ago , I showed how I had emptied out the active bin and took the (mostly) finished compost and moved it to my tumbler for a final few months of cooking.  My plan is use that compost come Spring time and will use the rest of the Summer and Fall to get it finished.  I also took the rest of the (not quite finished) material from the active bin (t

Late Summer Compost Bin Update - August 2021

Image
The last time I posted about our compost bins was back in mid-July when I measured the temperature right at/below the 'cooking' zone .  Since then, we've had the hottest weather of the year and that means that we had some 'action' in our bins.  Below, you can see in the photo what our two-bin setup looks like right now.  On the right, an empty bin.  On the right, a (mostly) full bin.   Compare these with what the same thing looked like in May of this year when both bins were (mostly) full:  This photo above is from May of 2021. Where did all that material go?  Well...the good news is that the bottom of the bin on the right looked like this below: Lovely stuff.  Black gold?  Almost. But, no smell.  No mud.  Just kinda feels great in your hand.   Where did this stuff go?  Into our compost tumbler - to be finished for next Spring.  My plan now is to run a three-bin setup that uses two large storage bins and our tumbler for finishing.   Below, you can see in the photo w

Pre-Turning Compost Bin Temperature Check - July 2021

Image
I haven't turned my compost bins - nor added accelerator of any type - since last Fall when I piled in the leaves that fell on our lawn.  The good news (I suppose) is that with the air temps up in the 90's recently, the interior of the pile; even the part with the pvc aeration at the bottom , is up near 90 degrees in the lighter green 'steady' category.   I'm no compost expert, but I'm taking the 'steady' category as meaning that there is *some* level of decomposition going on, but, it isn't 'active' cooking.  Since I put these bins in the shade, I know that some effort is required to get the temps up above 100 degrees. Which leads me to my next steps:  I have a four-part project in the next few weeks.   First, I'll fork out the contents of both bins.   Second, I'll add some additional perforated pvc pipes for passive aearation. Third, I'll soak the Alfalfa Cubes and begin to layer things in. And fourth, I'll try to pile EVER

Spring Compost Bin Compaction - May 2021

Image
The last time that I posted about our compost bins was back in October when I showed it about 3/4's of the way full with the season's leaves and a little bit of grass clippings.  By the time the snow fell last Winter, I had stuffed the primary bin to the VERY TOP and filled the second one most of the way.   Today, posting a view of the bins as they sit right now - having compacted over Winter.  First, the primary bin - this one is back down to about 3/4's full.  It has had a full Winter of snow pushing down on it.  This bin also has passive aeration down at the bottom.  It will need a turn in the next few weeks then I'll add some fuel to try to get it cooking this Summer. Here, below, shows the second bin.  This one was full of (exclusively) leaves last Fall.  I've thrown all of my early Spring cleanup in there.  And, I'll use this bin as the 'turn' portion - when I fork out all of the contents of the main bin, I'll put them in this secondary one. 

Relocated and Refilled Compost Bin(s) - October 2020

Image
The last time I checked in on out compost bin was in May of this year before the heat of the Summer worked to heat up the pile.   At that time, I had the 3 bin setup in the easement behind our yard.  One active bin, one carbon storage bin and one nitrogen storage bin.  Earlier in the Spring, I worked to install a passive aeration system by inserting six 2" perforated pvc pipes in the bottom third of the pile . But as fall arrived, I've come to realization that the pile isn't in enough sun, so I thought that I'd move it to a place where I think it can get a little more heat.  That meant deconstructing and digging out the full pile.   When I dug out the bottom of the pile, I came to the realization that something had occurred.  Why?  Because we had some black gold.  Either time.  Or the passive aeration.  Or both? Something exerted the right pressure on the pile and transformed our yard waste into that black gold.   The other thing that I noticed is the shrinkage.  The

Mid-July 2020 Compost Bin Look

Image
Sixty days or so ago, I posted some photos of our three-bin compost setup that I have back on the easement behind our property.  If you go look at the bins in Mid-May, you'll see that the 'active' bin on the left is just about filled to the top.  Earlier this Spring, I added passive aeration and then made a mix of browns/greens that I had on hand.  Today, the photo at the top shows the bins in their current state.  The active bin has compacted significantly.  And the nitrogen/green bin (in the middle) has some clumps of turf and topsoil in it. A couple of things of note.  First, about the time of that photo in Mid-May, I added some compost starter to the pile .  And, I took a couple of bags of grass clippings off the backyard and threw them on top and mixed them in with my pitchfork in an attempt to get the ratio right for high heat. Here, below, is a head-on photo of my active bin.  You can see some of the grass clippings in the front on top and there are a few pi

Mid-May 2020 Three-Bin Compost Setup Update

Image
Last May I built out our three-bin compost set-up .  One active bin. One carbon storage. One nitrogen storage.  That was a year ago - and the bins were.... empty . I did a check-in on the bins in December and showed all the leaves that I had picked up from our yard, but the bins weren't that full.   Once the weather turned, I started to fill the bins with yard waste and started to see enough volume to fill the active bin.  I knew that I wanted to get a good batch 'cooking' this Spring, so I decided to install a passive aeration system a few weeks back .  When I did this pvc pipe project, I opened up the bin, cleared all of them out and started from scratch - both to get the right combination together, but also to 'turn' the stuff that was at the bottom as there was a lot of anaerobic decomposition going on down in the bottom. While I had the bins empty, I clipped some of the fence panels to allow for the pvc pipes to 'pass through' the front.  I di

Boosting Our Compost Bin And Tumbler with a Compost Starter

Image
I'm adding this entry to my [ garden diary ] to mark the date when I added this Jobe's Organic Compost Starter to our active bin and our tumbler in the Spring.  If you're not familiar with a compost starter, here's a good overview of what they are and what they do. There is some competing views on the value of a compost starter or booster, but if you believe the claims and buy one with 'microbes', then your compost starter - like the one above from Jobe's - is cultured to speed the decomposition of the materials in your pile. There are a bunch of people who say that they don't really do anything - but for less than $10, I figure...it can't really hurt, right?  It contains no synthetics and is made up of things that you can buy at a garden center like Bone Meal, Feather Meal, Potassium, and manure. I used this same product last year, but I don't think that I posted about it in the garden diary. Here's the listing on Amazon (note...

DIY Passive Compost Aeration - Perforated PVC Pipe Inserted Horizontally - May 2020

Image
Number 6 (#6) on my 2020 To-Do list in the garden this year was to add some passive aeration mechanism in our compost bin setup in the backyard.   I have a three-bin setup (one active bin, one carbon storage bin, one nitrogen storage bin) and a 50 gallon tumbler.  Last Fall, the active bin (on the left) was about half-full and I was storing the excess leaves in the carbon storage bin (middle) . Earlier this year, I posted some discussion about various passive compost aeration techniques - including one design with vertically installed pvc pipes and another with horizontally inserted perforated pipes.    After poking around on the Web, I decided to go with 10' sections of 2" perforated PVC pipe inserted horizontally in the pile.  My bins are 3' x 3', so I cut down 6 40" sections.   Then, I grabbed my garden fork and started to dig out the active bin of compost to get the volume low enough to install the pipes at a level that would make them work well

Revisiting Compost Aeration Techniques - For Springtime 2020

Image
A slight pause from the [ tree dreaming ] posts to quickly revisit my three-bin compost setup.  Winter means idle time for me in the garden, so I've been thinking about projects to work on this Summer and that includes my compost pile setup.  I have two compost setups:  first....a large 80 gallon tumbler.  And then a 3-bin fence setup.  The tumbler is in our yard and I filled it with quite a bit of browns this Fall and included some greens (grass clippings).  With Winter here, the composting is very slow, so I've been bringing some kitchen scraps out there including vegetables, coffee grounds, egg shells to try to add some nitrogen. The three-bin setup is one that I haven't touched since the Fall after I piled on leaves. I set it up in Spring and started to add some material. I revisited the bin on December 1st when I had filled the left bin and the middle bin with Fall leaves (carbons).  A couple of weeks later, I posted about how I haven't been good about '