Posts

Showing posts with the label mulch beds

Before/After: Cocoa Bean Shell Mulch Around Saucer Magnolia Tree

Image
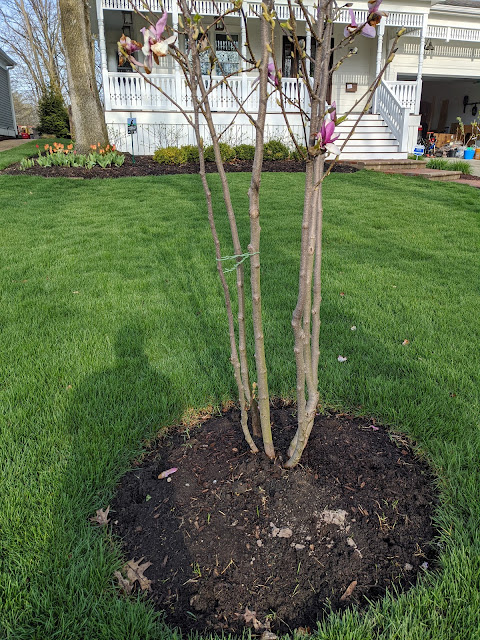
Yesterday, I posted a photo of the bags of Cocoa Bean Shell mulch that I picked in Wisconsin and mentioned that I was planning on using it in our front yard.  I got started with some of the trees in our front yard and will get the larger porch bed next.   Below, you can see the before picture of our front yard Saucer Magnolia tree.  I mulched this tree ring with Cocoa Bean Shell mulch last year, so this is about 11 months since last mulch application.   You can see some of the flowers that are still clinging to the Magnolia - as it flowered this year after skipping a year last year.   And...now below is the 'after' where I applied a layer of the cocoa bean shells to the tree ring: One of the things that you have to do is to 'water in' the mulch to kind of set it up and when you do that it darkens the cocoa bean shells little bit.  After I do a few more tree rings, I'll water this stuff in to set it. The cocoa bean shell mulch looks great from th

Cocoa Bean Shell Mulch - For Our Front Yard 2020

Image
Once again, I'm going with Cocoa Bean Shell mulch in our front yard this year.  On a recent trip to Wisconsin, I stopped at the Hull Farm outside of Lake Geneva and bought ten bags.  They sell it for about 50% the cost of Menards, so buying direct is worth the trip if you are buying in bulk. We first saw the French using Cocoa Bean Shell mulch in the beds at Luxembourg Gardens in Paris last year and ever since, it has become something that I wanted to bring to our home garden.    Last year, I applied bags of the stuff to the front beds and around a couple of trees .  This year, I'm going to replicate that plan and use it just on the front yard beds - to keep the cost in control and to keep it away from Lizzie.  I'll post some photos of the beds once I put the cocoa bean shells (or hulls) down on top of the existing mulch/shells. There are a couple of things that I like about this particular kind of mulch including the 'mat' that gets created as a weed barrier

A Few Transplanted Hostas - Under Hornbeams - May 2020

Image
The hostas that are emerging from the mulch in the blue circles are ones that I've planted over the past few seasons.  They were taken from other parts of the yard, divided and planted in this bed.  I have nine blue circles, but I think that there are 11 current hostas with a couple of them being just 'tips'. The two hostas in red circles are non-variegated hostas that I dug up from around the kitchen window, divided and transplanted here.  These are some of the 'teardown hostas' that I've posted about over the years including when they flowered last year .   If I get around to it, I'm going to dig up another bunch to split and transplant further back in the bed - along the fence - like the two current transplants.  I think a blend of different color hostas would look nice filling in this area below the trees. I also transplanted some of these hostas around the tree swing Oak tree - and I'll post about that tomorrow but the most critical part of t

Floating Mulch Flagstone Retaining Ledge Installation

Image
A couple of days ago, I posted a photo of some of our orange tulips blooming in the front yard and mentioned that in that photo there was a detail of a small (potentially partial) project that I had knocked off my list.  In the photo at the top you can see that project: a little buried flagstone retaining 'ledge'.   In mid-April, I posted about my 'floating mulch' problem in this area due to the grade (it is on a slope) and water run-off (some gutter downspouts come out in this area).   In that post, I speculated that if I dug-in some retaining blocks that I could keep the cocoa bean hull mulch from migrating too far into the lawn.  But, at the same time, I didn't want to make it super visible from down near the sidewalk.  What you see at the top of this post is my compromise.  I dug in the blocks a few inches and left them proud of the mulch by about 1/2" or so.   If you look at the photo below, you can get a better sense for how they look from a

Orange Double Late Tulips Blooming - Front Beds - April 2020

Image
The Orange Double Late Tulip bulbs that I planted in the Fall of 2018 have sprung up and are in bloom while the red-ish Crystal Beauty Fringed Pink Tulips that were planted at the same time haven't flowered at all.  I planted 25 of each at the same time and last year they bloomed (for the first time) at the same time.  You can see that post showing the flowers here .  I count either 23 or 24 of the initial 25 have bloomed this year, so that's a nice year-two-rate. This is the only pop of color that we have in the front yard beds and it comes in early Spring.  Nat was just telling me that she wishes we had more color in the front yard, so that's something we'll have to work on. I posted a photo of these tulips in early March emerging from the mulch .  And, this is the same section that I've covered in the past about trying to 'balance' out the colors by adding yellow to the mix .  I didn't get around to buying bulbs last Fall, but it will be on m

New Mulch Beds - Northside Behind Oak Tree Swing

Image
Yesterday, I shared a video of our twelve yard mulch delivery and my plans to spread it around our property as part of my (new) social distancing project plans.  One of the areas that I mentioned in that post as a 'net new' bed was in the area by our tree swing - what I've billed as " Priority Area 2 " earlier this Spring.  Here's a new look at that area from our bedroom (zoomed in) that shows how I've take what was once a mulch island (just a ring of mulch around that big Oak) to more of a continuous bed. I took the tree ring - that you can mostly still see and extended the bed all the way to the right where one of our large Chanticleer Pear trees is located.  And to the left, I created a whole new bed that was a mix of thin grass, weeds and, frankly...leaf mulch.  Have a look at this post - featuring that River Birch behind the Oak tree - to see what I'm talking about.  This area was some grass, some weeds and never really defined in any way

12 Steaming Yards of Hardwood Fine Mulch Delivered - Spring 2020

Image
Recently, we had twelve steaming yards of hardwood fines mulch delivered to our driveway from Best Firewood and Mulch - the same folks who deliver our firewood.  That's the delivery in the video at the top of this post showing the driver doing a little bit of 'jiggling' with his lifted bed to get all of the mulch to drop.  Nine years ago, I posted a similar video of ten yards of mulch that was dropped on our old driveway.  You can watch that video here .  This new mulch is destined for the beds that I pointed out in my recent garden tour post  and will fill in the spots between the front (where we're doing the cocoa bean hull mulch) and the far back (where I've been doing the wood chips from the Villag e). I have a seven cubic yard cart (wheelbarrow...but not a traditional wheelbarrow).  There are 27 cubic feet in a yard.  Let's figure that it takes four carts to get that yard.  Twelve x four per yard = 48 carts lugged into the back and side yard.  Ther

Floating Mulch Solution: Installing A Small Retaining Ledge

Image
Our front yard is pitched from the house down to the street.  There's a significant grade difference between where our house sits and the curb such that our yard is on a slope and parts of our parkway are on a pretty severe slope.  But, so, too, are the beds in front and on side of our front porch.  You can kind of see/appreciate the grade difference in the photo above in this post. This is a profile view of the area that you can see in the photo on this tulip post from last year .  In that photo/post, you can see how the grade from about halfway back on the house all the way to the front of this bed is downhill.  But, it also slopes away from the foundation, too. This area is where I get the most erosion in any of the beds around our property.  We get rainwater erosion and plenty of floating mulch.  A couple of times a year, I break out the rake and pull the mulch back into the bed. Here's a post showing all the mulch in place .  If you look at the white boards on the

A Look Around The Yard - April 2020

Image
I wanted to take and share some photos in the [ garden diary ] here so I can look at the development of the shrubs and perennials in our yard.  I've already posted images of a few things including our Saucer Magnolia , Dappled Willow (treeform) , front-yard Cleveland Pear , some of our lilac buds , how we've added some wood chips to the far back and biosolids in testing and most recently, posted both hostas and peonies coming thru the mulch .  Here's a few items that I've covered over the years.  This is what they're looking like in mid-April, 2020. Starting with the northside Rhododendron.  This was put in the bed in 2018 and didn't flower last year.  Buds game looks strong this year.  This is the one plant that I applied Wilt-Pruf this Winter .  In the bed outside the screened porch, I planted a solitary Karl Foerster Feather Reed Grass a couple of years back.  We should add more here, I think.  I trimmed last year's growth off in March and th

Going All-In On Wood Chip Mulch (Far Backyard) - April 2020

Image
Well, that escalated quickly.  A little more than a week ago, I posted a photo showing the result of a five gallon bucket full of free wood chips/mulch from the Village of Downers Grove. Today, I've made 15 trips to what we're calling the 'mulch pit'.  I've gone all-in on the free wood chips/mulch for the very far back of our yard.  This is an area that I've done absolutely nothing to over the past few years and just let go natural. I've cobbled together a series of buckets, trugs and one garbage can that I believe - when filled - total about 9 cubic feet of mulch.  That's about 1/3rd of a yard each trip.  15 trips = 5 yards.  I'm not quite 50% of the way done across the back of the yard, but with the social distancing being extended for another 30 days, that means that I might be able to get the far backyard covered in this weed barrier before I end up getting back to the office.   I figure that I'll need about 20 more trips to get all the

The Hostas Are Back - March 2020

Image
It may be the last day of March, but - just like the peonies - the hostas are now tipping through the mulch.  You can see the purple tips that have sort of spiraled their way through the ground and are ready to unfurl in this bed underneath our kitchen window.  Those of you eagle-eyed readers might also spot something else in this photo:  a piece of burned wood/charred hardwood.  On the right side of the photo in the middle.  That's a result of spreading the hardwood ashes from our fireplace out in the yard .  I've put some of it in the grass, some in the beds including around these hostas.  This is the teardown hosta that I've been tracking since I transplanted it.  Here's a look at this plant in mid-Summer last year .  This is a bed that I'm going to try to tend to with a topcoat of hardwood fine mulch because, as you can see, most of the remaining mulch is the larger, more coarse pieces.

Thinking of Free Wood Chips As Base Layer?

Image
Maybe it is this whole social distancing exercise and the idea of being cooped up for who knows how long.  Or maybe it is just the weather turning a little bit nice that has me thinking more and more about getting our yard in shape.  Either way, it has me turning my thoughts to mulch.  In the past, we've had our mulch delivered and spread by pros, but we haven't done the full yard.  I mean...we have a BIG yard to mulch and we've really only done the little bit in the front plus a little bit around the house/beds that were already created and planted.  That left the back 2/3rds of the yard with what I'd loosely call 'beds' around the perimeter of the back of the yard.  They haven't been tended to at ALL in terms of grooming and mulching with hardwood mulch (or fines).  I have, however, been taking my lawnmower and mulching up the Fall leaves and piling them up in the beds around the back as a Knowing that we might be hanging around the house A LOT more h

Tulip Bulb Tips Emerging From the Mulch - March 2020

Image
The very first tips of some of our Spring bulbs have started to poke through the mulch.  This is a tulip bulb in our front beds that are covered with cocoa bean hull mulch.  Which...now that I'm looking at this photo - sure looks pretty great.  The cocoa bean mulch is a rich, dark brown and composed of small flakes that are both breaking down, but not disappearing.  Compare the color to the few pieces of bark/wood that are in the bed and you can see how the color is much deeper in the cocoa bean mulch. These bulbs are the same ones that I documented last Spring - but later in March . One of the biggest problems that I have this time of year in this area is keeping these from getting stepped on.  This bed is in between our house and the neighbors whom the girls spend time with.  It is easy to trample these tips if they're not careful.  These are the red and orange tulips that I told myself I needed to augment with yellow .  But...I didn't end up doing it last year.

Spreading Hardwood Ash As Tree Fertilizer

Image
'Tis the season for fireplace burning in our house - and likely in yours.  That means that you'll have to deal with the ash that gets left behind after the wood burns.  We burn hardwoods exclusively (so far this year, we've burned Cherry and Birch) and that means we end up with hardwood ash.  Turns out, it has value in the garden as a soil conditioner and fertilizer.    According to the Oregon State University (Notice...I did include *the* for those other OSU lunatics) Extension office , hardwood ash can aid in making the soil an environment that supports plant and tree growth.  From the OSU Extension article : Because wood ash is derived from plant material, it contains most of the 13 essential nutrients the soil supplies for plant growth, according to Dan Sullivan, OSU Extension soil scientist.  "When wood burns, nitrogen and sulfur are lost as gas," Sullivan said, "but calcium, potassium, magnesium and other trace elements remain. The carbonates a

Japanese Painted Fern - Northside Porch - 2019

Image
All the way back in Spring of 2018, I planted a couple of ferns on the northside of our screened porch - in a spot that is in (I think) total shade all day long.  It felt like the right spot for ferns and hostas - at least as a temporary measure until I figure out the path/pavers that will run alongside the little bed.  One of them was an Autumn Fern.  The other is this Japanese Painted Fern.  Last September - almost exactly a year ago today - I posted a photo of this fern that was trying to establish itself after a rough Summer .  It was showing just.a.little.bit of growth then, but I was hopeful that this fern was going to make it.  The photo at the top of this post is from this week - and you can see that this Japanese Painted Fern has really come back and is spreading itself out in a big way.  I had a Japanese Painted Fern back in Elmhurst - that came back for a few years (when it wasn't smothered by mulch!) - so this isn't my first one of these varieties that ha

Teardown Fern Sprouts Second Vase - June 2019

Image
In the photo you see above, you'll see a large "vase" (at least that what I'm calling them for now) of Ostrich Ferns and if you look at the bottom of the photo, you'll see a smaller, second Ostrich Fern in the foreground.  The one at the top is what I've been calling the "Teardown Fern".  Here's a post showing this same Ostrich Fern a year ago in June of 2018 .    The top photo in *that* post is from when it was just un-furling and the photo at the bottom of that the post is what it looked like in mid-June.  Here's the original post when I pulled them out of our neighbor's yard in October of 2017 .  Hence...the whole " Teardown Fern " moniker.  This year, you can see that it has more fronds and is larger.  But...that's not the most important part.  That's the second fern that has popped up.  This thing has multiplied.    How nice.  These things do, indeed, multiply and I'm glad that it has matured enough to

Front Yard Tulips Emerge For First Spring - 2019

Image
Seems like this is the week for (finally) some action in our garden/yard that indicates Spring is actually arriving.  Yesterday, I posted a photo of what I think is a 'clump' 1 of Ostrich Ferns.  Today, let's talk about bulbs.   Last October, I planted 50 Tulip bulbs in one of our beds out in front of the porch, just underneath a giant Norway Maple .  At the time, I did my best to protect them from various critters, but as time went on, I noticed some digging in the area.  Between the skunks looking for grubs and perhaps squirrels with their eyes on the actual bulbs, somebody was pretty active shortly after I planted these bulbs.   And the soil?  I've talked about the soil we have close to our foundation.  It is terrible right now.  All clay.  If you read my Top 10 2019 Spring/Summer Gardening To-Do List , you'll remember that #1 on my list was to continue to improve the soil .  But, I've only have had one full garden season to work the soil and the

Everlasting Revolution Hydrangea - June 2018

Image
This is the third in the series of posts updating some plants that Nat's Mom gifted us late last fall.  Yesterday, I posted about the Tuff Stuff Red Hydrangea that is doing really well .   Today, I'm sharing the photo you see above to show the current state of the Everlasting Revolution hydrangea that isn't doing *as well*.  You can see that it is much smaller than the Tuff Stuff and the foliage is barely emerging from the mulch.  In fact, I had to kind of carve out a little hole/trench for this thing to even have a chance.  It is located about eight feet from the Tuff Stuff variety, so they're getting basically the same support - sun, water, soil.  But the difference is stark.  I've actually babied this one a bit more this late Spring and hope that it continues to establish itself a bit so we head into the Winter with a strong base/root system. I'll try to revisit this plant later this Summer/Fall to see how it has grown when the heat of the Summer hits Do