Posts

Showing posts with the label crafts

Toddler Birthday Project

Image
In a week, my niece turns two!  To celebrate, her parents are having a party for her where our whole family with gather.  I came across a fun project that *seems* appropriate for a two year old, so I started to put it together.  Can't spill the beans just yet on what it is, because my sister reads these posts on occasion.  After the party, I'll post a full how-to with more photos.

This Year's Easter Bunny Mold - 2012

Image
The mold for my Easter Bunny Faux Chocolate craft project arrived via the USPS a few days ago.  He's about 11" tall which is about the same as the ones I made last year.  Here's last year's version of the Faux Chocolate Bunny craft project . I made four of them last year with Durham's Water Putty and gave three of them away.  Hopefully, I'll find time to make at least four of them again this year to start what I'll call a 'collection'. Now that I have the mold, it is just a matter of buying enough Water Putty and paint!

Mark it Down: Rope Light Christmas Craft

Image
This is the second year in a row that Christmas came and went and I didn't get this craft project done.  I've been sitting on two packages of rope lights for more than 700 days and things always get to crazy in December and I don't get this done. I'm writing this note to myself so I keep me honest and get this done in 2012.  "Joy" it will be.

Renegade Holiday Craft Fair - 2011

Image
For the 3rd year in a row, we spent part of our weekend at the Chicago Renegade Holiday Craft Fair at the Pulaski Park Fieldhouse.   Here's my post on our 2010 visit . And, just like in years past, I *really* want to like Renegade.  The bright spot for me was the parking this year:  we found a street spot (which was in a marked zone, but we got lucky with no ticket) and were only 1 block away.  Once we got inside?  It was much better than last year - either the aisles were wider or there were a lot less people milling around. We opted for no stroller - which is the ONLY way to roll at this event but the Babe wasn't that interested in being hauled around and wanted to walk herself. Nat picked up multiple items for gifts - which is a good outcome for her - but I haven't quite come around on the event.  It wasn't as terrible of an experience as it was last year, but I must be outside of the main demographic.  Too many screen printers.  And...what's with the mu

Parrillo Family Photo - September 2011

We took this photo at the summer Renegade Craft Fair in the city.   Here's the photo from 2009 (note where the Babe is in the first one!) and one from last December .    Beard in all 3. December 2009  December 2010

How to: Faux Chocolate Bunnies for Easter

Image
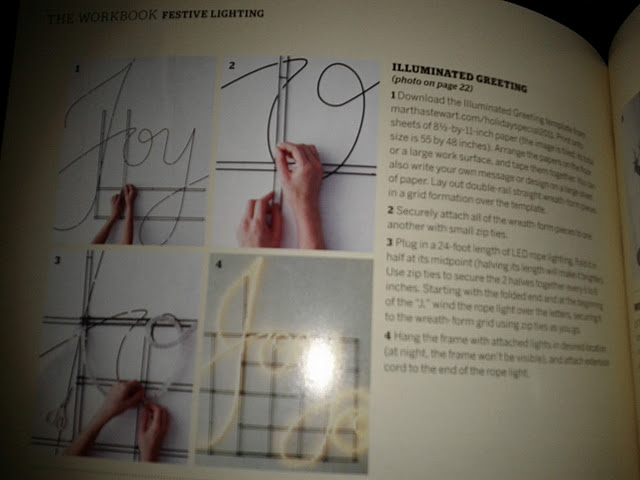
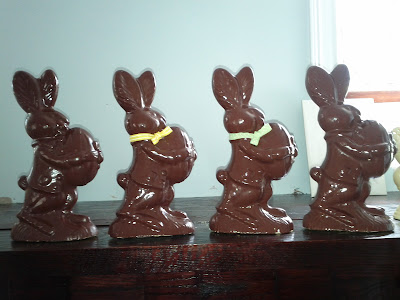
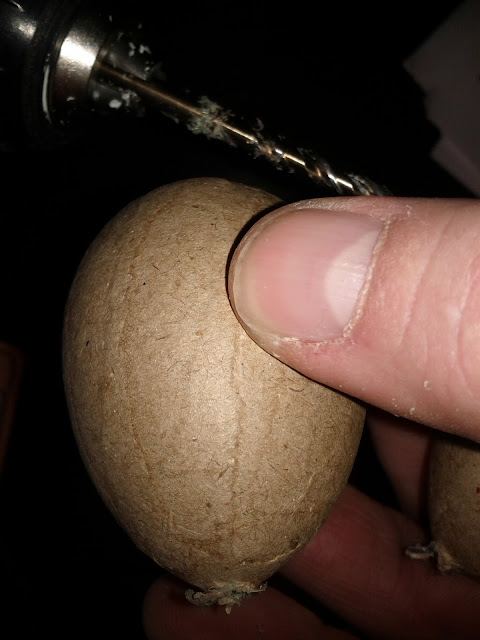
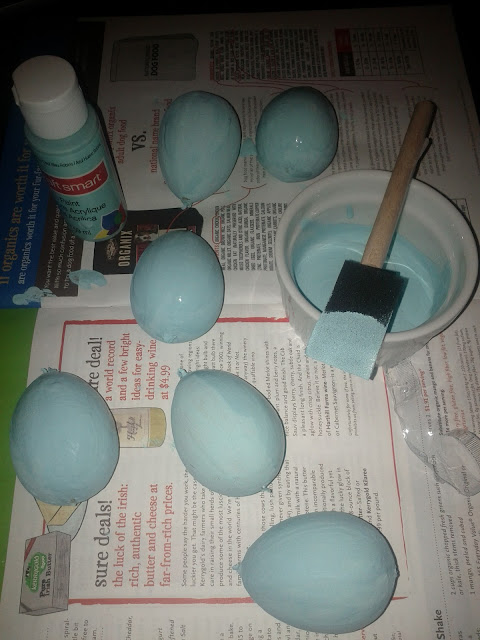
For Easter, I decided to take on a craft project from Martha Stewart that seemed kind of manly.  I chose to make these Faux Chocolate Easter Bunnies .  I ended up making four of them: three as gifts and one to keep for ourselves.  I believe Ms. Martha herself makes different chocolate bunnies each year, so perhaps this will become a tradition.  I suppose I'm only limited by the number of molds I can find. Martha Stewart's Faux-Chocolate Bunnies Tools Required: Easter bunny chocolate molds Binder clips Clothespins Scissors Bucket Bamboo skewer or other long, slender stick File, sandpaper, and/or Dremel tool with a sanding attachment Durham's water putty Drill with paint mixer attachment, or paint mixing stick White primer paint Brown paint (Martha used liquid acrylic -- a mix of burnt sienna, burnt umber, and white) Clear satin topcoat Paint in a variety of colors for details Ribbon and flowers for embellishing This year, I bought a mold at KHL Molds - p

Easter Egg Garland - How To

Image
Over on Martha Stewart's site, you can see her instructions and how-to, but I made a few modifications to the products and tools so I'll walk you through this easy project.  This could be something fun to do with kids, but it isn't a one-day project because of the painting and the multiple colors involved. Things you'll need for the Easter Egg Garland: 5 dozen (more or less if you want) paper mache eggs spring color paint (I chose 5 different pastel colors) paint brush (I used a foam brush) 5 or 6 feet of ribbon - pretty thin ribbon A drill and a 11/16th inch bit (you can use any size bit that will allow your ribbon to pass through wooden skewer (or beading needle) to push ribbon through holes Martha calls for real eggs.  Yup.  Like blown out eggs that you would have on hand around Easter-time.  In fact, she calls for you to dye the eggs just like you would normally.  I figured there had to be a better way not just due to the fact that blowing out eggs, well.....bl

Easter Crafts: Painting the Egg Garland

Image
Progress has been made on my Easter  egg garland - I've begun painting the eggs various colors.  When they're done, there will be five different colors of six sets of eggs - for a total of 30 eggs.    I'm thinking that I should have primed these eggs and I likely should have used spray paint, but experiment and learn, right? Hopefully I'll find some time this week to put the remaining coats on the eggs and string them up.  Easter is less than 2 weeks away!

2011 Easter Crafts - Second Project: Durham's Water Putty

Image
After seeing this charming can in the hardware store for many years, this week was the first time that I actually went and bought Durham's Water Putty.  Look at that strongman on the can:  he's pretty trustworthy, isn't he?  I sure hope so because I've begun to work with this stuff on my second Easter craft project.  This one is a bit more secretive and I won't be sharing what exactly I'm doing because I'm (hopefully) going to be gifting this craft project for an Easter present.   I can, however, say that after working with this water putty for a bit today, it sure has a lot of uses I can foresee and does become "rock hard" as the can implies.    I'll show you the results closer to Easter and perhaps even share the how-to in the project. 

How To: DIY Personalized Front Door Mats

Image
One of the Christmas presents we gave our family was personalized outdoor door mats.   Using this post by Martha Stewart as my inspiration , I set out to make mats with names on them - while Martha's uses numbers.  We started with plain mats from Ikea.   The ones we bought are called Trampa and run less than $10 each. Just like M artha say s, I first started with creating a border.  For these, I used blue painters tape to make an edge that would remain un-painted.  From there, because I was doing names, not numbers, I had to create a stencil.  I did this by printing out the name on paper, affix it to a piece of posterboard and pricking holes through the posterboard to create an outline of the name.  Using a pair of sharp, small scissors, I cut the letters out - leaving behind custom stencil. I popped the stencil in the middle of the mat and taped everything down. Then came the easy part:  spray painting the mats.  Being careful to protect the mat I used a piece of scrap cardb

Sourdough Starter: Day Three

Image
It's alive! Look at all those bubbles!  That's a wide-mouth quart mason jar and the starter is all the way up to the top lip.  That's a lot of growth.  Right after I feed the jar, I split it into 2.  If all goes well, I'll have 2 starters to work from for those occasions when I'm doing a lot of baking.  Just a few more feedings (and thin-ings) and we're on our way to dough.  Lots and lots of dough. Sourdough Starter:  Day One Sourdough Starter:  Day Two

Sourdough Starter: Day Two

Image
Looks like we might have something, here!  After feeding the starter some flour and water, I'm seeing some bubbles. This *should* double in size in the next day.  After a bit of thin-ing (dumping of some of it to remove acidity) and feeding, we should be on our way to the finest breads and pizza skins in the land! Sourdough Starter:  Day One

Sourdough Starter: Day One

Image
For Christmas, my mother-in-law bought me a sourdough starter from Sourdo.com .   Yes.  Finally.  Some of you might remember that I was asking for one back in June for Father's Day.  This particular culture is of the Italian variety and comes from Ischia - right in the northern end of the Gulf of Naples . The starter takes a few days of work to get started and requires some specific steps.    The first of which includes getting the starter in a jar and bringing the temperature up while it proofs.  This is my kitchen hack of a proofing box - a plastic tub with an Illini nightlight rigged inside.  So far, so good.   It is like a thick pancake batter. 24 hours from now, I get to move on to step two - if this goes as predicted.  We *should* have bubbles and a bit of fermentation action.  My fingers are crossed.  I hope yours are, too!

Noel Angel Candleholders

Image
With Christmas already in our rearview mirror (sad, isn't it?), I needed to document the latest addition to our decor before it gets packed away.  In early December, we went to a vintage Christmas fair on Randolph Street in the city.  We've gone the past two years and have come home with a handful of treasures each year. These guys were my favorite buy this year and they've been sitting near our front door in the entry - so we get to see them a lot. They're stamped "Japan" - so I'm guessing that dates them to before WWII, right?  As with most people's Christmas and their Christmas decor, things just keep expanding.  Or...as my brother-in-law once put it:  "Christmas is like the universe.  It keeps growing each year." I'll have to remember to put these guys back up by the front door.  That is, if I can get my attention away from building the baddest Christmas Village ever!

Penny Hockey (Topper Hockey) - Stamping on the Undercarriage and Rules of the Game

Image
Christmas is here and the Penny Hockey boards (Topper Hockey!) were a hit!  Nat and I gave our gifts to my family last night on Christmas Eve. The boys get A LOT of gifts from Santa and others at my folks, so it takes a lot to grab their attention.  I'm hopeful that they'll pick up their boards in the coming days and fall in love with the game like I did. On the 3 boards I made, I stamped each one with the name of the game (Topper Hockey), their name and also left room for a second owner.  Getting them to think of the game as something that they can enjoy and share with others is important and this way, they understand that this isn't a disposable gift. Also...if you look closely, you'll see that Topper Hockey hasn't left 'beta' quite yet! I stamped my initials and the year in the bottom corner - so they remember when the game showed up.  I also included a "History of Topper Hockey" (written tongue-in-cheek) and the official rules of the gam

Family Photobooth Photo 2010

Image
At the Renegade Craft Fair last year (2009), we sat for a photobooth session and came up with this image.  The 2009 post is here - but included below for comparisons sake.   This year, the Babe played a starring role.  They're certainly not as formal as some family portraits. But, for us, they're much cuter!

Renegade Holiday Craft Fair - Chicago 2010

Image
We trudged through the snow today to go into the city to the Pulaski Park Fieldhouse for the annual Holiday Renegade Craft Fair .  Nat's mom and sister came along and we made a day of it. I have to be a bit honest about it:  I really, really want to love Renegade.  In fact, last year, we had a great time, bought LOTS of gifts, and swore that we'd never miss it. But this year?  Meh.  At least parking (for us) wasn't terrible.  We didn't have to circle for 30 minutes - just took us about 5 minutes to find a spot.   From there, the fair - while having some great vendors/products - was just simply too crowded to be fun.  Perhaps it was the time went (2ish in the afternoon), but we really couldn't get too close to any of the tables.  In the end, we only bought one thing (gift tags), and that really is  a shame.  Maybe the vendors like a full house?  But...I'm guessing they don't.  There has to be some operational study done to figure out what the maximizatio

Cat and Pumpkin Join the Owl

Image
I told you the Owl was getting lonely. The cat turned out the best, but I think that's because he has chompers.  I have yet to decide if these are worth keeping in storage for next year or if now, since it is November, these should get chucked.  Maybe they'll join our owl pumpkins in the compost bin?

More (Paper) Owls

Image
I didn't want my pumpkin owls to be all alone, so I folded up an indoor companion.   Using these as guidelines , I accordion-folded some construction paper.  He's a little amateurish, but that's fine with me.  I used the hot glue gun and I think that was a mistake, but being me, I also took a stab at the largest one - which according to the comments on the page is the one with the highest difficulty.   If I have time today, I'll make him a pumpkin and cat friend - perhaps in the medium version.  Spooky owls can't be sitting on our window sill all alone, right?

Michael's Has Wooden Balls

Image
Unfortunately for me, just in one size:  2.5".  They have plenty of "doll heads" which are wooden balls of various shapes and sizes with one side of them flattened out to allow for said ball to perch on a pair of shoulders, I suppose. I have a project that requires three different sizes of wooden balls and I was hoping that I'd be able to buy all of the in-person at Michael's.  I'll have to turn to some online shop to get the other sizes.  There's always Hobby Lobby, but being deeply religious folks , they might be out of the ball-business all together.  What...with the bad puns and all.