Posts

Balancing The Color Pallette In Our Front Tulips

Image
A couple of weeks ago, I posted some photos of the newly bloomed tulips that came up in our front yard bed right in front of the large Maple tree.  Go see that photo here .  They look - to me at least - to be orange and red.  I say that because the reds were *supposed* to be pink, but they came out much more like a true red.  They looked great.  Or at least I thought they did.  That was, until I came across this ebook from Pretty Purple Door .  It is called " 7 questions to ask yourself to choose the right plants for your garden " and you can get it by giving her your name and email address here on her site .  I'm not going to link directly to the .pdf because she is running a biz, but I do want to show one little nugget that is in that guide.  She talks about color palette and then lists a few of her favorites and a few to avoid.  To be respectful, here's a screenshot, but I've blurred out the parts that aren't relevant here.  (Again...if you want the fu

Done: Backyard Tulip Bulbs Relocated

Image
Number one on my 2019 Gardening To-Do Addendum List was to relocate some of my Fall bulbs.  It didn't make my main To-do list for the year, but the two kind of go together.  Why's that?  Because #8 on the main To-Do list is to add some conifers to the backyard.    My thinking was that if I move these tulips from back against the fenceline, I can replace them with the Weeping White Spruce that I bought and move these closer to the front of the bed.    Here's what these same tulips looked like earlier this Spring .  I started to dig them and realized that moving blooming tulips is not for the faint of heart.  I dug deep and tried to pull out the bulbs and the ground with them.  Then, I poked around and tried to remove whatever weeds that had glom'd on to the bulbs and stuck them back in the ground.  Everything I've read about Tulips suggests that people often cut off the tulip leaves far too early because once the flower blooms, they figure that they should

Three More Canadian Hemlocks Planted - 2019

Image
Back at the beginning of May, I posted a photo that showed three of the six Canadian Hemlock tiny trees that I bought with a credit from an online nursery .  These things are tiny.   The official name is Tsuga canadensis . Sometimes they're called Canadian Hemlocks. Sometimes Eastern Hemlocks. Maybe 16" tall.  I mentioned in the post that I put the first three in the far back reaches of our yard and that I was planning on putting the other three on the northside. These aren't the first Hemlocks that I've planted, unfortunately.  I bought a tiny one just like these at Menards on a whim and put it in the ground last Summer.  By September, it was gone .  Done.  Not sure what happened to it, but I also lost our little Fraser Fir at the same time .  Guessing it was neglect via limited water? The three trees that are in this post (circled in green in the photo above) are the same trees that are specified in the landscape plan portion that I posted about in June of

My First Bonsai Pruning (Eeek...I Went Too Far)

Image
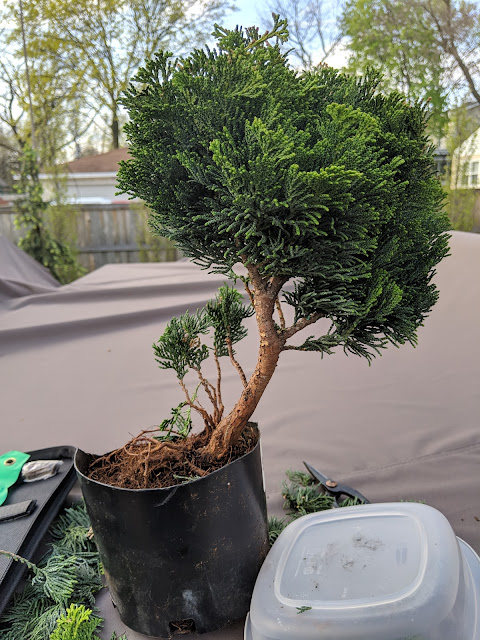
Back on May 7th of this year, I shared a couple of photos and talked about my initial excitement of giving the art of bonsai a shot with a piece of nursery stock that I picked up at Home Depot for $10 .  It is a Cypress Hinoki and had one large(ish) trunk that seemed to have decent trunk taper, very little reverse taper and priced so cheaply that if I killed the poor thing, I wouldn't be that upset. In that initial post, I talked about how I was following some of the Mirai Bonsai Basics video directions and started with the roots and trunk.  More recently, I moved on to the next few steps and began to try to prune the Cypress into a bonsai of sorts. I know that every article you read talks about how you aren't supposed to prune more than 30% of the tree at any one time and that pruning an evergreen like this Cypress is best done in the late fall when it the tree is heading to dormancy.  But, I couldn't, umm, help myself.  I dove right in. I began by pruning off

Trying A Blue Spray Pattern Indicator - With Creeping Charlie Spray

Image
Out in the backyard, we have what I'd call a real work-in-progress when it comes to the lawn.  Well...a work-in-progress when it comes to everything back there including the landscaping and trees and mulch and what-have-you.  But this post is about the lawn in particular.  The past two seasons, I've done what I'd call the minimum in terms of working the lawn.  I put down a synthetic crabgrass preventer with early feed, a weed and feed and a Summer feed.  I also put down a synthetic grub treatment and last season put down an organic insect killer that was supposed to treat for ticks and ants and other things.  But, I mostly left the weeding to chance.  When we moved in, we sodded about the first 100' of grass, then seeded the next 50 or so feet and left the balance to just be how it was.  There were plenty of weeds, crabgrass and clover back there.  The problem with weeds in the lawn is that they don't just stay in place.  They colonize!  They grow.  They move a

Our Current Yard Hydrant Setup - Spring 2019

Image
Last year, I came to the conclusion that due to the size of our property, having a hose that is connected to our main spigot against the house was basically unusable.  The hose would have to be 200+ feet long and would stretch all over the place.  What else?  It would inevitably end up being strewn across the lawn and get nicked up by our Automower.  My solution was this yard hydrant.  I bought this beige color one that has a hose holder attached and simply stuck it in the ground.  It has its own spigot and allows me to turn the water on/off at this point. I ran a rubber hose from the house out about 100 or so feet in the mulch beds.  I buried it just a few inches underground and connected it to the yard hydrant.  Then I have this existing vinyl 100' hose that I can use to run out to the various beds. This eliminated half of the problem of having hose laying around.  But, it still means that I have 100 feet of hose (instead of 200 feet!) that ends up laying around. Posti

30 Gladiolus Corms Planted - 2019

Image
The two varieties of orange Dahlias that I posted about a few days ago aren't the only flower that we planted recently.  The Dahlias aren't bulbs, technically.  They're tubers.  The flowers (or...hopefully soon-to-be flowers) here in this photo are 30 Gladiolus.  Turns out, Gladiolus aren't bulbs, either.  They're technically corms.  What the heck is a corm?  I had no idea, but I found this post that walks you through bulbs vs. corms vs. tubers .  These are the first corms that we've planted and the first time I've planted gladiolus.  I don't know why, but they've never been something that I've been drawn to over the years despite the fact that growing up I attend the Glad-Peach Festival in Coloma every year.  There were always tons of gladiolus.  But not that many peaches.  The Bird helped me plant there and I put them all in the bed between the last and the second to last Hornbeam on the North fenceline.  I decided to not plant them in