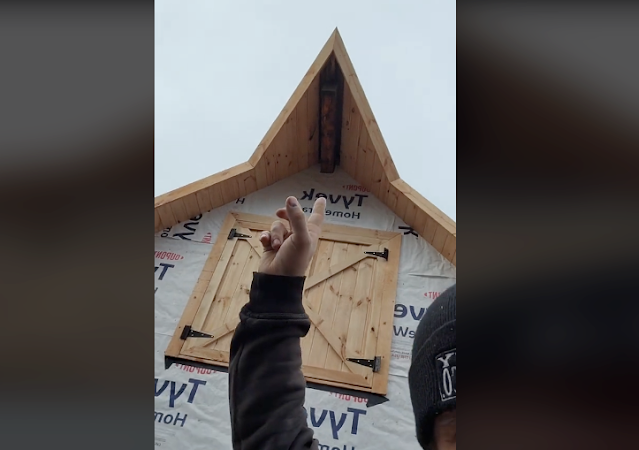
Posts

Showing posts with the label 2024 projects

DIY Pizza Oven Floor Template-Making - July 2024

Image
Last week, I showed the final form of the raised hearth - after I stripped the concrete-pouring forms from the four sides and talked about how I can now move-on to actual oven building.    For me, that started with creating a template out of Masonite.  I bought an 8x4' sheet and created a little circle-drawing jig that I cabbage'd together out of spare parts I had on hand.  The sheet is just 48" wide and after thinking about it, I've decided to make a 40" oven (interior diameter), which means the outside footprint diameter is 49".  That meant that I'm going to be a half-inch shy on either side.  That's ok.   I also needed to figure out where the dome meets the inner arch.  I started by attaching the circle-drawing-jig to the center of the board and drew out a 40" and 49" circle.  Then, I started to think about my arch sizes and how the inner/outer arch differ.  I chose to go with a 20-1/8th" inner arch width.   That meant that I could

Rebar Installed for Pizza Oven Hearth - June 2024

Image
The last I posted about my DIY backyard wood-fired pizza oven, I shared how I made and mounted the forms for the reinforced hearth on top of my cinder block stand.  With the forms set-up and square (and level), I began to finalize the rebar setup.  I ran a couple of rows around the flow-thru bond beam blocks that made-up the top row of the stand.  Before doing the rest of the rebar, I laid down a couple pieces of vapor barrier on TOP of the tile backer board segments.  Once in place, I ran vertical rebar up the filled cores from the foundation slab, through the block stand and out the top.   I tied a grid of 1/2" rebar together and spanned the hearth with seven pieces each direction.   I used zip ties to tie them together and some block fragments to elevate the center part of the grid.  On the edges, I tied this rebar grid directly to the vertical posts.   Once that was done with the rebar, I cut up some one-foot segments of 1/2" pvc and drilled holes through the tile backer

New Bed for Cut Flowers - South Sideyard - May 2024

Image
The southside sideyard of our property is like most suburban sideyards.  Long and narrow.  It is also one of the very few areas outside of our front yard where we get A LOT of sun.  Over the years, I've planted some things over there including three Disneyland Roses , a pair of espaliered Sugar Tyme Crabapple trees , some Summer Beauty Allium, Karl Foerster Grasses, a few various allium bulbs, our Indiana Street Iris  and last Fall I added a small Blue Star Juniper .  Closer to the front of the house, we have a pair of Limelight Hydrangeas that are adjacent to the porch. The bed along this side of the house has been the same size since we moved in:  long and thin and hugging the foundation.  Something about 18" wide.  Below is a photo showing the bed as it looked before I started this new bed project.  One other note (to future Jake) - the orange spray paint shows where the cable line is buried.   I've been talking about growing flowers since last Fall - and pushed myself

DIY Pizza Oven Foundation Slab Pour - May 2024

Image
After bending and installing the rebar, reinforcing grid and vapor barrier , it was now time to pour the foundation slab for our diy backyard wood-fired pizza oven.   As I posted about last week, I shrunk the foundation slab down to be 72" wide and 80" front-to-back.  It is 5.5" thick (2x6's for concrete forms).   This is sitting on top of six inches of 1/2" compacted gravel and a 48" deep of large rock drywell.   I used an online concrete estimating calculator tool and when you put those dimensions in, it says that I needed 42 60# bags.    I have to pour two slabs - this foundation slab and then, once I build the stand, an insulated hearth.  Each approximately the same size.   When adding those two up, I ordered 85 60# bags and had them delivered.  I opted for 4000 PSI concrete - as a little bit of an upgrade over the baseline concrete. Knowing that the labor involved in this pour is in two parts, I opted to split them up:  first...hauling the concrete

Potting Up Melina Fleur Dahlia Tubers - May 2024

Image
Back in December, I ordered some Dahlia Tubers from Longfield Gardens and planned to try to both grow them this year AND (importantly) treat them as something that I'll pull out of the ground before the season ends and attempt to over-Winter in my garage.  I bought two varieties - Melina Fleur and Cornel Bronze Dahlias .  They recently arrived and I decided to start some of them indoors.  The Melina Fleur tubers come two-to-a-pack, so I grabbed six one-gallon nursery containers that I had laying around and filled them with a sandy homebrewed potting mix.  It is a mix of sand + potting mix that I normally use for succulents.  Here, below, is a photo of the Longfield Gardens dahlia tuber packaging that lists some specs (18" apart, 32" tall). After potting them up, I brought them down to the basement in the window well.  This is south-facing and while it *is* the basement, they get good light down there.  I put them on some trays that I had laying around and watered them in.

2024 Yard and Garden To-Do List

Image
  The season is here. The Yard and Garden Season, that is. Each Spring arrives and I’m OVERWHELMED by what I need to do, should do, have to do, might do in and around our garden. The arrival of trees, shrubs, perennials and annuals at the big box stores and nurseries just add to the strong urge to GET GOING out there. But, over the years, I’ve learned that I need to prioritize. And plan. And give myself something to measure-up against, so I know that I’ve accomplished what I thought I needed to focus on each season. The first year I did one was 2019 and I've done one every year. Here is 2020 .  2021 .  2022 .  And last year - 2023 .  Each year, I score myself against the 25 items that I picked out.  Last year, in addition to scoring (22 out of 25 marked 'complete' ), I also wrote up a list of 10 takeaways/lessons learned that have become important in thinking about my path forward.  In that list of 10 takeaways, I included things like:  no more shade trees (for now)

DIY Wood-Fired Pizza Oven Construction - Initial Excavation For Foundation - February 2024

Image
This past weekend, I posted a list of 'early potential priorities' out in the yard and garden for the upcoming 2024 growing season .  That list featured a number of projects/ideas/areas that *could* be something that I'm going to prioritize in 2024.  But, it also featured one item that has certainty when it comes to being a priority:  the backyard wood-fired pizza oven construction. The location/site of the oven has been an open question for me ever since we moved in back in 2017.  I wrote about a couple of final options in the backyard in early January where I narrowed it down to two locations :  built into the berm/closer to the patio vs. down on the drywell, lower-elevation. With the run of warmer temperatures this week, I got out one night after work and just got busy:  digging the foundation.   I went with the drywell location.  Further from the house, but anchoring a secondary, lower-tiered patio.  Below is a look at the site - annotated to show the outline of the fou

Parkway Tulip Tips Shoot Up - February 2024

Image
We've had a VERY mild Winter.  There was a span of about three weeks when it was brutally cold and it seemed like it snowed every.single.day.  But, overall...it was mild.  And that's likely turned a number of gardening variables on their ears.  Emergence.  Bloom time.  Exposure to late Frosts.  And, more, I'm sure. One of the 'mild Winter' related change that I saw VERY early in January was that the tulip bulbs that I had planted around the parkway tree had ALREADY come up, out of the mulch.  By January 5th.   J A N U A R Y. That seems VERY early.  It was BEFORE that three-week spell of 'brutally cold' weather that I mentioned above.  But, tulips being tulips, the foliage didn't mind the weather.  (or...the snow blanket was sufficient insulation.) I'm *very* aware of mulch volcanoes around trees and worry that every year - when we add another layer of mulch - that I'm burying things and creating problems.  Everyone says that you're supposed t

An Early Look At Some Potential 2024 Priorities - February 2024

Image
I've organized my approach to the yard and garden season a few ways the past couple of years.  First, I think about some of the potential options for where/how I want to prioritize.  In terms of effort, budget, time and thinking.   Then, I narrow those down to create some focus.  What falls out of those initial priorities is my annual to-do list that helps keep me honest in terms of what I am trying to accomplish.  Last year - I did an early look at some priorities as a way to organize my thoughts .  A few days ago, I marked 20 years of Blogging and in that post, I referenced Paul Graham; and how he has said the act of writing generates ideas.  That's what is at play here.  I need to sketch out an approach and with it, will come some clarity. This is different than my annual to-do list.  Here's last year's scorecard - which is informative in terms of what worked/what didn't work/what's left remaining.  But, this is more about sketching out a list of priorities.

Imagining A Front Yard Conifer Garden With Miegakaure - February 2024

Image
A couple of weeks ago, I posted a pretty lengthy garden diary post that outlined some of the inspiration and design ideas that I've been cataloging for the front yard .  I also posted this conifer inspo of three blue junipers (upright) in a mixed perennial bed .  What would it look like?  Ideally... something like this house .  But, that's not realistic - just yet.   In that post, I talked about doing a 'phase 1', but doing it with an eye for the entire design.  What's the key, defining characteristic of the 'entire design'?  I think it is centered on three things: 1. A path. 2. A bern. 3. ...and some miegakure. I was out front - taking the garbage cans out - this past week and because there was some frost on the front lawn, I thought I could (sort-of) shuffle my feet through the grass and leave a mark of what feels natural in terms of a front-yard path.  See below for my winding, curved (potential) garden path.  It starts closer to the driveway, winds *b

2024 Project: Bee Hotel Renovation - February 2024

Image
We've had a bee hotel (or Mason Bee House, if you will) for a number of years, but the past two it has been sort-of 'out of service'.  It fell from the its perch and has been laying on the ground.  For 2024, I'm going to push myself to renovate this thing.  It needs a new bottom and some replacement bamboo pieces. Why did I suddenly think of my Bee Hotel?  Because the University of Illinois is (right now...) conducting a " Bee Hotel Project " where they're calling for people to donate their Bee Hotels to science.  Check out the details here and sign-up to donate your Bee Hotel here .  U of I researcher Timo Wayman (an Entomology graduate student at University of Illinois ) is looking to help better understand native bees. I'm not sure our Bee Hotel will be of any value as it has been sitting on the ground for two seasons, but I'm going to fill out the form and see if they'd like to take a look.

Roof Inspiration - Backyard Pizza Oven - January 2024

Image
Yesterday, I posted a photo of the 'drywell exploration' that I conducted to find the edges and depth of the drywell to discover if it would serve as a suitable subsurface for my diy backyard wood-fired pizza oven.   I've also recently posted about some brickwork inspiration here .    When thinking about the oven, the facade is a big part of the 'looks', but so too is the roofline.  I recently came across this Tiktok from RustyVanRanch  - embedded below - that shows a barn roof that has an extended peak out front at the top of the gable: @rustyvanranch ♬ original sound - Rusty Van Ranch Here's a screenshot of the roof in question: A little digging revealed that those are called " Hay Hoods ".  Some call them "Crow's Beaks".  It serves a purpose of providing a little bit more shelter over the hay loft door.  For my pizza oven, there's appeal in a little bit of protection WITHOUT creating a huge, overhead roof.   Filing this awa

Digging To Find Drywell For Backyard Wood-Fired Oven - January 2024

Image
A few weeks ago, I posted a couple of items related to my 2024 goal of building a wood-fired pizza oven in our backyard including a look at a couple of locations , some brickwork inspiration and how I could build the stand out of cinder blocks - including corners .   With the snow melting away this week, I went out to look at one of the locations and remembered...that ahead of the snow, I was digging around trying to find the 'edges' of the drywell.   Below is a photo showing a number of locations that I dug down to see 'how deep' the drywell is located and how I was probing to find the 'edge' of the well.   The drop from grade to drywell is variable across this six-foot-by-six-foot section.  Surprisingly so.  I also found (I think) two of the 'edges' of the drywell.  Which...if I sited the oven where I *wanted* to, would have a small portion of the foundation OVERHANGING the drywell.  That would mean that I'd have to bring in some gravel - which i

Front Yard Conifer Combo Inspiration - Blue Needles and Purple Perennials - January 2024

Image
Yesterday, I created and published a lengthy - and winding - post about a potential front-yard garden transformation that is anchored in conifers and contains a potential 'path' through the middle.  In that post, I talked about using a berm in part to create some elevation change and I also sort-of came to the conclusion that I would certainly NEED to start in phases as the project is a multi-year planting (at least for me).  In that post, I concluded that based on some inspiration, I could (in theory) start down by the sidewalk with a small bed and expand from there.   One of the dependencies is the creation of the berm and the location for said berm.  My current thinking is that the berm is created if-and-only-if, I do some excavation for the pizza oven.  I would haul the material that I excavated from the back out to the front and build up a little berm on the driveway side of the front yard, down near the sidewalk.  I bring this all up, because I recently came across a pho