Posts

Showing posts with the label shop

Hang Up on the Wall-Hung Workbench - Notched Cuts Template

Image
Back at the end of July, I posted a photo of the wall-hung workbench that I had selected to build first in the garage (garden bench) and then down in my shop (once I got the hang of it!).  I pulled down some plans from WoodSmith Plans and got started ripping down the lumber to make all the pieces.  But there was a part that I got hung up on - these angled brackets with notched cuts at the bottom that I've circled above.  The plan calls for these supports to be notched and attached to a ledger board (that gets attached to the wall).  But, my little, amateur woodworking brain couldn't quite figure out how to make those cuts.  I took a sacrificial board and drew all over it to get the angles right.  I even took it over to Nat's Dad's house and had him mark it up so I could figure out the best way to make the cuts.  He showed me how to use my table saw to get most of the wood out, then a saber saw to make the final cuts.  But then I got home an...
New Shop Tool: The Grr-Ripper from Microjig

Image
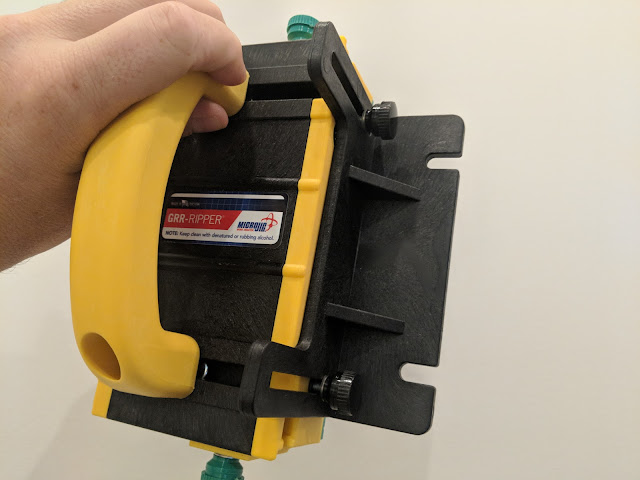
I'm always very hesitant to use my table saw in my shop.  If there's another tool that will get the job done, I usually chose it.  But, there are plenty of instances that call for a table saw.  To stack the odds in my favor, I usually am very deliberate with the saw and use a push stick and keep my hands away from anything moving during the cut and way long after the blade stops. But, I've started to use this thing:  The Grr-Ripper to 'bulletproof' my hands.  You use this thing to guide the piece through the cutting zone.  See below for the channel that the blade runs through. I won't use the saw without this thing now.  I'm not even doing it justice, so if you have interest, check out this video below that explains everything about it as they call it a "must-have for any table saw."

Decision Time: Final Wall-Hung Work Bench Design

Image
Bench via WoodsmithPlans.com In March of this year, I posted a photo of a wall-hung workbench that I came across on Instagram .  The photo above is of that same bench, but comes from the source of the plans:  Woodsmith Plans .  They're offering a plan for sale for the bench plus the tool holder above and the little shelf for hand tools on the very top for $10 .  I think I've settled on going with this direction for both a bench in my shop in the basement, but also for a garden bench that I'm now planning in the garage. This whole thing started with this initial wall-hung workbench with curves that I found online at the WoodArchivis t.  But, in looking at the space constraints that I have in my shop, coupled with some concerns about the rigidity of the curved superstructure, I've kind of drifted away from my initial plan.  In the shop, my plan calls for hanging the bench on concrete walls, which requires cleats or ledgers (as in this design above)....

Drywall and Door Hung in Basement Workshop

Image
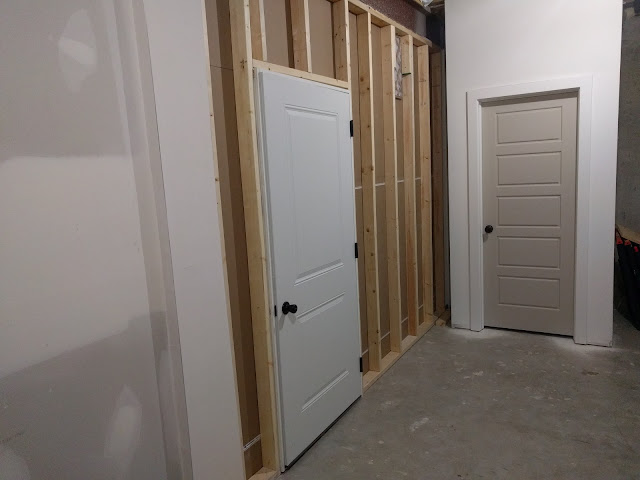
Just a few days ago, I posted about the progress being made in the construction of my #newoldworkshop down in the basement.  I shared a photo of the wall being framed in here .  Today, you can see the door installed and the sheetrock attached to the outside of the framing.  If you look closely, you'll also see the dust vent up near the top of the framing.  The door on the right is the door to our "Christmas Closet" and was already built by our builder's team.  As I mentioned in the post outlining all the 'to do's' for my shop , I used an exterior door with weather seal to keep the dust contained.  I'm also planning on painting the walls in the shop to brighten up the space and lay down some of that epoxy garage floor coating to spif the place up.  And, I've been reading up on dust collection systems including this one from GeekBea t.  I like his ducting/routing/termination system.  But, I'm thinking of going a different route in terms o...

Workshop Wall Going In (Basement)

Image
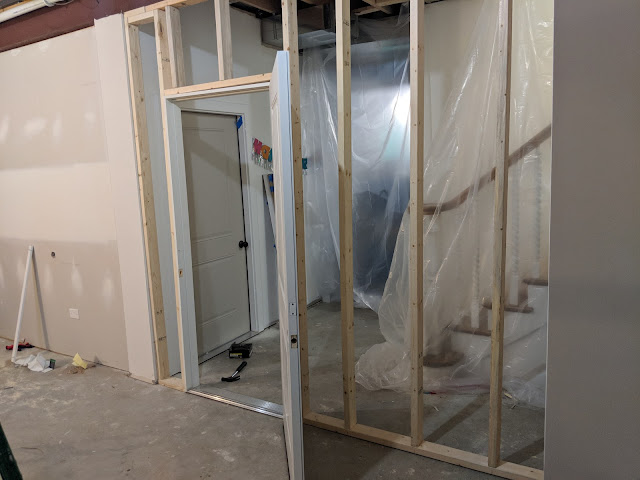
After months of planning and thinking and posting about my eventual workshop, we finally have progress:  the wall that divides the rest of our basement with my shop is getting installed.  In the photo above, you can see the wall being framed and the steel door - an exterior door - installed.  On the right side of the photo - through the framing - you can see the existing stairs and banister coming down from the first floor.  In the middle of the room, you can see an existing door/wall that built out by our builder to contain the mechanical room.  They used a steel, exterior door on the mechanical room, so we replicated that with the door for my shop.  They're going to be so close, so it was important for them to match. Right after the wall framing is done, drywall is going on the outside, but I'm going to leave the inside unfinished.  I'm still planning on cutting in a spot for a vent ( see here for inspiration ) and stuffing the joist cavities wi...

Door Acquired for Basement Workshop Project

Image
Some good news here in terms of the basement shop project.  Thanks to the fine folks at Oakley Home Builders ,  I've acquired the door.   The hang up for the entire project was the door and the thing about the door was that I really wanted it to match the existing storage room door that was already in place in the basement.  The storage room door is right at the base of the stairs and my shop is going to be just to the left of it.  The doors to the two rooms are going to be just a few feet apart (but set at 90 degrees), so it seemed important to have the doors match.  I posted back at the end of February about the shop being 'pressurized' and trying to figure out a venting work-around .  And this door is the primary reason.  It is an exterior door that is sealed all the way around.  I wanted to use a sealed door for dust control, but am fearful that if we built the shop too 'tight', it would act like a balloon and make it hard to cl...

Another Wall-Hung Workbench?

Image
Back at the end of January, I posted about this wall-hung workbench and - at the time - commented about how it was quite a 'looker'.  I still like it.  But, somehow, I came across this Instagram post from woodworking_lovers - which I think is a spammy account - that features a twist on the wall-hung workbench.  Spammy post (about starting a business) aside, the bracing that this bench shows off is interesting to me - and maybe just seems a bit stronger/easier to understand how it would work.  The 2x6's that are angled from the top to the wall are notched to rest on the wall cleat.  Visually, it makes sense to me why it would support the weight.  Maybe there's a way to marry the two ideas?  This one for the super-structure.  Then wrapped in the curves from the original to cover up the structure? 

I've Taken the Sortimo Plunge

Image
Thanks to my brother-in-law, I've now stuck my toe into the Sortimo universe with my first T-boxx for storage of fasteners and other small parts.  My interest in them came about due to a confluence of events:  the whole [contractors of instagram] thing that is happening with all those guys in love with their Festool systems and says along with this video showing Adam Savage's shop and the glory of his Sortimo setup. I started with a sorting container, but they make entire systems both for mobile uses (in vans) but also shops and include sorting containers but also tool containers.  I think the next step in my plans for Sortimo is likely the  WorkMo 24-500 T-BOXX Ready rack that holds up to 4 T-BOXXes. Here's the handle on the T-BOXXes with the Sortimo branding: This leads me down a path towards carrying an inventory of fasteners in my shop - now that I have a good place to keep them.  I'll likely start with a screw and bolt/washer/nut inventory ...

Windows into My Shop/Laboratory?

Image
That photo you see above is from the Polite Pig down at Disney Springs .  It is basically a window'd box that has inside a butcher's counter, supplies, and at least one big smoker where they smoke many of their fine meats.  And....let me tell you...they have very fine meats. I had the brisket sandwich that was served with pimento cheese spread and crispy onions.   Anyway, the windows.  Yeah...they've put this window setup right in the queue where patrons line up to order their food.  It is kind of a show kitchen of sorts.  At the time we were there, there wasn't anyone working in there, but I can imagine a cast member/chef cutting up brisket or pulling pork or what-have-you in there.   For a long time, I've been fascinated with these windows into workspaces.  You see them a lot in restaurants, but you also see them on cooking shows or science shows.  Where they have a 'lab' next to/adjacent to the stage that sort of se...

Wall-Hung Workbench - Quite a Looker!

Image
I came across this wall-hung workbench on the Wood Archivist and it stopped me in my tracks. I posted last week on my link blog the minute I saw it .  I was/am smitten.  I didn't want to lose the link.  Just look at it - she's a beaut, right?  Those curves. The built in lighting.  The fact that it doesn't hog floorspace?  The built-in dust collection system? All of it.  Awesome.  The full plans (or call it an article showing some of the steps and the cutlist) are here .  My shop right now is just a 'space', but that is ending soon.  Have plans to add a wall and a door to define the space.  Then, the first step is to finish my miter saw table.  After that, I'm going to turn my attention to a few benches. I currently have a bench that is satisfactory, but needs an upgrade.    I posted about the first (and existing) bench here on the blog back in 2010 .  Still looks the same.  Functional, but kinda basic...

Ready to Cut With The Rockwell Sonicrafter 4.2 Amp F80

Image
I've had one of these Rockwell Sonicrafters for a number of years and I've found it pretty useful from time-to-time.  It isn't something that I pull out every time I tackle a project, but have been a specific set of applications that required *just* this tool.  This year at Christmas, I was upgraded to the new version of the F80 that has 4.2 Amps and comes with this nifty hard-sided case.  My original one came in a cloth carrying bag and I pushed it to it's max, so this upgraded version is a welcome addition to my shop lineup. You might be wondering...what do you do with an oscillating tool?  Welp, the fine folks at Rockwell have created this handy list of 10 things you can do with a Sonicrafter . The F80 comes with a nice light to shine on your project and has two 'degrees' - meaning one setting is a narrow oscillation and the other is a wider oscillation.  Also, note... this is a corded tool.  But, it is a 10 foot cord, so you get some pretty goo...

Miter Saw Table - Progress Step 1

Image
This winter break, I've embarked on a few projects to get my shop up and running in the new house.  The first project is a mitre saw stand.  I figure that if I get my saw up off the floor onto a stand, I can then begin to make a few other tables/benches to host the other tools and what-have-yous that I've collected over the years.  I have two Christmas's worth of tools to unpack and set up and actually use. I'm using this plan from the Home Depot with a few modifications including the addition of this Kreg Precision Trak and Stop Kit , so that will require me to use a thicker fence than what is spec'd in the plans.  I also think I'm going to add a dust shroud and dust collection near the end.  But, the first few steps in the plans - which focus on the legs and the base pieces, I'm going straight by the plans.  In the photo above, you can see the four legs that I put together with 2x4's and a 2x6.  The plans call pocket screws, so that's what I ...

Reclaiming the Basement: My New Workbench

Image
If you know the difference between, say, a  Holtzapffel-style cabinet maker's bench and a split-top Roubo-style workbench , then this post will not impress you. (Bill Fox...I'm looking in your direction.) But...those of you guys who are cramped up in a condo somewhere on the northside and long for a little man-retreat, then you're going to be jealous! Anyway...back to the story.  Starting a few weeks back, I began to beat my cabin fever by beginning to organize our basement.  Our basement is probably like a lot of basements: unfinished, messy, damp, and quite a bit disorganized. During construction (or re-construction), the basement housed just about everything we owed that wasn't in our POD - and it was messy down there.  Once we moved in, we started to put everything that didn't have a home down there.  Over time, I bought some shelving units and began to put some of our stuff on the shelves, but in no particular order. We then inherited some of my s...