Posts

Showing posts with the label drainage

Mosiac Tile (Upside Down) Under Pizza Oven Insulation - For Drainage - July 2024

Image
With the foundation and stand complete for our diy'd wood-fired pizza oven, I recently started turning to building the *actual* oven by cutting bricks last week.   The process of starting the actual oven begins with prepping the top of the hearth to accept the calcium silicate insulation boards.  Cal Sil boards are water-resistant, but you want to keep it as dry as possible so the mass of insulation works as ACTUAL insulation under the oven floor.   The latest innovation for dealing with water penetration that has been driven through the community over at Forno Bravo is the addition of mats of mosiac tiles - set upside down - on top of the reinforced hearth and under the insulation boards.  The idea is that by setting the mosiac tile upside (with the mesh/glue pieces facing up), you create little channels that any surface water that hits the hearth can find its way to the drain holes. I went up to a closeout flooring store on North Avenue in Northlake recently a...

Adding Gravel to Pizza Oven Foundation Prep - Backyard Wood-Fired Oven - March 2024

Image
The last progress-report on our backyard pizza oven was earlier in March when I showed the cut-down concrete slab framing pieces (2x6's) that I cut to the final dimension s (Slab: 78" wide, 86" deep. 6.5' wide, 7'2" deep. Stand: 72 wide, 80 deep - 4.5 blocks wide, 5 blocks deep).  In that post, I talked about the next step is to fill the excavated cavity with gravel ahead of the rest of the slab prep. I went over to Menards and picked up 10 0.5 cubic foot bags of their multi-purpose gravel.  Each bag is supposed to cover about six square feet.  I wasn't sure how far these ten bags would go, but I figured that was about the limit that I wanted to push my car weight-wise.   I brought the ten bags home and hauled them (one-by-one) to the site and piled them up: Opening each bag and spreading it out, I quickly discovered that I was FAR short of the amount of gravel that I REALLY needed to complete the project.  Below, is what the site looks like after ten ha...

Front Porch Bed - Cardboard to Smother Grass + Top Soil + Biosolids - March 2024

Image
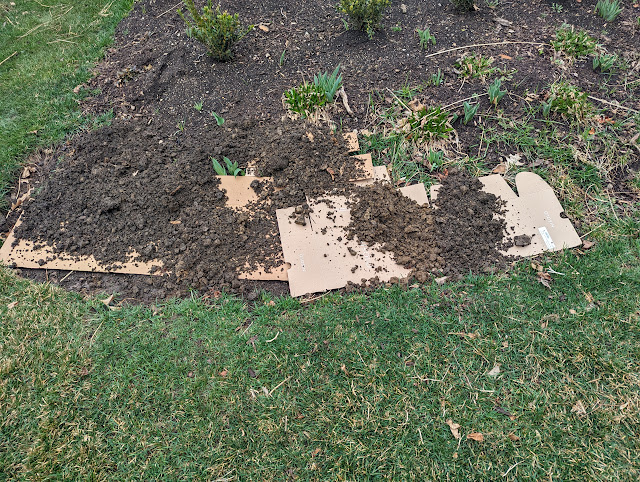
Just a week ago, I spotted some issues in the corner of our front porch bed .  It is a low-spot and because of that was taking on some water from the downspouts.  But, the front part of that bed was also showing some signs of turf coming back.  This was a small extension that I carved out of the lawn last year.  And...it turns out...I must not have pulled out/dug out all of the turf.   I decided to kill-two-birds in this project.  (Well...half of a project since I didn't have enough materials to finish it.) First, I laid down some cardboard to smother the grass.  I cut holes for the handful of tulips in the area, then spread out some thick, unpainted cardboard on top of the turf.  I then went back to the pile of topsoil and clay that I excavated from the Pizza Oven foundation and spread that on top of the cardboard.   I started by the property-line edge and went north.  Below are a few photos showing the progress - first with ...

Front Porch Bed - Drainage and Turf Issues - March 2024

Image
Last Summer (June), I extended and (attempted) to clean up the front edge of our 'front porch bed' along the south property line .  The edge had been creeping 'inward' over the years, so I decided to use a shovel to remove as much of the grass as I could, carve off a clean edge and sort-of 'extend' the swoop of that bed a little bit into the lawn.    If you look back at the photos in this post , you'll see a nice, grass-free edge that I planted with bedding plants ( dwarf, French Marigolds ) and Dusty Millers .   By September, the dwarf (French) Marigolds took off and filled in the new border.  They looked great and were thick/full of oranges, reds and yellows .  Behind those annuals went a colony of Summer Beauty Alliums .  Backed by some small Green Velvet Boxwoods to extend the existing short hedge of boxwoods.   All was good last year.   This year, I've already started to clean up this bed - cutting down grasses and rakin...

Backyard DIY Pizza Oven Construction - Slab Framing - March 2023

Image
Over the weekend, I went out and picked up four 2x6x8 boards and brought them home to begin to figure out if I've done enough excavation for our wood-fired pizza oven project.  I've been using a tape measure to figure out how much I needed to remove and if my dig was large enough to support the slab framing - along with the necessary bracing.  But, that's an imperfect science, so I decided to just go out and cut the lumber down to the final dimensions and place them in the hole to see - without guessing - if I've excavated enough. As a reminder - mostly to myself - my final dimensions are based on 8x8x16 construction blocks:  Slab: 78" wide, 86" deep. 6.5' wide, 7'2" deep). Stand: 72 wide, 80 deep (4.5 blocks wide, 5 blocks deep) Leaving reveal of 6" total both dimensions. 3" all ways. This allows for 2" face brick and a 1" reveal. I cut the two side pieces of the frame to be 86" and the front/back to be 81" (to acco...

A Look Around The Yard - April 2020

Image
I wanted to take and share some photos in the [ garden diary ] here so I can look at the development of the shrubs and perennials in our yard.  I've already posted images of a few things including our Saucer Magnolia , Dappled Willow (treeform) , front-yard Cleveland Pear , some of our lilac buds , how we've added some wood chips to the far back and biosolids in testing and most recently, posted both hostas and peonies coming thru the mulch .  Here's a few items that I've covered over the years.  This is what they're looking like in mid-April, 2020. Starting with the northside Rhododendron.  This was put in the bed in 2018 and didn't flower last year.  Buds game looks strong this year.  This is the one plant that I applied Wilt-Pruf this Winter .  In the bed outside the screened porch, I planted a solitary Karl Foerster Feather Reed Grass a couple of years back.  We should add more here, I think.  I trimmed last year's growth off...

Documenting A Couple Of Spots of Standing Water In Our Backyard - May 2019

Image
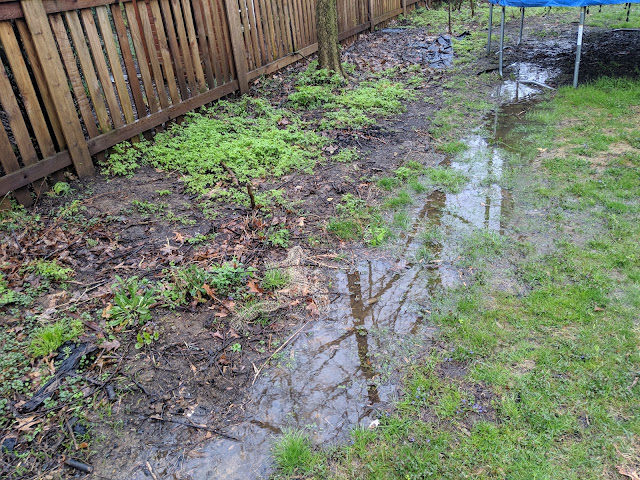
A few weeks back, we had a few days of very heavy rain.  It came down in the morning, afternoon and evening.  For like three of four days straight.  The ability to work in the yard was almost zero because of how saturated the ground was in the yard and the beds.  But that rain event also exposed to me a few areas in the far reaches of our yard that I think are worth documenting here in order to be sure that as I begin to address the far back yard that these spots are giving proper consideration. Due to their location and distance for the existing water mitigation tools (Dry well, etc), I am thinking that the only way to really address some of these is through a combination of improving the soil's ability to absorb water (aeration, de-thatching) and through the changing of the grade. First up is this linear puddle that is maybe twenty feet long and sits between a rough (eventual!) bed and the yard from the trampoline to the neighbor gate on the southside....