Posts

Showing posts with the label composting

Compost Bin Compaction Progress - Late Winter Activity - March 2024

Image
Well...things are STARTING to happen in my 3rd, storage bin in our three-bin compost setup.  That third bin (which I put up last year) is a storage bin full of non-mixed material.  It is LOADED with last season's fall leaves as well as where I've been stashing our kitchen scraps.  Most recently, I topped it off with all of the cut-downs from our ornamental grasses. Three things have happened all in the past week or so that have managed to move things along in this bin. First, I applied a top-layer of municipal biosolids.  Both as material to balance the browns (I'm considering biosolids to be a green due to their high nitrogen content) as well as a WEIGHT due to their mass . Then...(on accident), some of the bin caught on fire . (eek). And, now, have a look at the bins.  In particular, look at the level of the storage bin on the left.  The top of it is now BELOW the top of the frame: Look back at this post from a week ago when the biosolids and grass clippings were mounded

Compost Bin Fire - Dry Material Burned in Late Winter - February 2024

Image
I was feeling pretty good about my prescribed burning of tiny piles of leaves and some perennial litter from last season.  I posted the details of it yesterday .  Over the weekend, I went out and did a little bit more burning.  I used my small hand rake to pull together a pile of (mostly) oak leaves - creating a little burn break from other leaf litter - and use my small propane torch to light-it-up.   But, I think I got a little too cocky.  Burning and burning and burning.  And feeling good about returning the carbon to the soil via little ash piles.  All the while...cleaning up the beds a bit.  I was puttering around the beds making little piles and burning them.  They light up, then expire on their own when they exhaust all the material.  A little smoldering for a minute or two, then the piles of ash go dark.  And leave behind some white, burned out material.   I found myself back by the compost bins, where I recently filled-them-up with a bunch of ornamental grass cut-downs that I

Amending Compost Bins With Biosolids - February 2024

Image
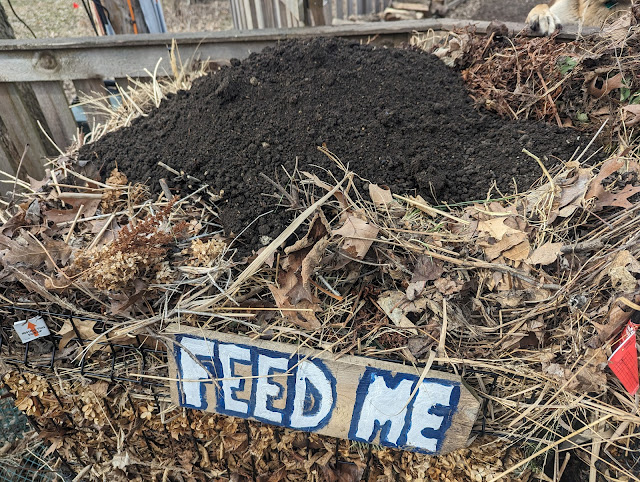
Yesterday, I shared a round of photos showing the first (for this growing season) load of municipal biosolids that I added to our perennial garden beds as a topdressing .  The goal is to improve the soil and feed the trees and plants.   I also used these biosolids in a different spot:  as a compost bin amendment.   I've done this in the past - here's a post from March of 2023 - when I dumped some biosolids in as a sort-of accelerant/enhancement to my bins due to them being overloaded with 'browns'.  I thought the biosolids - full of Nitrogen - would help balance out the blend.   Right now, all three of our bins are F-U-L-L.  The clean-up that I did recently of all the ornamental grasses produced an enormous amount of material.  I posted some photos back a couple weeks .    For this round - I added a 5-gallon bucket (filled 2/3rds of the way) into my 'storage bin'.  The one with the "Feed Me" compost bin sign .    Below is a look at that mound of mater

Hellebores Late Winter Clean-Up - February 204

Image
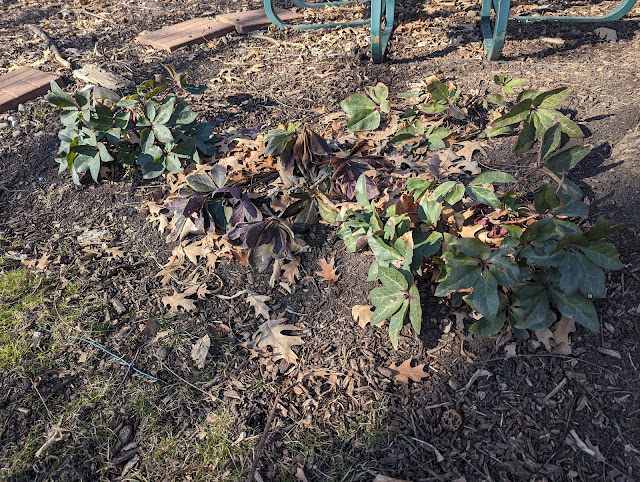
On the first of February (2 weeks ago today), I noticed the pink tips of the Hellebores had emerged from the mulch in their annual late Winter arrival.   Those pink tips and buds were accompanied by the previous year's foliage - which persisted through the Winter.  With the temps in the 40's yesterday after work, I decided to get out there to clean-up the foliage.  Here, below, is the 'before' photo - with all of the green leaves on the plants: And, here below, is the 'after' photo.  Looks like a messy pile of oak leaves laying on the ground.  But, if you look closely, you'll notice some peeks of pink.  I've left the leaves in place (for now) as a little bit of extra protection until we do a proper cleanup in the beds. Here, below, are a few more looks at this year's Hellebores being protected by Oak leaves. I considered a 'chop and drop' for the foliage - where I'd trim-off and then cut-down into smaller pieces the stems and leaves and

Cleaning Up Front Porch Beds - Ornamental Grasses for Compost - February 2024

Image
A couple of days ago, I posted in my [compost bins] diary a look at the current state of my bins now that I've topped them off with a lot of ornamental grass material - reeds, canes and blades.  I tried to chop the material down into smaller segments in an attempt to break it up a bit and speed decomposition.    While I was cleaning up the grasses, I also went into the front porch bed and clipped off and cleaned up the front of the bed.  That included a number of Dusty Millers and all of the Seslaria Autumnalis (Autumn Moor Grass) .    Here, below, is a look at this bed after I trimmed up the Moor Grasses - but left behind some of the Fall leaf litter that has accumulated over Winter:  I also have three large Karl Foerster Feather Reed Grasses in the island bed between our driveway and front walk.  I pruned all of those ornamental grasses and cut them off an inch-or-two above their crown.  That island bed after the ornamental grasses have been cleaned up for Spring is below: I'

Adding Ornamental Grasses To Compost Bins - February 2024

Image
We had "false Spring" last week when the temperatures rose to the upper 40's and low 50's, so that (naturally) lead me to getting out in the garden to do a little bit of work.   I went with the whole "leave the leaves" thing last Fall.  Well...sort-of.  I cleaned up A LOT of leaves.  But, wasn't super picky about things and left some leaves whole.  And, blew some other leaves on the lawn, chopped them up with my mulching mower, and blew those chopped-up bits back onto the beds.   I also left ALL the standing material up all Winter.  That 'standing material' includes flower stalks and ornamental grasses.  Thanks to "Fall Dividing", we have ornamental grasses all over the place.  I've read a bunch of the posts/stories about the risks of doing a Spring Cleanup in the garden too soon; leading to some problems with nesting insects.  So, I opted - for now - to mostly leave the leaf litter in place.  But, I figured I should go at those gra

Winter Kitchen Compost Snapshot - Pre-Mixing - February 2024

Image
Two days ago, I posted a photo of a new "Desire Path" in our backyard that appeared during Winter and was a result of walking back-and-forth from our house to our compost bin with our kitchen compost material.   We kept up with composting (thus far) through the cold weather and have been stashing the kitchen scrap material in the new 3rd storage bin.  The one with the "feed me" compost bin sign on it .  I just brought out a load of material and dumped it and thought I should document the state of this bin - pre-mixing this material.  Here, below, is a photo showing the top of the bin.  The bottom 98% of this bin is filled with autumn leaves.  The top 2% that you see here is pretty colorful.  And comprised of vegetables and fruits, cut flowers, egg shells, avocado peels, onion skins, coffee grounds and some spent hydrangea blooms.   The temperatures have STOPPED any decomposition the past 30-or-so-days and kept the colors vibrant.  I've left this material on top

New Compost Bin Sign: Feed Me - December 2023

Image
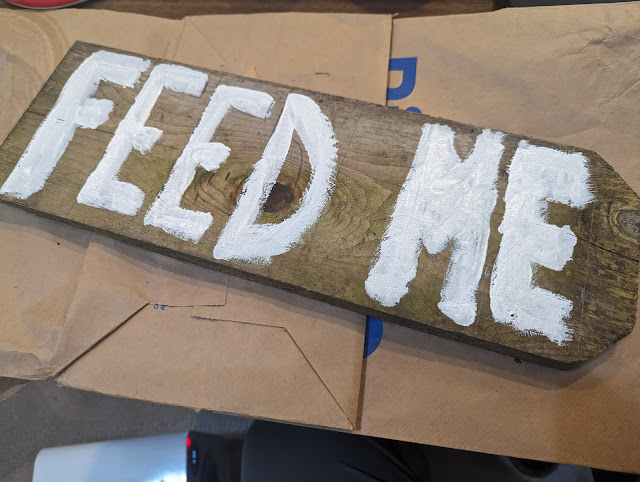
It was just a few days back that I mused about adding a little personality to our garden via the addition of a way-finding sign on our compost bins .  I was seeing that various users from our house (ahem aheam...the kids) were dumping our kitchen waste in the bin that I was viewing as 'cooking' instead of the storage (not properly mixed bin) that I can get to over time.   I posted about the signage because I wanted to remind myself to make one this Spring.  But, I found myself with a tiny bit of time and decided to just jump on it right now.  This *is* 2024, right?  At least in terms of gardening seasons, I'm call it 2024. I had some cut-offs of cedar pickets that I used for a different project laying around, so I grabbed one of them and some paint.  I painted the words "Feed Me" on the board in white.  Outlined in a navy blue.  Then, spray a topcoat (clear) on top of the paint in an attempt at making the sign lasting just.a.little.bit.longer than it would normall

Compost Bins - Full in Early Winter - December 2023

Image
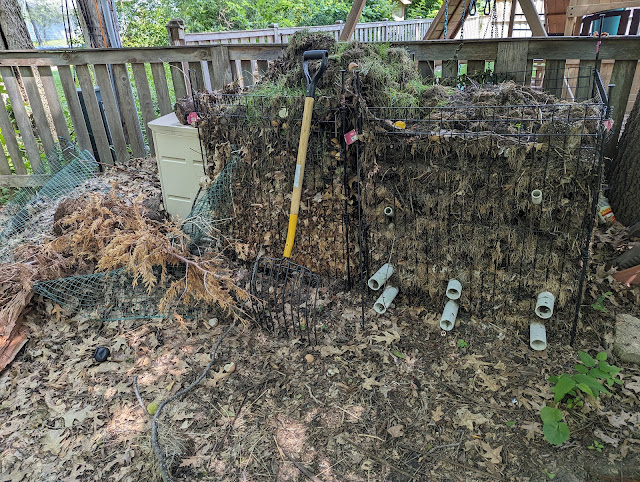
My compost bins grew this Fall - from two bins and a tumbler to three bins and a tumbler.  I've long wanted to add that third bin, but it took this Fall's leaves to compel me to act.  Below, you can see the new third bin - on the left - and this photo serves as an 'early winter' snapshot of our three bins (in terms of how full they are) as the composting process slows down with the temperature drops: The new bin (on the left) is almost exclusively leaves.  The pumpkins that you see in the middle bin are there (for now) as I break them down into chunks and layer them in every time I add more leaves to the new 3rd bin.  I put in a bunch of leaves on top --> chop up chunks of pumpkins --> layer them on top of the leaves in the 3rd bin.  I've done that for the top 12-inches-or-so and as that bin continues to compress I'll keep adding leaves.   One other thing to note:  on the bottom right, there are two white plastic garbage bags that are laying around.  Those

Compost Pile Up To Temperature 48 Hours Post Turning - July 2023

Image
It was just a couple of days ago that I posted the details (and photos) of my mid-Summer emptying, turning, re-layering, amending and re-building of our compost bins .  I stuck my compost thermometer in the pile about 2/3rds of the way down and after just about 24 hours, we're already up to temperature.  See below for a look at the current temp showing the pile in the 'active' zone at about 110°.  And climbing.   That gray-shaded "hot" zone is where you want your pile, so I'll be watching to see if I was able to mix the material to the proper ratio and if I supplied enough moisture to get it really cooking.  From what I've read, if you can get your compost pile up to that 160° area, you can have compost as quickly as just five-or-six weeks.  

Compost Bin Summer Update: Turning, Layering, Reloading - July 2023

Image
I had a little bit of time off earlier this week and I opted to do some annual compost program maintenance.   I've done this the past few years and #11 on my list this year was to 'continue on my compost journey'.   Here's what I wrote: 11.  Continue on our composting journey.   That starts with using  our kitchen bin , turning the mixed bin, amending with alfalfa and/or biosolids.  It also means that I need to keep moving through the two bins and tumbler set-up with the goal of a tumbler-full-of-finished compost to be used in the garden every season.   Fall leaves stored in Fall , full, properly mixed bin by end-of-season. Up until now, I felt pretty good about composting this year.  Between the use of Starbucks grounds as an additive to adding kitchen scraps , I've been good about putting more waste in the bins.  I've also made a pretty big mound/pile of material from various projects and all the leaves from my Spring cleanup.  My two bins were pretty full a

Starbucks Grounds For The Garden - Compost Amendment - April 2023

Image
This Winter, we've been adding our kitchen waste to the carbon storage (mostly leaves) compost bin out back and have been sort of hand-turning it in to the top layer.  I add some kitchen waste, then add a thin layer of leaves on top.  And repeat.  I also started to add a little bit of biosolids to that same storage bin, too.   As the weather warms up, I'll get out there and turn the bin, but for now, I'm just thinking about how to add some amendments that might help speed-up the leaf bin a little bit. To that end, I was at the SBUX in Westmont last week and saw the big bag of used grounds on the counter that they were offering.  I grabbed a bag and brought it home.  Below are some photos of this ' Grounds for Your Garden ' package: I dumped the bag of grounds on the top of the bin and stir'd it in.  Below is how the grounds look straight out of the bag. In that photo, you can see some of the ornamental grasses that I cleaned up and put in the top of the bin. 

Compost Bins Update - January 2023

Image
The last time I checked in our dual compost bin setup was a month ago - in early December - when I considered the bins (mostly) done for the season and filled with all the Fall leaves that had come down.  In that post, both bins - the carbon/leaf storage on the left and the properly mixed and passively aerated bin on the right - were both 'heaping' with a mound of material extending well above the top of the fence panels.   I was out puttering in the yard recently and went back to see what kind of compaction that had occurred in the past 30 days.   Below, you can see the current - January 2023 - state of the bins.   On the left - the carbon storage:  The material has compacted to be well-below the top of the fence panel. I've also added a bunch of container material to the top including some Fall Cabbages.  On the right - the mix has darkened in color as decomposition has begun to take place it seems.  Compare the color of the front of the bin today (above) with what it l

Compost Bins Filled - December 2022

Image
That appears to be a wrap on composting this growing season.  I have all three spots filled - the tumbler (with partially-processed mixed compost from the bottom of the mixed bin), the mixed bin on the right below (with a blended batch of greens/browns and *some* passive aeration pipes installed) and a (mostly) carbon storage bin on the left.   You can see the two bins in the photo below and how they're filled right up to the top of the railing with the belief that we'll see a little settling and compaction this Winter: The last time I checked in on these bins was in early November when I had rounded up a bunch of leaves and filled both of these bins in a 'heaping' fashion .  In the month since, I've seen a bunch of settling in the left bin and was able to re-fill it up.  And some compaction from the bin on the right with the large mound in the middle compressing down.  I used my mower to collect the leaves in the carbon storage bin this year and as such, I also col

Compost Bins - More Fall Leaf Collection - November 2022

Image
Just a couple of days ago, I posted the first photo of my compost bins with an initial pile of leaves from our yard in the storage bin .  The leaves just don't stop.  At least, until the trees drop them all.  So, my approach is to try to stay on top of them with repeated cleanups in the backyard instead of waiting until the end when there's one big cleanup.  I've tried that....and found that the job is TOO MUCH if I wait. So, I sent about collecting (and mulching) even more leaves and storing them in the compost bins.   Here, below, is what the bins look like just a few days later: The bin on the left - the carbon storage bin - is now heaping.  And the bin on the right - which is properly mixed - has settled to just below the frame.  So, I put a bit of leaves on TOP of that pile, too.  If you look at the foreground, you'll see that there is a layer of mulched-up leaves scattered in FRONT of the bins, too.   The carbon storage bin will continue to settle and I'll be

Compost Bins - Fall Leaf Collection Begins - November 2022

Image
The last time I checked in on our compost bins, I was looking after some of the settling that was taking place post a full turn in both bins and our tumbler.  This was in late September when the bin on the right was still 'over full' and the bin on the left was about 1/8th full .  Below, is a photo showing the current state of the same two bins.   The one on the right has settled even further.  The bin on the left has just started to be put to work with the initial pile of leaf mulch piled in that side. The pile on the left will continue to be filled and settled.  I also am planning on insulating the Disneyland Roses with leaf mulch again, so those chicken-wire rings will be full of material this Fall.  Once I get the bins mostly stuffed full, I'll then just simply switch to mulching-in-place the leaves on the lawn.  That's the process I used last year and the material was broken down by the time Spring arrived. I haven't gotten around to adding a third bin, but ma

Compost Pile Settling - September 2022

Image
Ten days in the life of a recently turned compost pile is an eternity.  At least, that's how it seems with my compost bins.  Ten or so days ago, I posted the details of how I emptied my compost bins (and tumbler) and refilled them with a proper mix of browns and greens along with some alfalfa cube accelerant .  At that time, the main, properly mixed bin was heaping.  By that, I mean I piled up the compost into a mound that extended well above the top of the fence panels on all sides and was mounded about 30" past the top of the panels in the very center.  Go here to have a look at the pile ten days ago . Thanks to active decomposition and gravity, the 'heaping pile' bin is now well under-control.  See below for an updated photo showing the edges of the bin have all sunk down and are now under the top of the fence panel edges.  And the center mound?  That's dropped by more than half, too.   We're getting close to the start of leaf collection season, so that mean

Turning And Re-Pile'ing Compost - September 2022

Image
Earlier this week I posted a couple of updates on our compost project.  First, I shared photos of the black gold compost that came out of our tumbler .  I spread that material on the front beds as an amendment and a way to try to improve the conditions up there.  Then, I posted some photos of what the pair of bins looked like pre-turning and walked through how I emptied them to get down to the 'most done' material (at the bottom of the mixed bin - under the passive aeration pipes) in an attempt to fill the tumbler and get the balance of the material ready for re-pilin'ing.  At that point, I had two full-to-the-top bins.  The one on the right, properly mixed.  The one on the left...not so much.  It was filled with Fall leaves and whatever I picked up this season including all the thatch from my backyard lawn renovation project. My plan was to open up the front panel of the bins to allow me to empty the bins to allow for proper mixing, then put the front panel back in place

Compost Pile Update and Turning - September 2022

Image
I mentioned a few days ago that I had begun to empty the compost tumbler and spreading the black gold out in the beds out front as a soil amendment .  Having that tumbler empty means that I can begin to tackle the other two bins.  Below is a photo showing the current state (early September) of the two bins.  Of note, you'll see in the bin on the left AND in the wheelbarrow, I have recently added a big batch of grass clippings and thatch that I removed from our backyard.  Both bins are full up to the top. I began to turn these piles by starting to empty the bins.  The bin on the right is a proper mix of greens and browns.  And has passive aeration in it.  The bin on the left was empty up until last Fall when I filled it up with mulched-up leaves.  It was (then) mostly browns.  And now, it is topped with grass - mostly greens.   So, these bins need three things:  first...pulling out of the most-done compost material that I can fill up the tumbler to get a batch of 'finished'

Spreading Compost (Black Gold) on Front Porch Beds - Amending the Soil - September 2022

Image
On my 2022 to-do list were a few items related to compost that I've begun to address in the past week or so since the weather has started to cool down.  If you go back and look at this year's list , you'll see that #13 focused on MAKING compost and using what I have while #19 talked about improving the soil conditions in the front of our house.  This post is about how I've combined those two things by using the compost - or Black Gold - that is in our compost tumbler and applied it to our font porch beds.  First, have a look (below) at the makeup of the compost that is currently in our tumbler.  Do I turn this thing regularly?  No.  Is it in the sun?  No.  Do we still get a pot of black gold compost at the end of the Summer?  Yes.  Here's proof: I wanted to take it a little bit at a time (to start), so I began to fill a couple of five-gallon buckets with the compost.  See below: And, brought it up front to the beds where I'm dealing with a mix of hydrophobic mu