Posts

Showing posts with the label beds

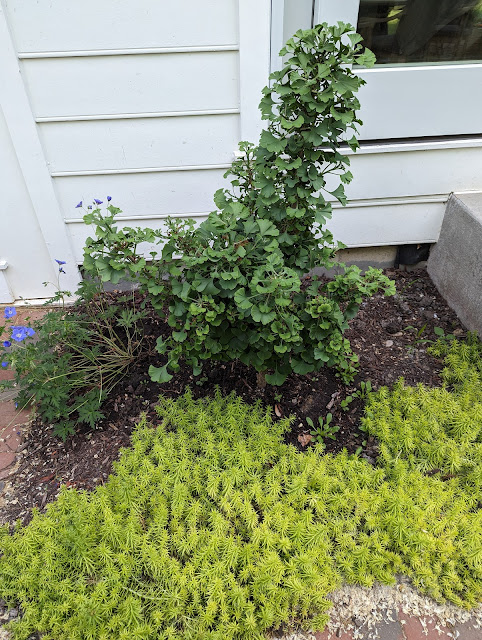
More Front Yard Bed Extensions - Saratoga Ginkgo Bed Curves Added - April 2026

Image
Two days ago, I posted the first part of a bed extension (lazy method) project in the front yard around the tiny Saratoga Ginkgo tree that is in an island between our driveway and front walk.  I started with the rough shape I wanted and mentioned that I usually expand these beds over multiple days due to having just enough material (Cardboard + municipal biosolids + composted manure) on hand to do a section-at-a-time.   Today, I'm sharing a few more updated photos showing the final shape of this newly, expanded bed.  With proper curves.  I wanted to add some true 'swooping' curves (curvilinear shape) and expanded out the bed by twelve inches in most of the bed and closer to two-feet at the main curve.   Note:  This post is going up in early April, but I laid these out on March 20th.  So, when it comes to that crucial component (time!), these will have 10 days in March, all of April and if I get to the first week of May (prior to planting), t...

Saratoga Ginkgo (Lazy) Bed Extension (Part 1) - Front Yard - April 2026

Image
Lazy bed extensions were listed as a "Fall Project" in my 2026 to-do list .  And, I need to do that.  But, I also wanted to use the time I had this Spring by knocking some of the bed extensions off my list while I could in March and April.  I've posted a few times already when I first extended and reshaped the front yard island bed .  Then, I did an initial expansion on the southside of the house in the cut flower foundation beds .   Today, I'm doing an initial expansion of the small corner bed that I call the "Saratoga Bed" because it features the tiny Saratoga Ginkgo tree along with some Little Henry Sweetspire Spirea shrubs .   By now, I've laid out the elements of my lazy bed extensions: 1.  Cardboard to smother the existing turf grass. 2.  A mix of (municipal) biosolids, leaf litter and composted manure + topsoil. 3.  Time. Here, below, is the 'before' photo.  The bed needs more breathing room by extending things outward....

Expanding Cut Flower Beds - Lazy Method - Sideyard Garden - March 2026

Image
One of my 2026 to-do items is to 'expand the beds in Fall'.  I say 'Fall' because of how I utilize what I call the "lazy method" of smothering out the turf with cardboard.  That means that in addition to materials like cardboard and municipal biosolids, I need time.  Time for the grass to die.  Time for the cardboard to breakdown.  And time for the biosolids to MELLOW OUT.   Last year, I missed the Fall window to do some bed extensions, so I started to do them this Spring.  The first one was a few weeks ago with the Island Bed taking on new edges .  I used cardboard, municipal biosolids and composted manure to create a blend that I'll plant up (and mulch) later this Spring.  In the sideyard, I want to do the same thing:  expand the beds along the foundation to be more proud of the house.  Last year, I planted out the Dahlias in late May/early June.  I like to have about six weeks of time between laying down these bed exten...

More Front Yard Bed Extension - Island Bed - Priority 3 - March 2025

Image
Two days ago, I posted some photos showing the first step in the 'lazy bed extension' around our island bed in the front yard .  This was one of my priority projects for the year - #3.  I started with laying down cardboard to smother out the grass along the driveway.  That section went about twelve feet by three-feet wide.   For step two in this process, I went with filling-in the stretch of grass between the sidewalk back to the (current) island bed.  This section is about five-feet deep by twelve feet long.  I laid down two layers of cardboard with a slight overlap (both overlapped between the two of them and overlapped with the first layer on the driveway side).  I wet it down with the hose.  Then, topped with municipal biosolids.  And, finally...a layer of other organic yard material (leaves, grass clippings, etc) on top.  I mixed those together and used my hose again to wet it all together.   Below are a couple of sho...

Lazy Bed Extension (Part One) - Front Yard Island Bed - Priority #3 - March 2025

Image
Yesterday, I shared the overview of my third priority for 2025 - expanding the front yard island bed .  These first three ( Pizza Oven MVP , Renovation of the bluestone chips gravel path and this island bed) were pulled from my initial 'early look' list .   We caught a little bit of a run of decent weather this past weekend, so I opted to start the island bed expansion/extension.   Remember....I talked about one of the most critical components to this project:  time.  I need time to smother out the turf grass.  And time for the biosolids to 'mellow' out a little bit.   This bed started back in Summer last year when I dug up and created a kidney-bean-shaped island bed with a Korean Maple tree (Northern Glow) and a dwarf (Spring Grove) Ginkgo tree .   In the post yesterday, I showed the size (12x12) of the extensions and looked at some potential plantings.  This bed, when complete (at more than 150ish square feet) will be ...

Orange Nugget Dahlia - In Bloom - Late September 2024

Image
 Earlier this Spring, I bought a package of three Orange Nugget Dahlia tubers at big box retail .  They were billed as being compact - less than 30" - and were...well...orange.  So, it was a no-brainer.  I started the tubers inside, but moved them out after the threat of frost had passed.  I planted them in the new 'cut flower' bed on the southside of the house .   From the beginning, these Orange Nuggets were behind my other dahlias - specifically the Melina Fleur and Cornell Bronze varieties.   But, over the past month or so, the plant grew up and out.  And...now - in Late September - is full of blooms and buds.  Below is a look at what these Orange Nugget Dahlia plants look like in the morning: I count seven-or-eight blooms in that photo and a dozen-or-more buds that will open soon.  They're not huge, but nice-sized flowers.  I'd describe them as 'delicate'.    The stems, however...are also 'delicate'.  O...

Chocolate Chip Ajuga - Hits and Misses and Maybes - April 2024

Image
The past few years have been a love story between me, the gardener and Ajuga 'Chocolate Chips', the groundcover.  I've bought it a few different sizes (quarts and plugs) and have scattered them around the front and back of our yard.  Some have really thrived.  Some have died totally.  And others...well...they're still TBD.  This time in early Spring is when these Ajugas take on a different form - with curled-up, darker foliage that make them standout a bit.  Soon...they'll be filled with blue/purple flowers.   Here's a look at some of those - starting with some less-than-one-year-old plugs.  These went in the bed in late May in our backyard, sort-of in-front-of the Fanal Astilbes .  The six plugs are not stretching out into six plants.  Soon...maybe this year, they'll connect to each other: Next up, is a pair of plugs that went in the backyard in late Fall.  These are planted in front of the Baby Blue Spruce Tree.  They, w...

Front Porch Bed - Drainage and Turf Issues - March 2024

Image
Last Summer (June), I extended and (attempted) to clean up the front edge of our 'front porch bed' along the south property line .  The edge had been creeping 'inward' over the years, so I decided to use a shovel to remove as much of the grass as I could, carve off a clean edge and sort-of 'extend' the swoop of that bed a little bit into the lawn.    If you look back at the photos in this post , you'll see a nice, grass-free edge that I planted with bedding plants ( dwarf, French Marigolds ) and Dusty Millers .   By September, the dwarf (French) Marigolds took off and filled in the new border.  They looked great and were thick/full of oranges, reds and yellows .  Behind those annuals went a colony of Summer Beauty Alliums .  Backed by some small Green Velvet Boxwoods to extend the existing short hedge of boxwoods.   All was good last year.   This year, I've already started to clean up this bed - cutting down grasses and rakin...

Second Load of Biosolids Applied - Perennial Garden Topdressing - February 2024

Image
Last week, I posted the details and photos of the first late-winter application of municipal biosolids in our garden and talked about how I was going to try to find some time to head to the mulch pit to get a few loads before gardening season heats up.  I applied that initial load to some areas that needed the soil amendment including the Spring Grove Ginkgos, the epimedium colony and my Hellebores.   I mentioned (in that post) that for every spot that I dumped a bucket of biosolids, I spotted 2x more spots that could use a top-dressing.  Not to mention the lawn, the parkway and the compost bins.   Over the weekend, I ran out and picked up another load.   About 8 five-gallon buckets filled up 2/3rds-of-the way.  And dumped and spread out around the backyard.   I added another partial-bucket under the Linden trees: And, right at the base of my bird feeder pole: At regular intervals along the front of the south border: Around the tru...

Little Lime Hydrangeas - Summer Bloom Time - August 2023

Image
Last Summer (June 2022), I bought three Little Lime Hydrangea (a dwarf cultivar of Limelight ) and planted them in front of the Belgian Fence of Apple trees.  They were small, but produced a handful of blooms in late July that first growing season . Fast-forward a year and these three flowering shrubs have changed quite a bit.  They're thicker, more full and...FULL of blooms this year.  See below for a photo of their current (mid-August) state: These are a really good solve for this spot - they're at the back of the bed, but with the Belgian Fence behind, I couldn't use a full-height shrub here as they'd obscure the espalier.  So, this dwarf version is perfect.   It also has me thinking about how I could re-use these in other spots that are mid-bed.  Further back on this same northside of the backyard, there are spots.  And, maybe even IB2DWS?

Spring Grove Ginkgos + Brookside Geraniums - One Month Later - June 2023

Image
Back in mid-May, I replanted our two small, square beds on either side of our back stoop .  I dug out the RJM Rhododendrons that were there since our first Summer and replaced them with a pairing of Brookside Geraniums and a witches broom, dwarf Ginkgo named Spring Grove .  #13 on my 2023 to-do list was to 'fix the back stoop beds' and this swapping out was a big part of that need.   I also took a few plugs of Angelina Sedum from the north bed and transplanted it to the south bed, so they would be mirror-images of each other.   When I planted the Spring Grove Ginkgos, they has leaf'd out, but had suffered a litttle bit of late-frost damage to the tender leaves.  The geraniums were small and just emerging, too.   A little bit over one month later, what do they look like?  The geraniums have grown quite a bit.  And, so too, have the Ginkgos.  See below for (first) the north bed.  And then, below that, the south bed. Spring ...

Shade Annuals Planted in Landscape Lobelia, Begonias, Impatiens, Polka Dot Plants - May 2023

Image
The way that I think about gardening is that you have to have a systemic approach to planning and planting that is paired with a secondary, supplemental approach to zhuzh'ing things during the growing season.  That systemic approach means trees and shrubs and even perennials.  (I need to do more evergreen shrubs....just a self-reminder.) But that supplemental zhuzh'ing is something that I've mostly done through division and some bulbs.   I suppose that's the difference between a landscaper and a gardener, right?  A landscape gets it all planted and is satisfied.  A gardener will work the garden all year long.  A plantsman?  That's for another post. One of the things that I've talked about over the years is how to use annuals in the landscape.  The only place that I've successfully planted them is out front in the porch beds.  In the back?  Nothing. Last year, I included the idea of using shade annuals and dark foliage .  B...

Hand Pulling Wild Onions From Lawn - Northern Illinois - April 2023

Image
The Wild Onion continues to be a problem.  The clumps of these bulbs are in our lawn and in our beds.  I've worked at them for years - including cultural and herbicide treatments over the years.  I've removed them, sprayed them and attempted to treat the soil to make them less happy.  This Spring, I've lime'd the backyard , sprayed the tips with Tenacity and pulled them out by hand.  This past week, I went into the understory garden bed and used my Hori Hori to pull up a bunch of these jerks.  Below is the orange trug filled up with the bulbs.  What's different in the beds vs the lawn is that it is a bit easier to get the bulbs out without taking more dirt/soil/earth.  I pry up the bulbs, cut the clump and pull from the bottom.   If you have Wild Onions like we do, be SURE TO NOT COMPOST THEM.  These go right in the trash - not the compost pile.   Here's a couple of other Spring 2023 posts on these awful things. 

Dividing Summer Beauty Allium - October 2022

Image
Third in the Fall dividing for "free plants" in our garden post series.  First was the roundup of 22 hostas .  Then, yesterday I showed three net new ferns .  Today, I'm sharing a look at my first attempt at dividing some Summer Beauty Allium.  I have a couple of colonies of Summer Beauty in our backyard beds.  First, the one closer to the house.  I dug up one of the Allium and divided the bulbs to make a second plant.  I tucked the original one back in the same hole.  See below for the 'after' - the division came out of the Allium in the middle of the photo: Here, below, is what the clump looked like: I decided to plant this one trial division in the sideyard, in between a couple of the Disneyland Roses: I repeated this trial exercise with another of the larger Summer Beauties in the further-back-section.  I took from the plant at the very top/middle of the photo below.  And dug it into the spot at the very bottom/middle of the photo be...