Posts

Showing posts with the label backyard projects

3rd Location - Backyard Pizza Oven - January 2024

Image
Analysis causes paralysis is a trope that people say in business and life.  But, I'm NOW feeling that very thing HARD in regards to our backyard pizza oven planning.  It was just a week ago that I VERY CONFIDENTLY posted about how I was down to just two finalist locations for our oven .  But, today?  I'm not so sure any longer.  What about a 3rd location, on the south side of the yard, about the same distance from the house.  But, tucked into a current bed where the Alice Oakleaf Hydrangeas are planted?  See below for this 3rd location at the bottom of the drawing: This 3rd location re-introduces one of the ORIGINAL sites that I contemplated as far back as 2017 .    What does this new site get us?  It certainly doesn't take advantage of the grade change, so that means that the full height and mass of the oven will be in-view.  That provides for a bit of screening.  But, it also means that the oven becomes a garden focal-point.  If site'd here, it would be the biggest dr

Using L-Shaped Cinder Blocks For Corners of Backyard Pizza Oven Stand - January 2024

Image
Earlier this week, I posted my 3-D model using LEGO bricks of my proposed wood-fired pizza oven stand that would be built from a couple different sizes of standard cinder blocks - 16x8x8 and 8x8x8.  In that post (and using the model), I determined that I needed 4.5 blocks deep (from front-to-back) and 4 blocks wide (side-to-side).  That gave me a 74" deep by 64" wide block stand.  Or 6'2" deep and 5'4" wide. But...there's a new development.  At least...new to me, the novice bricklayer.  Turns out, there are 'corner' cinder blocks.   I discovered this fact when I was at Menards looking over the block inventory.  Here's a few photos showing these L-shaped corner-forming cinder blocks  below and how they work together with normal blocks.  These are 12" block compatible. Below is a drawing from Menards that shows the dimensions of these L-shaped corner cinder blocks in 10" width: There are so many variables that I still need to work out

Creating A Stumpery Garden - Getting Ahead of A 2024 Garden Trend - November 2023

Image
I spotted this annual outlook on gardening trends from Garden Design and will - I think - post about the full list at some point.  I've done that the past few years - 2022 trends -  and last year - 2023 trends .  There are a few items on this years list that are worth a blog-post-level exploration.   But...there's one item that was totally BRAND NEW to me.  Borderline revelation.  It was that in 2024, more gardeners are going to 'rediscover stumpery gardens'.    I read that and was like... Wait a second.  Stumpery.  What the heck is a stumpery?   I've never heard of a stumpery let alone thought about adding one or 'rediscovering' stumpery gardens.   Here's what Garden Design says : While once a Victorian fad designed to show off fern collections, stumperies are again making a comeback. Only now, the focus isn’t only on plant collections but also on creating wildlife sanctuaries while showcasing shade-loving plants. Simply speaking, a stumpery is a shad

2023 Yard and Garden To-Do List Late-Summer Check-in - September 2023

Image
My 2023 yard and garden to-do list had 25 items on it and with most 1 of the growing season behind us, I thought it would be helpful (for me!) to do a mid-season check-in.  How am I doing against my priorities?  What do I need to do before the season ends?  Let's run through the list and see how we're doing: 1.  Evergreens.  I wanted to plant more evergreens.  I've planted 19 evergreens so far this season:  five Boxwoods in front, a Columnar Scotch Pine tree in back and now 13 more Boxwoods in back.  I also transplanted a large Boxwood from the front-to-back.  So..20 evergreens including one transplant.  I'd say... Done .  2.  IB2DW Extension.   I wanted to extend the bed and add 'clustered evergreens' along with other things like grasses and annuals.  I haven't added anything, but I did amend the soil with biosolids and carved out some turf to extend the bed a little bit.  I'd say this is: Incomplete.   3.  Front porch bed.   I amended the bed with

Teal Oil for Teak Patio Table - Summer 2023

Image
It isn't the patio container box ( which...is #23 on my 2023 to-do list) , but it *is* something:  I applied a coat of Teak Oil to our patio table.  The top is, indeed, teak.  And, after a few passes with a sander, I was able to get down to some nice, clean teak.  And the top soaked the oil right up.   Is it a seasonal project?  Sort-of?  I'm going to count it on my 2023 to-do list check-in, for sure.

Building a Floating Backyard Boardwalk - July 2023

Image
As far back as Summer of 2017 (the Summer we moved into our house), I've been posting, talking, dreaming and planning for the 'entrance' to our backyard along the northside of our house.  This post from July 2017 shows where we started - a small, narrow strip of land between our screened porch and our fence that has a grade down from our house .    In the six (yes...SIX) years since then, I've looked at this problem a ton of ways.  I've had pros come up with designs .  I found inspiration on YouTube that included a waterfall .   And, I began to address some of the issues with this spot.   What were those issues? 1.  Privacy.  We needed to add some screening along this fenceline to make our patio and screened porch usable. 2.  Access.  Getting from our driveway to our patio has been tough - the grade has been the biggest pain. 3.  Size.  It is narrow in there.  4.  Cost.  How can I accomodate the right mix of materials and construction to make the costs work. Now...

Backyard Retractable Hose Reel Mounted to 6x6 Post - May 2023

Image
Beginning in Spring 2022, I have talked about installing a second yard hydrant in our backyard featuring a self-rewinding hose reel.  I included it on my 2022 to-do list and failed to install the post and reel in 2022.   I carried that task over to our 2023 list and put it at #5:  install a second hose reel .  I had the hose reel for more than a year, so it was simply a matter of installing the post to hold the reel. This is the third of these reels that I have at the house - the first one is in the garage .  The second one is about half-way back attached to our fence .  This third one is planned for close to the spigot.  I have historically used a loose hose to water the patio containers.  I thought this upgrade would keep things a bit more tidy.   Ahead of digging the hole, I called J.U.L.I.E. and had them mark any underground utilities.  In the photo below, you can see the red line for electrical underground.  And the orange stake is where I wanted to dig the post.  All clear.  I c

A Disney-Inspired Water Feature for 2023? February 2023

Image
One of the things that I've been chasing FOR YEARS in all three of our gardens (two of our own, one borrowed via my sister Vic/Equation Boy/Man when we lived there for two years) is a water feature.  I've longed after one in various forms.  Over the years, I've had two water features that managed to be planned, executed and maintained.  But, each of them lasted for just one season. The first one was this three-tiered acrylic fountain that I had near our garden in our first house in Elmhurst.  The birds loved it.  But, it dried out rapidly.  Then it cracked and was junk.   The second one was this small wine barrel water 'feature' that we had in the borrowed garden/patio .  It was an insert that wasn't quite the right size inside of a wine barrel planter from the hardware store.   I've talked about adding some water - for both the visuals but also the sounds - many times.  I included it on my 2022 to-do list and it was an item that didn't get done.   Wh

Overseeding an Overseeded Lawn - September 2022

Image
Last week, I posted the details of how I was overseeding and renovating my backyard with a mix of Kentucky Bluegrass and Tall Fescue seeds .  In this post , I went over how I was attempting to pre-germinate the seed by soaking it in water for five days in an attempt to speed-up the process once I scattered the seed.  Well...I went ahead and scattered the seed using e-Corganite as the spreading and drying agent with the wet, pre-germinated seed.  As a reminder, I put down 30 pounds of seed across about 10k square feet in our backyard that was made-up of 10# of KBG and 20# of Tall Fescue seeds.  I applied it at different rates to different parts of the yard.   But, then I panicked.  As I walked around the yard, not only did I NOT see any seedlings, I saw a bunch of what sure seem like blank spots.  Just dirt.  No seeds.  Yikes.  I thought that maybe I didn't put down enough seed.  Or that it had washed away.  Especially on the sides.   So, I rushed out and bought another bag of seed.

Greenspire Linden Horizontal Cordon Espalier - Spring 2022

Image
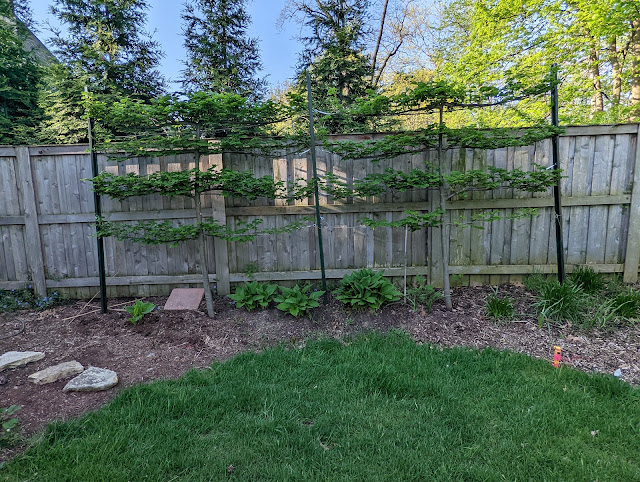
Earlier this week, I showed off the new haircut that I gave to the pair of crabapple trees in our sideyard and talked about my plan for shaping them into a Palmette Verrier form along the side of our house . I thought it would be wise to document my other (or...as the kids say:  OG) espalier:  the pair of Greenspire Linden trees that are shaped into a four-tiered horizontal cordon. The last time that I showed these trees was in early April when they had NO leaves on them .  I mentioned last week that they had broken bud (very pretty buds, btw) and were leaf'ing out.   What do they look like this week?  Really lovely set of espalier - with four tiers.  Well...almost four.  See below: On the left, the bottom tier is done on the left, but needs some help going right.   On the tree on the right, the bottom tier needs some help extending both ways.   I'm thinking those will get done this growing season.   #6 on my 2022 to-do list was to continue to work the Lindens (these have bee

2022 Yard And Garden To-Do List

Image
As the calendar is showing late March, we're now STARING down the real beginning of gardening and yard care season here in USDA Growing Zone 5b.  And, like a lot of amateur gardeners and landscape caretakers, I often find myself adrift - drawn to things in garden centers that I don't have in my plans, pulled to focus on projects that steal time and end up planting things in places that don't make sense for the long haul.  However, I *do* have a landscape plan that was drawn by a professional.  I have of gardening rules don't buy just ONE of anything  and dig a $5 hole for a 50 cent plant .  (That makes me think that I *should* write a post that outlines my adopted gardening rules that I've collected over tim).  And, I have list of projects that I'd like to tackle.   Using those tools and direction SHOULD make the growing season go smoothly.  But, everybody - including me - needs to be held accountable.   That's why, over the past three growing seasons, I'

Bluestone Chips Garden Path - September 2021 - Driveway Section

Image
Six weeks ago, I posted a photo of part of our garden path on the northside of our house that we installed this Summer that featured a metal edge and a thick layer of Bluestone chips for the gravel.  In that post (from early August), I showed a view from a concrete landing forward to the gate on our fence .  The Bluestone garden path extends PAST the gate and (now) connects our driveway with our backyard.  Or....mostly does.  There's still another section to do that I think we're going to have to do in pavers with a retaining wall.   But, I wanted to capture in the [ garden diary ] how the path works with the driveway.  You can see below how I flared the edging out to make a wider birth and tapered it back to a 48" wide path as it makes the curve around that Vanilla Strawberry Hydrangea.  As I said back in August, this project wasn't on my 2021 to-do list , but it should have been.  It was something that we NEEDED to get done and now gives me a bunch of opportunities t

A 2020 Miss: Staining the Patio Container - December 2020

Image
 I'm due for a final 2020 to-do list recap, but before I get to that full list, I wanted to put down a post here about just one item:  #12 - Paint/stain the Patio Wood Container.   Here's a link to a late-season (October) checkin on the list that at the time showed #12 being left uncompleted .  Here, below, is a photo of said wooden patio container and one of our larger glazed patio containers tucked in next to it.  And guess what?  It is STILL unstained.   I started this project back in Summer of 2019 - as it was an ask from Natalie. I used treated lumber and based on everything that I read, you're supposed to wait a while to let the treated lumber to breath on its own BEFORE staining it.  That meant that I let myself off the hook that first year.  But this year?  NO excuse.  Other than COVID, I guess. Posting this mostly to SHAME MYSELF into getting this back on the 2021 to-do list and to get it done in the Spring.  Nat wants it stained black - so I just need to get to th

Garden Obelisk - Lumber Order - Spring 2020 Projects

Image
Yesterday, I posted (for my own thinking) a lumber order for the building of a Versailles Orangerie Planter box and mentioned that it was one of a couple of projects I'm thinking about as part of our social distancing program.  I recently received the catalog from Gardeners Supply Company - which is a joy to read right now - and saw this large cedar obelisk.  They're asking $199.00 for what seems to be a pretty " good quality item ".  But, I know that I can beat that price if I built them myself. Here's the Gardener's Supply Company Obelisk.  This is NOT my photo - it is via their catalog here: Source via Gardener's Supply . As for the 'why' add an obelisk, well...I'm not totally sure just now, but thinking about growing something like hops.  We had Golden Hops planted in our yard back in Elmhurst and I liked having them grow up a trellis.  It took a couple of seasons to get them to grow vertically, but by the time we moved, they