Posts

Showing posts with the label 2024 planning

2024 Yard and Garden To-Do List

Image
  The season is here. The Yard and Garden Season, that is. Each Spring arrives and I’m OVERWHELMED by what I need to do, should do, have to do, might do in and around our garden. The arrival of trees, shrubs, perennials and annuals at the big box stores and nurseries just add to the strong urge to GET GOING out there. But, over the years, I’ve learned that I need to prioritize. And plan. And give myself something to measure-up against, so I know that I’ve accomplished what I thought I needed to focus on each season. The first year I did one was 2019 and I've done one every year. Here is 2020 .  2021 .  2022 .  And last year - 2023 .  Each year, I score myself against the 25 items that I picked out.  Last year, in addition to scoring (22 out of 25 marked 'complete' ), I also wrote up a list of 10 takeaways/lessons learned that have become important in thinking about my path forward.  In that list of 10 takeaways, I included things like:  no more shade trees (for now)

Getting to know Coleus - Edged Leaf vs Veined Leaf Sun vs Shade - March 2024

Image
Resist the lure of the big box nursery store.  That's something that I'm trying to live-by this Spring.  And, something I'll need to remind myself when it comes to containers.  The past few years, I've picked up some bedding annuals from the orange big box store.  Same with some of the plants that go into our various containers.  One of those has been coleus.  I've used it in containers - but not as a bedding plant where I've installed it as an annual in mass.   Here's a post about our large, rectangular front porch container from the 2021 season that includes some two-toned coleus .   Over the years, I've admired coleus as a bedding plant in some municipal applications (like in large, island beds in Downtown Downers Grove) where they've planted one variety in mass.   I also have come back a few times to this garden tour on the S&K Greenhouse YouTube Channel where Justin (the S&K Nursery guy) visits the home garden of Bruce Duncan .  Justin a

Dahlia Tubers @ Home Depot - February 2024

Image
Last year, I started to learn how to put together cuttings from our garden into countertop arrangements .  I made a number of them from late Summer to Fall that were primarily anchored by the Disneyland Floribunda roses.   By the end of the season, I came the conclusion that I needed to get outside of my foliage-gardening 'comfort zone' and start to add some flowers.    On a late-season whim (sale), I planted a few new (to me) flowering perennials including May Night salvia , coneflowers and some Agastache 'Blue Fortune' to the front IB2DWs beds.   I also pulled the trigger on a small dahlia tuber order from Longfield - where I pre-ordered some Melina Fleur (Decorative) and Cornel Bronze (Pompon) tubers .  My (current) plan is to put those in by the Disneyland Roses on the side of the house.    I also bought some Cut-and-Come-Again Zinnia seeds that I'd like to start inside and move to my containers in the back  - to replicate the look of a  combo of Zinnias and E

Harbor Freight Cement Mixer - Pizza Oven Construction - Tools - February 2024

Image
After excavation, the first step of building my backyard pizza oven is framing and pouring a solid foundation for the oven to sit-on.  This foundation is going to be a 5.5" thick, reinforced concrete slab.  I've been probing for the boundaries of the in-ground drywell in our backyard ( post with photos here ) and have to decide on final location in the coming weeks.   Once that location is set, I can begin excavation.  Then, my brain will switch to construction material ordering - starting with bags of concrete/cement and concrete block for the foundation. The first consideration in that process is how I'll go about making/mixing the concrete.  One of the recommendations from the builder community on the Forno Bravo forums is to buy a 3.5 cubic foot cement mixer from Harbor Freight.  I went over to the local HF store this past weekend and sized the machine up.  Here, below is a photo of the cement mixer below: Here's the product page - shows the specs and the price : 

Cleaning Up Front Porch Beds - Ornamental Grasses for Compost - February 2024

Image
A couple of days ago, I posted in my [compost bins] diary a look at the current state of my bins now that I've topped them off with a lot of ornamental grass material - reeds, canes and blades.  I tried to chop the material down into smaller segments in an attempt to break it up a bit and speed decomposition.    While I was cleaning up the grasses, I also went into the front porch bed and clipped off and cleaned up the front of the bed.  That included a number of Dusty Millers and all of the Seslaria Autumnalis (Autumn Moor Grass) .    Here, below, is a look at this bed after I trimmed up the Moor Grasses - but left behind some of the Fall leaf litter that has accumulated over Winter:  I also have three large Karl Foerster Feather Reed Grasses in the island bed between our driveway and front walk.  I pruned all of those ornamental grasses and cut them off an inch-or-two above their crown.  That island bed after the ornamental grasses have been cleaned up for Spring is below: I'

Imagining A Front Yard Conifer Garden With Miegakaure - February 2024

Image
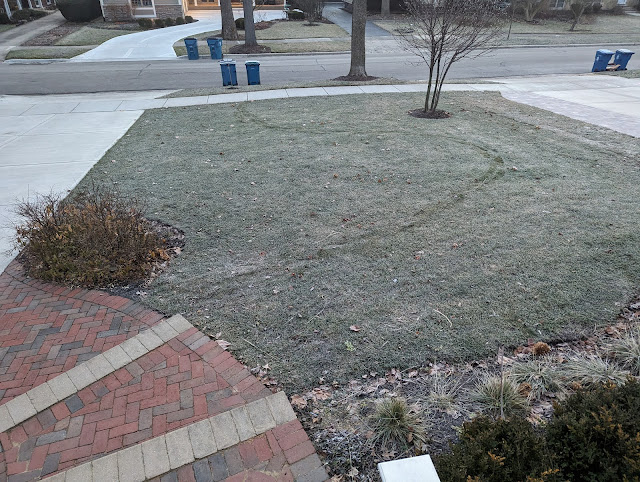
A couple of weeks ago, I posted a pretty lengthy garden diary post that outlined some of the inspiration and design ideas that I've been cataloging for the front yard .  I also posted this conifer inspo of three blue junipers (upright) in a mixed perennial bed .  What would it look like?  Ideally... something like this house .  But, that's not realistic - just yet.   In that post, I talked about doing a 'phase 1', but doing it with an eye for the entire design.  What's the key, defining characteristic of the 'entire design'?  I think it is centered on three things: 1. A path. 2. A bern. 3. ...and some miegakure. I was out front - taking the garbage cans out - this past week and because there was some frost on the front lawn, I thought I could (sort-of) shuffle my feet through the grass and leave a mark of what feels natural in terms of a front-yard path.  See below for my winding, curved (potential) garden path.  It starts closer to the driveway, winds *b

2024 Project: Bee Hotel Renovation - February 2024

Image
We've had a bee hotel (or Mason Bee House, if you will) for a number of years, but the past two it has been sort-of 'out of service'.  It fell from the its perch and has been laying on the ground.  For 2024, I'm going to push myself to renovate this thing.  It needs a new bottom and some replacement bamboo pieces. Why did I suddenly think of my Bee Hotel?  Because the University of Illinois is (right now...) conducting a " Bee Hotel Project " where they're calling for people to donate their Bee Hotels to science.  Check out the details here and sign-up to donate your Bee Hotel here .  U of I researcher Timo Wayman (an Entomology graduate student at University of Illinois ) is looking to help better understand native bees. I'm not sure our Bee Hotel will be of any value as it has been sitting on the ground for two seasons, but I'm going to fill out the form and see if they'd like to take a look.

Winter Kitchen Compost Snapshot - Pre-Mixing - February 2024

Image
Two days ago, I posted a photo of a new "Desire Path" in our backyard that appeared during Winter and was a result of walking back-and-forth from our house to our compost bin with our kitchen compost material.   We kept up with composting (thus far) through the cold weather and have been stashing the kitchen scrap material in the new 3rd storage bin.  The one with the "feed me" compost bin sign on it .  I just brought out a load of material and dumped it and thought I should document the state of this bin - pre-mixing this material.  Here, below, is a photo showing the top of the bin.  The bottom 98% of this bin is filled with autumn leaves.  The top 2% that you see here is pretty colorful.  And comprised of vegetables and fruits, cut flowers, egg shells, avocado peels, onion skins, coffee grounds and some spent hydrangea blooms.   The temperatures have STOPPED any decomposition the past 30-or-so-days and kept the colors vibrant.  I've left this material on top

Hellebores Emerging For Season - February 2024

Image
I was out in the backyard this week and after walking around and being bummed about all the rabbit (dang rabbits!) damage , my emotions turned back upwards when I walked over to the little colony of Hellebores we have planted underneath some large trees (Walnut and Catalpa).  All of the Hellebores are showing their new 2024 growth emerging from the soil with pink, almond-shaped buds.  Here's a few photos showing this year's growth:  Ivory Prince Hellebore Emerges in early February in Zone 6a.  As of this Spring, we had six (6) Hellebores in the garden.  I bought two (Merlin variety) at the Morton Sale and planted them along the existing four (1 Sally's Shell, 3 Ivory Prince) .   As noted in late August, both of the Merlins died .  Didn't even make the Summer.  Bummer.  My first real, true (and VERY FAST) failure from the Morton Sale.  I lost a Maidenhair Fern that I bought in 2021 that very same year, but I think that was due to neglect.  These were something else.  Di

Roof Inspiration - Backyard Pizza Oven - January 2024

Image
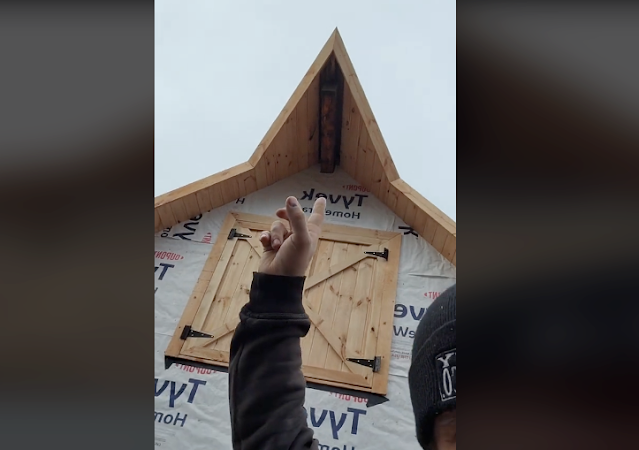
Yesterday, I posted a photo of the 'drywell exploration' that I conducted to find the edges and depth of the drywell to discover if it would serve as a suitable subsurface for my diy backyard wood-fired pizza oven.   I've also recently posted about some brickwork inspiration here .    When thinking about the oven, the facade is a big part of the 'looks', but so too is the roofline.  I recently came across this Tiktok from RustyVanRanch  - embedded below - that shows a barn roof that has an extended peak out front at the top of the gable: @rustyvanranch ♬ original sound - Rusty Van Ranch Here's a screenshot of the roof in question: A little digging revealed that those are called " Hay Hoods ".  Some call them "Crow's Beaks".  It serves a purpose of providing a little bit more shelter over the hay loft door.  For my pizza oven, there's appeal in a little bit of protection WITHOUT creating a huge, overhead roof.   Filing this awa

Digging To Find Drywell For Backyard Wood-Fired Oven - January 2024

Image
A few weeks ago, I posted a couple of items related to my 2024 goal of building a wood-fired pizza oven in our backyard including a look at a couple of locations , some brickwork inspiration and how I could build the stand out of cinder blocks - including corners .   With the snow melting away this week, I went out to look at one of the locations and remembered...that ahead of the snow, I was digging around trying to find the 'edges' of the drywell.   Below is a photo showing a number of locations that I dug down to see 'how deep' the drywell is located and how I was probing to find the 'edge' of the well.   The drop from grade to drywell is variable across this six-foot-by-six-foot section.  Surprisingly so.  I also found (I think) two of the 'edges' of the drywell.  Which...if I sited the oven where I *wanted* to, would have a small portion of the foundation OVERHANGING the drywell.  That would mean that I'd have to bring in some gravel - which i

Front Yard Conifer Combo Inspiration - Blue Needles and Purple Perennials - January 2024

Image
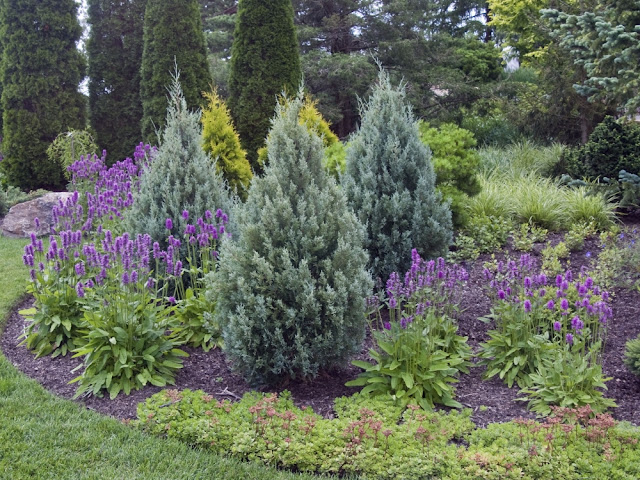
Yesterday, I created and published a lengthy - and winding - post about a potential front-yard garden transformation that is anchored in conifers and contains a potential 'path' through the middle.  In that post, I talked about using a berm in part to create some elevation change and I also sort-of came to the conclusion that I would certainly NEED to start in phases as the project is a multi-year planting (at least for me).  In that post, I concluded that based on some inspiration, I could (in theory) start down by the sidewalk with a small bed and expand from there.   One of the dependencies is the creation of the berm and the location for said berm.  My current thinking is that the berm is created if-and-only-if, I do some excavation for the pizza oven.  I would haul the material that I excavated from the back out to the front and build up a little berm on the driveway side of the front yard, down near the sidewalk.  I bring this all up, because I recently came across a pho

Using L-Shaped Cinder Blocks For Corners of Backyard Pizza Oven Stand - January 2024

Image
Earlier this week, I posted my 3-D model using LEGO bricks of my proposed wood-fired pizza oven stand that would be built from a couple different sizes of standard cinder blocks - 16x8x8 and 8x8x8.  In that post (and using the model), I determined that I needed 4.5 blocks deep (from front-to-back) and 4 blocks wide (side-to-side).  That gave me a 74" deep by 64" wide block stand.  Or 6'2" deep and 5'4" wide. But...there's a new development.  At least...new to me, the novice bricklayer.  Turns out, there are 'corner' cinder blocks.   I discovered this fact when I was at Menards looking over the block inventory.  Here's a few photos showing these L-shaped corner-forming cinder blocks  below and how they work together with normal blocks.  These are 12" block compatible. Below is a drawing from Menards that shows the dimensions of these L-shaped corner cinder blocks in 10" width: There are so many variables that I still need to work out

Lego Model For Wood-Burning Pizza Oven Stand - January 2024

Image
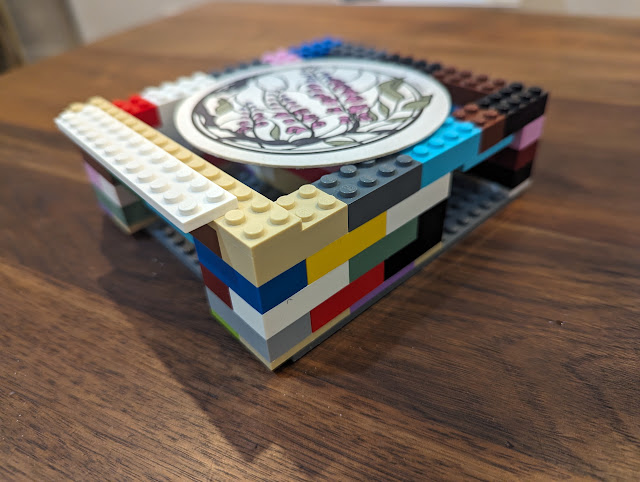
I've been busy getting to know Sketchup - in an attempt to create a true, accurate model of my (hopefully to-be-built-in-2024) backyard wood-fired pizza oven .  But, I also figured out a different, three-dimensional approach that will work (at least for me).  The stand of the oven is built from typical cinder blocks:  16x8x8 (16" long, 8" tall, 8" deep) and half-blocks of 8x8x8 (8" long, 8" tall, 8" deep) that are commonly available from any big-box hardware store.   I was playing around with sketchup one afternoon when I realized that I could build out a model using some common bricks.   I wanted to get a sense for how the stand would come together and also begin to build out a parts-list for the blocks.   I went up to the kids lego bins and quickly figured out how to build this: Part 3001 (2x4 brick)  has 8 studs on top and is the typical rectangle brick that you think of when you think of LEGO bricks.   Using a one-stud for 4" each direction, t