Posts

Showing posts with the label workbench

Outdoor Bonsai Table (DIY Idea)

Image
Back in February, when I was at the end of the line in terms of wanting to deal with snow, I posted something that amounted to a bonsai wish list (or to-do list) for the season.  It was a way to get my brain thinking about what the Spring and Summer will look like and a coping mechanism after all the snow.  (Listen...I'm not normally someone who hates Winter.  But, February...and ALL.THE.SNOW was, umm, a bit much.) So, out of that post , I mentioned that I wanted to do a few things including utilizing the existing nursery stock that I have on hand, acquire more for future use, dig up a 'found' bonsai (American Elm), take a bonsai class and...create a bench or table for the trees.   I've looked around (briefly) on the Web to figure out the right way to display bonsai and it seems like if you are interested in learning more about the topic, stop number one on your journey should be this Bonsai Empire post that talks how to display trees and gives some tips. ...

Hang Up on the Wall-Hung Workbench - Notched Cuts Template

Image
Back at the end of July, I posted a photo of the wall-hung workbench that I had selected to build first in the garage (garden bench) and then down in my shop (once I got the hang of it!).  I pulled down some plans from WoodSmith Plans and got started ripping down the lumber to make all the pieces.  But there was a part that I got hung up on - these angled brackets with notched cuts at the bottom that I've circled above.  The plan calls for these supports to be notched and attached to a ledger board (that gets attached to the wall).  But, my little, amateur woodworking brain couldn't quite figure out how to make those cuts.  I took a sacrificial board and drew all over it to get the angles right.  I even took it over to Nat's Dad's house and had him mark it up so I could figure out the best way to make the cuts.  He showed me how to use my table saw to get most of the wood out, then a saber saw to make the final cuts.  But then I got home an...

Decision Time: Final Wall-Hung Work Bench Design

Image
Bench via WoodsmithPlans.com In March of this year, I posted a photo of a wall-hung workbench that I came across on Instagram .  The photo above is of that same bench, but comes from the source of the plans:  Woodsmith Plans .  They're offering a plan for sale for the bench plus the tool holder above and the little shelf for hand tools on the very top for $10 .  I think I've settled on going with this direction for both a bench in my shop in the basement, but also for a garden bench that I'm now planning in the garage. This whole thing started with this initial wall-hung workbench with curves that I found online at the WoodArchivis t.  But, in looking at the space constraints that I have in my shop, coupled with some concerns about the rigidity of the curved superstructure, I've kind of drifted away from my initial plan.  In the shop, my plan calls for hanging the bench on concrete walls, which requires cleats or ledgers (as in this design above)....

Workshop Wall Going In (Basement)

Image
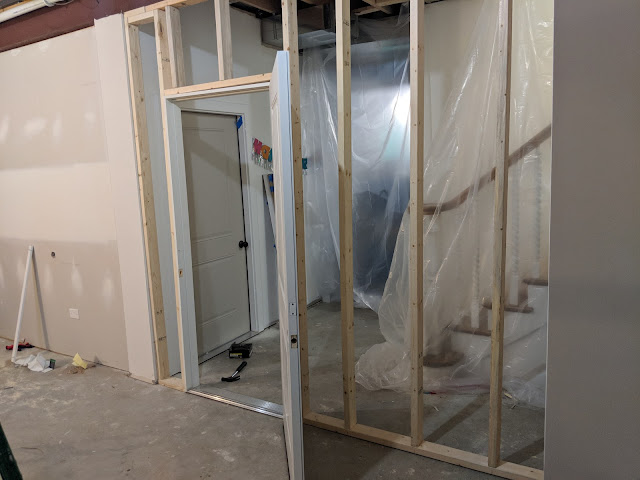
After months of planning and thinking and posting about my eventual workshop, we finally have progress:  the wall that divides the rest of our basement with my shop is getting installed.  In the photo above, you can see the wall being framed and the steel door - an exterior door - installed.  On the right side of the photo - through the framing - you can see the existing stairs and banister coming down from the first floor.  In the middle of the room, you can see an existing door/wall that built out by our builder to contain the mechanical room.  They used a steel, exterior door on the mechanical room, so we replicated that with the door for my shop.  They're going to be so close, so it was important for them to match. Right after the wall framing is done, drywall is going on the outside, but I'm going to leave the inside unfinished.  I'm still planning on cutting in a spot for a vent ( see here for inspiration ) and stuffing the joist cavities wi...

Another Wall-Hung Workbench?

Image
Back at the end of January, I posted about this wall-hung workbench and - at the time - commented about how it was quite a 'looker'.  I still like it.  But, somehow, I came across this Instagram post from woodworking_lovers - which I think is a spammy account - that features a twist on the wall-hung workbench.  Spammy post (about starting a business) aside, the bracing that this bench shows off is interesting to me - and maybe just seems a bit stronger/easier to understand how it would work.  The 2x6's that are angled from the top to the wall are notched to rest on the wall cleat.  Visually, it makes sense to me why it would support the weight.  Maybe there's a way to marry the two ideas?  This one for the super-structure.  Then wrapped in the curves from the original to cover up the structure? 

Wall-Hung Workbench - Quite a Looker!

Image
I came across this wall-hung workbench on the Wood Archivist and it stopped me in my tracks. I posted last week on my link blog the minute I saw it .  I was/am smitten.  I didn't want to lose the link.  Just look at it - she's a beaut, right?  Those curves. The built in lighting.  The fact that it doesn't hog floorspace?  The built-in dust collection system? All of it.  Awesome.  The full plans (or call it an article showing some of the steps and the cutlist) are here .  My shop right now is just a 'space', but that is ending soon.  Have plans to add a wall and a door to define the space.  Then, the first step is to finish my miter saw table.  After that, I'm going to turn my attention to a few benches. I currently have a bench that is satisfactory, but needs an upgrade.    I posted about the first (and existing) bench here on the blog back in 2010 .  Still looks the same.  Functional, but kinda basic...

Reclaiming the Basement: My New Workbench

Image
If you know the difference between, say, a  Holtzapffel-style cabinet maker's bench and a split-top Roubo-style workbench , then this post will not impress you. (Bill Fox...I'm looking in your direction.) But...those of you guys who are cramped up in a condo somewhere on the northside and long for a little man-retreat, then you're going to be jealous! Anyway...back to the story.  Starting a few weeks back, I began to beat my cabin fever by beginning to organize our basement.  Our basement is probably like a lot of basements: unfinished, messy, damp, and quite a bit disorganized. During construction (or re-construction), the basement housed just about everything we owed that wasn't in our POD - and it was messy down there.  Once we moved in, we started to put everything that didn't have a home down there.  Over time, I bought some shelving units and began to put some of our stuff on the shelves, but in no particular order. We then inherited some of my s...