Posts

Showing posts with the label #newoldfarmhouse

Upgraded Garage Spring - October 2020

Image
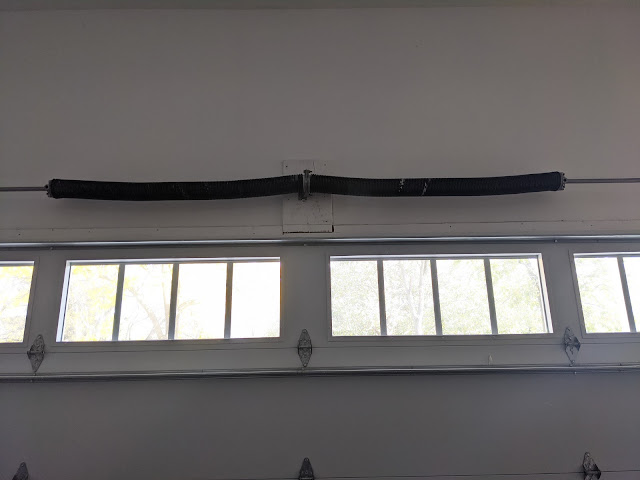
 Our garage door is oversized.  And, when I say oversized, I mean oversized...by a lot.  It is a normal width, but the height makes it bigger than most.  And heavier than most. Our spring snapped after just three years.  Seems like it didn't have a normal life.  So, instead of swapping out like-for-like, we replaced it with this monster: Still needs tweaking because it SCREAMS on the way up and on the way down.    The Garage Door Guy has an idea - and it involves PVC pipe to separate the spring from the metal rod.

Before/After Southside Window Well Clean-up

Image
Up top is the 'before' photo of one of the window wells on the southside of our house.  We had some work done to it and the landscaping required restoration.  This is technically the 'in the middle of' photo as the landscapers had already done some cleaning up. Below is the after.  They laid some sod, straightened things out and put mulch down.  Now we just have to babysit the sod with a soaker hose while it gets established.

Workshop Wall Going In (Basement)

Image
After months of planning and thinking and posting about my eventual workshop, we finally have progress:  the wall that divides the rest of our basement with my shop is getting installed.  In the photo above, you can see the wall being framed and the steel door - an exterior door - installed.  On the right side of the photo - through the framing - you can see the existing stairs and banister coming down from the first floor.  In the middle of the room, you can see an existing door/wall that built out by our builder to contain the mechanical room.  They used a steel, exterior door on the mechanical room, so we replicated that with the door for my shop.  They're going to be so close, so it was important for them to match. Right after the wall framing is done, drywall is going on the outside, but I'm going to leave the inside unfinished.  I'm still planning on cutting in a spot for a vent ( see here for inspiration ) and stuffing the joist cavities with insulation so we ca

Last Look @ Sideyard Pre-Hornbeam Hedge Installation

Image
I've posted a few times about our plan to add some European Hornbeams to the side yard alongside of our screened porch to provide some privacy from our neighbor's house.  In the photo above, you see the run of fence that will soon be lined with some 2.5" caliper trees.  You can go back to this post to see the drawing of where they are located , but they're going to cling to the fenceline and, I hope, peek over the top of the fence.  In the photo above, you can also see the grade difference with the porch on the left being a good four or five feet above where the bottom of the fence is located.  Once these trees mature a bit, they'll end up growing into a hedge of sorts ( like this ) and we'll be able to enjoy the screened porch without looking at our neighbors smoking cigarettes on their back stoop.  With April here, I'm just waiting word from the landscaper as to when these trees can be dug up and planted in our yard.  I took this photo a few week

Door Acquired for Basement Workshop Project

Image
Some good news here in terms of the basement shop project.  Thanks to the fine folks at Oakley Home Builders ,  I've acquired the door.   The hang up for the entire project was the door and the thing about the door was that I really wanted it to match the existing storage room door that was already in place in the basement.  The storage room door is right at the base of the stairs and my shop is going to be just to the left of it.  The doors to the two rooms are going to be just a few feet apart (but set at 90 degrees), so it seemed important to have the doors match.  I posted back at the end of February about the shop being 'pressurized' and trying to figure out a venting work-around .  And this door is the primary reason.  It is an exterior door that is sealed all the way around.  I wanted to use a sealed door for dust control, but am fearful that if we built the shop too 'tight', it would act like a balloon and make it hard to close the door/blow out part of

One Year Ago Today: We Just Got Windows Installed

Image
One year ago today, I posted that photo above here on the blog to mark the milestone in building our #NewOldFarmhouse when we had our windows installed into the framed house.  Hard to believe that was a year ago as it feels like yesterday that we were making the regular visits to Downers Grove to check on the status of the construction job.  Welp...Nat was there EVERYDAY because she was a trooper who took our one of our kids all the way to Downers Grove for school everyday from Elmhurst.  Then made the return trip back to pick her up.  We're one year removed from the installation of the windows, but still in the thick of things in terms of getting the house situated.  I've posted quite a bit about the needs in the yard/garden, but there's also so much still to get set-up inside.  Like window treatments, furniture, wall-hangings and what-have-yous.  Nat has done a really great job of introducing elements a little at a time and we're this/close to our installation d

House Doll'd Up For Halloween

Image
Or...at least with some ridiculous inflatables on the front porch.  For record-keeping purposes, here's the annual (or some-what-annual) photo of our house decorated for Halloween.  You can see the Big Pumpkin (or "Big Pump" as the kids call him) along with Frankenstein on our front porch.  You'll also note that the mums at the bottom of the steps are the very same ones I 'tied up' with my pro-tip earlier this fall .  There are also a couple of cinderella pumpkins stashed on the stairs near the right railing that you can - if you look closely - see peeking out.  This is the first holiday in our #newoldfarmhouse, so we're starting from scratch decorations-wise.  We've come a long way from last year when we were living in Equation Boy/Man and Vic's house (thanks to their generosity!).  Here's a photo from last year that shows the decorations .  Frankenstein is the only survivor from this whole setup!   To be fair, the line of pumpkin infla

Late Summer Saucer Magnolia Tree Update

Image
Just over a five weeks ago, I posted the first photo of our new/young Saucer Magnolia tree in the front yard of our #NewOldFarmhouse after I had 'limbed it up' for the first time .  It had grown a bit since being installed in June and the pruning I gave it will hopefully fuel its upward trajectory. Above you'll see a photo I took this past week after I gave it another minor pruning where I continued to 'limb up' the main leaders.  I took off a few suckers and removed leaves and shoots that were coming off low on the main branches.   Flipping back and forth between the early August post and this photo tells me the late summer growth is hard to detect in terms of size, but is noticeable in the buds being created.  The leaves - in some places - have become discolored - which has me worried, but I'll post a closeup of it on the blog and show off the newly emerging buds, too. I have big hopes that this tree will grow up - with our family - and be a meaningful

First Look at Potential Backyard "Entrance" Solution #1

Image
In the past couple of posts, I've talked about the need for backyard planning in our #newoldbackyard including the placement of a potential pizza oven and pavilion and my desire (despite Nat's properly-grounded resistance) to incorporate a waterfall/water feature into the 'entrance' of the backyard along with some stone stairs .   Because we've been so deliberate about all the choices that went into our New Old Farmhouse, I thought it was only appropriate that we enlisted some professionals when thinking about phase 2 of our landscape design and specifically to help us figure out the best way to provide some privacy screening and transition from the front yard to the backyard - as this will be the main traffic route for us and guests.  If you look back at this post that shows the pizza oven placement options , you can see the existing patio that we are working with and if you peek back at this post that shows a photo of this so-called 'entrance' to the

Inflatable Blinking Halloween Owl - Menards

Image
Just yesterday, I posted another photo of Menards Halloween setup with two of the kids and I've already covered a few of the Spooky Town structures .  But, there's a few things that we've bought already that have me giddy with Halloween excitement.  I'll share the bigger things in another post, but first, check out the newest inflatable to our crew: He blinks!?! Yeah.  And this one is definitely not a budget buster and there was just one box remaining on the shelves, so I *had* to buy it, right?  It remains to be seen where Nat will allow me to put up the inflatables at the #newoldfarmhouse.  In year's past, we've always kept most of our holiday-related freakiness (aka inflatables!) in the backyard.  This one is too cool to be hidden from the public, right? And, say what you want about Halloween Creep , but the fact that this was the last one of these things at Menards tells me that consumers are ok with Halloween stuff despite it being August.

Menards Halloween Is Up - 2017

Image
This past weekend marked the turning of the Menards seasonal store inventory over from Summer/back-to-school to Halloween stuff.  And it is the beginning of the most wonderful time of the year!  I've chronicled this transition to Halloween in years past including 2016 here .   2015 here .  And 2012 is here . Now that we've moved to Downers Grove, we don't have a Menards super close any longer - but we have two (Bolingbrook and Glendale Heights) that are the same 15 or 20 minute drive away.  The photo I took above is from Bolingbrook - which is an older-style store.  But their Halloween section is pretty robust and goes well beyond this Halloween Village set-up from Lemax.  Blowmolds and inflatables?  They have a bunch of them including a blinking-eye owl that I have my eye on.   Our new neighbors are going to love the Inflatable City, aren't they?  In Elmhurst, Nat was totally fine with inflatables in the backyard, but drew the line at the front of the house.  Gues

Our Cuckoo Clock

Image
We installed exactly two items on the walls of our #NewOldFarmhouse .  The first was a television.  I mounted it on the wall in the first few days after we moved in.  The other?  Our cuckoo clock that you see above.    I posted about the clock before when I posted a photo from my sister Vic and described how we bought our clock in the Black Forest and then after receiving it, how it went right into storage. Ours is an eight-day version, so the big weights you see in the photo have a long way to go to reach the floor, but I keep yanking them up after just a day or two so we've never had them dangle close to the reach of the kids. There are three kids on the clock with the middle one not glued down, so we have to place her over to one side or the other.  With it striking just the cuckoo at the bottom of the hour and playing a song at the top of the hour, I've grown to really like hearing it around the house.  It was running a bit fast, so I moved the flower circle up the

Self-Closing Screen Doors From Pella

Image
It took us about a month, but we finally got the big screen doors working properly out back.  These are the larger doors that lead to the #newoldbackyard and little patio we have out there.  They have this self-closing mechanism that allows us to set them to self-close automatically.  It is pretty great - especially when you live with three little savages that don't EVER close any doors behind themselves.  Except, when it turns into a guillotine when one of said kids doesn't open them far enough when they try to sneak out. It *does*, however help incredibly well with keeping the house flies out of the, ahem, house.  They remain just flies for the most part now.

"Limbed Up" Our Front Yard Saucer Magnolia Tree

Image
I mentioned in the post about our King Crimson Maple tree last month that we had planted nine trees including a Magnolia tree that we put in our front yard.  That's it above.  After I 'limbed it up' a bit by taking the leaves/shoots/small branches off the bottom few feet of the main trunks of this Saucer Magnolia.  We've never had a Magnolia of our own, but Equation Boy/Man and Vic had one at their house and Greg, our former neighbor had one.  Nat has long fancied them, so in working with Chris Paul at Green Grass Landscaping , we decided to put in a Saucer Magnolia in the front yard. In looking through the care and pruning advice in this piece , I decided to work on the tree to put more of the energy into the top range of the young tree to try to grow it up a bit.  Ours had leaves all the way to the ground, but if you look at photos of intermediate growth Saucers or larger, mature Saucer Magnolias , the successful ones have been 'limbed up' to get the f

Big Rob's Moving - Chicago

Image
That right there is one of the trucks in the fleet of Big Rob and Big Rob Hauling.  The best and most affordable movers in Chicago.   I posted about Big Rob and his crew back when my parents moved out of my childhood home in 2015 .  We've now used Big Rob for a few projects including moving us out of our first house and into storage .  And for moving some big furniture (like a church pew).  And now, most recently, to move us into our #newoldfarmhouse. The team at Big Rob's take great care with your stuff, work hard and are all-around nice dudes.  Need to move and can't believe the prices that you're getting?  Give Big Rob a call.  # NotAnAd.

Our #NewOldBackYard B.F. (Before Fence)

Image
Posting this panoramic photo of the backyard at our #NewOldFarmhouse (or...rather... our #NewOldBackyard) of the state of play BEFORE the cedar fence is going in.  That version above is clickable, so you can get a larger look at the yard, but I'll also share this version on Google Photos that allows you to zoom in and take a look at the panoramic that was stitched together from a few photos I took.  If you look closely, you'll see the crew delivering some of the materials like posts to the various locations around the yard.  Also, on the left side of the yard property line, you can also get a good look at the Japanese Cherry Blossom tree that we planted a few weeks back. And, those of you with sharp eyes who have kept up with some of the tree talk here on the blog, might also see the Greenspire Lindens that I am planning on espalier'ing .  They're still in their containers up along the rear portion of the house. You can also get a sense for the density of the

Unloading the POD

Image
Hello friends.  Nice to see you all again.  I'm speaking to our 'stuff'.  Yep...You're staring at the open end of our POD that was delivered to our driveway two years after we haphazardly packed it in the summer of 2015 when we moved out .  Opening up the boxes contained in this POD and our storage units is going to take some time, but I've set a firm 1 year deadline on things:  If we go a full year without touching something - and it isn't old - then it will be going to the curb.  At least I'm talking tough right now.  Who knows what will happen come next summer if I get all horde-y and wonder if I'll ever use that certain thing.  Stay strong, Jake!

An Update On Our Flowering Cherry Tree

Image
Back at the end of May, I posted a few pics of the new flowering cherry tree that we picked up for Nat for Mother's Day this year .  It lived in the driveway at Equation Boy/Man's house for more than a month while the girls kept it watered.  Last week, we finally got around to putting it in the ground in our #newoldbackyard.  We found a nice spot that can be easily seen from the kitchen/family room as well as upstairs from the bedroom, but far enough back and to the side that it won't interfere with any future plans. We dug a good sized hole, the girls helped me get it situated down in the earth, then we covered it up with earth (and tried to put the grass back in place!) and applied one of these Treegator watering bags .  We've been filling it up every other day since we planted it and looking at the tree over the weekend, I see some new growth. So, hoping that whatever shock this thing will get from being transplanted into the ground is being absorbed by copiou

Second Backyard Pavilion Inspiration

Image
Via RealCedar.com I came across this pavilion on the RealCedar.com site and I'm posting it here so I can later reference it when the time comes to think about such a structure in our #newoldbackyard.  Those of you who have been following along for years might recall that we had a pavilion at our old place.  All the way back in April of 2010, I posted the original inspiration photo here on the blog .  That one was anchored off a structure (garage in our case) and came to life over a series of posts .    The one you see above has some modern touches - like the horizontal slats, lights and some of the flat cuts - and is unanchored to another structure.  The slats remind me a lot of the raised bed planters that I posted about over the weekend.  The simple, single-plane roof is interesting to me in that it requires less framing work.   The #newoldbackyard is much bigger than our old one, so we have space to do a few things.  Pizza oven.  Greenhouse.  Sports court.  Veg

Water Management @ Our New Old Farmhouse

Image
About a month ago, I showed the last pictures of our #NewOldFarmhouse where we were having our driveway poured out front.  More recently, the crew moved on to the landscaping and that includes the underground routing of drain pipes.  We're putting the downspouts and the sump pump drain into pipes underground.  You can see one of the big runs in the image above.  They're taking some of the pipes and running them towards a dry well and others...they're running into the yard and installing some 'pop ups' and then letting the grading of the property take over.   I took some photos of the drywells (yes...there's more than one) that we put in underground and I'll post the details of those over time.  It seemed that we had a few choices:  put in the drywells or include a water garden - like the one that the City of Elmhurst recently installed as a demonstration .   From a landscaping perspective, I had a really unique experience.  The subcontracto