Posts

Showing posts from June, 2024

Three Japanese Maples LOST - First Ghost, Inaba Shadire, Seiryu - June 2024

Image
It is finally time to call a couple of dead trees:  Three Japanese Maples didn't come back this Spring.  They tried - leaf'd out from the graft - but now...they are foliage-free.  Two of them are from Mr. Maple - the upright Seiryu Japanese Maple and First Ghost - back by the firepit.  Both...are now on the LOST TREES list.  The Seiryu is one that I really was keen to see grow as I planted it in the shadow of the dying Flowering Cherry Tree.  That tree died last year, and now the JM is gone, too.  That leaves a big empty opportunity for a shade-tolerant tree.    The last one was the Inaba Shadire high-grafted tree.  Below are a couple of photos showing the skeletons of these Japanese Maples.  First the Seiryu followed by First Ghost.   Sadly...these are the fourth Japanese Maples that didn't make it just this year - with the unknown laceleaf tree from the orange big box store was pulled and replaced by an Emperor 1 earlier this Spring.   I've now planted ten Japanese

Hakonechloa Macra Hakone Grasses - Summer 2024 - June 2024

Image
Late Summer 2021, I planted the first three Hakonechloa Macra Grasses (the standard, green ones) from Northwind Perennial Farm in the border right around our tree swing tree.  I had some All Golds in the ground prior to 2021, but I read about the green ones online and when I saw them, I bought them as one-gallon nursery pots.  The All Gold variety have been slow growers (for me), so I wasn't sure what these would do when they matured.  I documented them in their first Spring ( May 2022 ) and then one year after planting ( August 2022 ) - when they had put on some growth. Last Summer, I added four more (behind the tree) and this Spring, I moved them (a garden edit) to sit next to the three original ones on the border.  Those four are two seasons behind and the move set them back with a little transplant stress.  But the three original?  They're starting to fill out the space and REALLY shine in the garden.   Below is a look at the three original Japanese Forest Grasses in our

Pizza Oven Hearth Concrete Pour - Wood-Fired Oven - June 2024

Image
Yesterday, I showed how I built a platform for the Mudmixer in order to pour the raised hearth in our backyard wood-fired oven stand construction project.  Today, we show the details of the actual pour.  Using the Mudmixer and 35-or-so 60# bags of 4K PSI concrete mix, I was able to complete the job in just about an hour of run-time.  I spent quite a bit of time trying to make sure the forms were level and square and using a mix of sand (to fill cores), caulk and backer rod, I filled as many of the gaps in the forms as I could to keep the slab from leaking too much. The good news - the forms held.  They didn't bow.  And...they didn't leak that much.  Same with the supports under the Densshield boards.  Below are a few photos showing the raised, reinforced hearth pour.  The first one shows the platform and the poured hearth: Below, you can see the drain pipes that were able to sit right at the surface of the hearth: Below are a couple of shots showing how snug the Mudmixer was to

Building A Platform For Concrete Mixer - Pizza Oven Hearth - June 2024

Image
A few days ago, I shared an update on our DIY backyard wood-fired pizza oven build that showed the latest progress:  the installation of the final rebar and bracing (wires) for the raised, reinforced concrete hearth.  I'm set to pour that 4.5" thick hearth (plus the filling of the pressed bond beam block cavities (so...around 8" deep around the perimeter and 12" deep across the opening spans), but the forms of the heart sit 42" above grade.   Like I did with the foundation slab, I'm planning on using the MudMixer to help pour the concrete.  The problem that I'm facing is that the Mudmixer's chute stands just 16" from the ground.  That means....that I have to either use buckets to lift the mixed concrete up from the Mudmixer chute or....raise the Mudmixer to allow it to 'POUR' directly into the raised hearth. If you look back at this post where I showed the foundation slab pour, you can see that I made a platform for the Mudmixer to allow

Disneyland Roses Rebound - Late June 2024

Image
What a difference two weeks make.  Earlier this month, I posted about our Disneyland Roses and described them as 'struggling '.  This is the second year where they 'struggled' - including an infestation of Sawfly Larvae.  The three bareroot ones didn't come back this season and I suspect it was the result of the pests.  As I've done in previous years, I've begun to feed the three remaining Floribunda roses with a combo fert + systemic insecticide on the first of the month (May, June).   But, that wasn't enough.  The leaves of the roses were lace-like and the plant seemed to be in decline. That's when I took drastic measures and first sprayed Neem Oil on them every few days follwing by  bombing all three of them with Eight insecticide dust .  The remaining foliage had a ghost-like quality with the white dust clinging to the leaves and stems.  For days and (now) weeks.     These Disneyland roses grow in 'flushes'.  At least that's what I c

In Praise of Drumstick Allium - June 2024

Image
The larger, more-showy Alliums are long gone.  Bloomed, were show-offs, and now all that is left behind are husks of their former glory.  But, not Drumstick Alliums.  I planted 50 Drumstick Allium bulbs back in the Fall of 2021 .  And didn't think much about it.  In fact, I'm not sure they were planted in the right spots.  But today?  I'm finding them to add a nice little pop of color to our garden and think I should plant even more this Fall.   I have them IB2DWs, in back and on the side of our house.  They are blooming right now - mid/late June and they work well (for me) when they're interplanted amongst other things so the little purple flower head sort-of peeks out.   My Fall 2024 bulb planting should include more of these.  I could see a big MASS planting and/or interplanted in lots of places.  

Rebar Installed for Pizza Oven Hearth - June 2024

Image
The last I posted about my DIY backyard wood-fired pizza oven, I shared how I made and mounted the forms for the reinforced hearth on top of my cinder block stand.  With the forms set-up and square (and level), I began to finalize the rebar setup.  I ran a couple of rows around the flow-thru bond beam blocks that made-up the top row of the stand.  Before doing the rest of the rebar, I laid down a couple pieces of vapor barrier on TOP of the tile backer board segments.  Once in place, I ran vertical rebar up the filled cores from the foundation slab, through the block stand and out the top.   I tied a grid of 1/2" rebar together and spanned the hearth with seven pieces each direction.   I used zip ties to tie them together and some block fragments to elevate the center part of the grid.  On the edges, I tied this rebar grid directly to the vertical posts.   Once that was done with the rebar, I cut up some one-foot segments of 1/2" pvc and drilled holes through the tile backer

Nicotiana Jasmine Seedlings In Cut Flower Bed - June 2024

Image
A month or so ago, I scattered a couple of seed packages of Nicotiana Jasmine in the new cut flower bed on the southside of our house.  Nicotiana seeds are TEENY TINY.  Like, REALLY teeny tiny.  You can't really place the seeds, rather...you have to scatter them.   So...that's what I did:  scattered them in the new cut flower bed.  I also tossed in some Zinnia seeds.  Here's a look back at the bed before I planted anything, but soon added some Dahlias, too .   These Nicotiana alata grandiflora - Jasmine Tobacco - were in seed packets that had a 2022 date on them, so I wasn't sure if they were viable.  Below is the seed packet: Looking back at my Google Photos archive, I see that I put these seeds down on May 21st.  Exactly one month ago.  What does the bed look like today?   See below: Those are direct-sown seeds of Nicotiana Jasmine in just four weeks.  Some of them are almost up to my waist.  They're crowding each other - and the Zinnias and Dahlias - out, so I

Stacked Flagstone Fountain Inspiration - June 2024

Image
I came across some new water feature inspiration - this time it was at the Lemont Park District Rec Center - in what appears to be the Danny Rizzo Memorial Plaza .  Right before you enter the building is a water feature that is made up of stacked, flat flagstones (or something similar) that allow for the fountain to cascade down each of the layers and pool into a round, visible reservoir.  I could see this being a DIY job - the hardest part is moving the rocks.   Here, below, is a video showing this stacked flagstone water feature/fountain in a round pool.  Here, below, is a photo: I could see this being an upgrade for our current container fountain and something (with the right drill bit), we could ourselves.  Maybe even a small pond as the reservoir.  

Garden Edit (Nook) - One Month Later - June 2024

Image
In the middle of May, I moved ahead with a garden edit in our backyard that involved removing/transplanting hostas (hosta replacement project) and adding a few things from the Morton Plant Sale.  Here's the post showing the original look and what this new mixed perennial shade bed looked like a month ago .  Now, four-or-so weeks later, the area has filled in a little bit.  Below is a photo showing the current state: The Ajuga 'Chocolate Chip' at the front of the border has filled in, the Dark Side of the Moon Astilbes have put on some size, as have the Summer Beauty Alliums.  Mixed in there are three Soft Touch Japanese Hollies and three Autumn Moor Grasses that I've moved around a few times.   At the back of this little garden pocket - brightening up the space - are the Sun King Aralias.   This is working - for me.    As I think about finishing up a few other spots of edits in the backyard, I'll revisit this combination - in particular the Alliums and Aralias.  

Cardoon About To Bloom - June 2024

Image
After battling a vast aphid invasion on our Cardoon plant (planted IB2DWs last Fall and came back this year), appears ready to burst with a couple of big, spike-y blooms.  I planted it on a whim late, late last year based on seeing this in the Fragrance Garden at the Morton Arboretum and didn't know what to expect.  At the time when I bought it, the sign at The Growing Place called it a "Biennial" - which I think means that it won't bloom the first year - so this is the bloom year.  This piece from the University of Wisconsin talks about how you don't normally see a bloom in cooler climates (like ours), so we might be in for a real treat.   See below for a look at our Cardoon buds/blooms as they grow up/out before they open: I went at the aphids pretty hard with both Neem Oil, our hose with a high-pressure setting (just to try to blow the aphids off) and then, ultimately with a insecticide dust.  I'm hoping the aphids didn't get these to a place where t

Rainbow Blend Carrot Seeds Planted in Greenstalk - June 2024

Image
Yesterday, I posted a photo of our first broccoli crown that has emerged and talked about our vertical vegetable garden container called a Greenstalk.  I put six Lieutenant Broccoli plants in one of the deeper rows in the middle of the tower.  In this earlier post , I covered a few of the other things in the vertical garden including herbs and a bell pepper plant.  In a few of the rows/levels, I also planted some Zinnia seeds as cut flowers, but that left one deep row (third from the bottom) empty.   Because it is one of the deeper Greenstalk levels, I thought we'd try something new (to us) in container gardening:  carrots.  In our previous, raised-bed garden in Elmhurst, we grew plenty of carrots from seeds.  My problem was NEVER getting the seeds to germinate, my problem was always in thin-ing them out enough to grow good-sized carrots.  Here's a post about the time I used carrot tape (went very well) and here's a series of posts from 2012 that shows the Touchon carrot

First Lieutenant Broccoli Crown Appears - June 2024

Image
Our kids eat broccoli all the time.  I'm a baby carrot eater.  Somehow, they've become a raw broccoli crown eater.  That's why we're trying to grow our own in the Greenstalk this year.  Last week, I posted an overview of what is in the Greenstalk tower - including six Lieutenant broccoli plants in one of the middle rows of the unit.   This variety is supposed to be suited for warm weather, so we're hoping that they will perform over the Summer.  And, early signs are positive - with an early crown emerging on one of the plants.  See below for a look at one of the broccoli crowns: In our previous garden, I grew some broccoli, so I *somewhat* know how to recognize when a broccoli crown is ready to harvest.  I also know that if it starts to flower and go yellow, it needs to be cut off immediately.   It seems like it might also be time to feed the tower with a food-grade fertilizer like Miracle-Gro.  

Four Cornell Bronze Dahlias Planted - Sideyard + IB2DWs - June 2024

Image
The last of the Dahlia tubers are in the ground:  I planted four Cornell Bronze Dahlias that I bought this past winter from Longfield Gardens.  I started them in nursery pots indoors, then moved those to the patio to get acclimated.    I've put in six Melina Fluer dahlias - three in the sideyard and three in the front porch bed .  Then, I put in four Orange Nugget dahlias in the new sideyard bed .  And, now I've put in four (2 in sideyard and 2 IB2DWs) Cornell Bronze dahlias.  13 total plants for the season.  Cut flower season. These are behind the others, but with a little water and a lot of sun, I'm thinking they'll close the gap quickly. 

Nicotiana alata 'Perfume Deep Purple' Planted IB2DWs - June 2024

Image
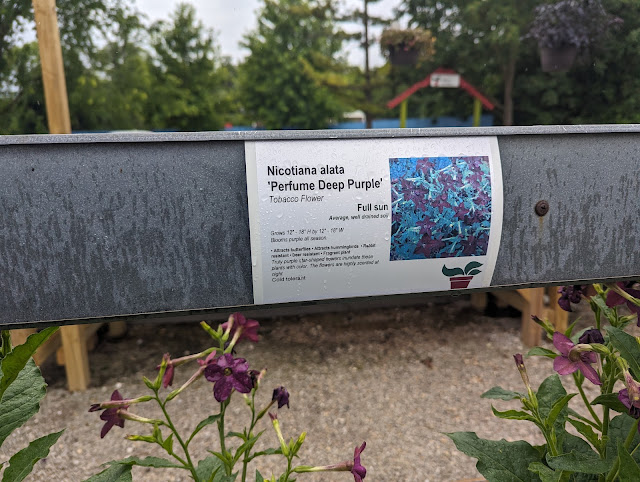
More flowers.  That's a big breakthrough for me as a gardener in 2024.  Last week, I posted photos of the Zinnias and Dahlias that I planted IB2DWs and in the new seed bed.  Today, I'm sharing the details of another new (to me) flower:  Nicotiana 'Perfume Deep Purple'.  I bought just one and planted it in the conifer garden - IB2DWs.  Below is the sign from The Growing Place that talks about the dark purple blooms and the smells that come with this flower: I've had Nicotiana Jasmine before , but it didn't reseed.    This new one is purple (vs white) and it is also in full sun.  Below is what it looks like at the time of planting: Below is a photo that provides a little context - this is in the new (as of last Fall) conifer garden.  

2x8 Forms for Hearth Concrete Pour - Wood-Fired Oven Build - June 2024

Image
Busy week with the pizza oven.  First, the bottom trays and supports were put in-place .   Then, I cut, bent and placed some rebar into the top of the stand - via the bond beam blocks .  I also cut most of the grid of rebar.   That meant that I could move-on to creating the hearth forms.  I used 1/2" trays and I'd like the hearth to be 4" or so thick, so that means I need 4.5" of height on-top of the stand.  Because of the Bond Beam blocks and their openings, I also need the forms to cover 1.5" of the stand.  That's 6" of form - which means I can't use a 2x6, but had to upgrade to 2x8's. I cut the 2x8's to length, then affixed a 2x4 to the face of them to stiffen them - and prevent bowing.  I used various pieces of lumber to create legs that were just a tiny bit short.  I put the forms together, stood-it-up on the legs and then shimmed in one side for the final height.   Moving around the stand, I leveled up each side using shims to get the

Cutting and Bending Rebar for Flow-Thru Bond Beam Blocks in Pizza Oven Stand - June 2024

Image
Earlier this week, I updated my wood-fired pizza oven build progress with some photos showing the bottom trays and their supports/bracing cut to size .  I have a couple of things that I need to do (I lifted eight steps - bracing for trays shimmed, rebar to bond beam blocks, fill gaps, cut rebar for grid, set up 2x8 forms, wire them, add drainage pipes and fill remaining cores with sand ) and most of those can go in any order.    Once I had the trays in place, I decided to see if I had enough rebar on hand to complete the job.  That started with bending some of the 1/2" steel rebar for around the bond beam blocks.  Then, I cut the rest for across the top in a grid pattern. Below is a photo showing the rebar bent and laid into the bond-beam blocks.  I'm doing curved rebar at every corner and doubling-it-up with 90-degree corners on top of those curves.   On top of this will be a 4.5" thick hearth, so the rebar you see running across the top of the stand will be stood-up wit

Pruning A Pagoda Dogwood Tree - June 2024

Image
For the second growing-season in-a-row, I've pruned the small Pagoda Dogwood tree in our backyard.  Planted in Fall 2021 , this native tree has just quietly grown into something about the size of a medium-sized shrub.   It has horizontal branching, so I've been careful to prune it - while making it more tree-form while not taking too much off the tree.   Last year, I pruned back the bottom layer of branches.  Not removing branches, but just cutting them back .  This year, I'm doing the same thing - but a layer higher.  Below is the pre-pruning look at our Pagoda Dogwood tree.  The second layer is reaching out wide.   And, below is the 'after'.  I cut a segment down on each of the second-tier of branching.  Hoping for even more vertical-growth from the leader this season.  

Adding Bottom Tray Support Under Hearth Pour - DIY Wood-Fired Oven Build - June 2024

Image
The next step after filling every-other-core in my DIY wood-fired oven build is to create the support that goes *under* the hearth that can support the concrete pour.  I've made three areas for storage in the stand, so each of those need a cover (or lid) and some support bracing to keep the concrete from sagging through the openings.  I opted to use 1/2" DensShield board and various 2x4's and 2x6's to create the supports under the openings.  Below are a few photos showing how I cut the board (1/2" thick) and then used the legs to support/span the openings. Below is a peek at the INSIDE of one of the storage bins and you can see the legs/supports laying this-way-and-that.  Why?  Because...I cut them just a little bit short of the length needed.  My plan is to use a bunch of wood shims under these so once the pour is complete, I can pull the shims out and the supports will fall away.   Without the shims, the supports might not come out so easily.   Also, I'm us